


通过
6万多字的篇幅向你全方位解析Spring IoC。
IoC
IoC,全称Inversion of Control,即控制反转。相较于传统编程模式,IoC实现了对控制流的反转,即:
- 传统编程模式: 用户代码 -> 库/框架 -> 用户代码。对于传统编程模式,每次调用库/框架时都会将控制权从用户代码转移到库/框架中,然后库/框架在执行结束后再将控制权返回到用户代码。
IoC编程模式: 库/框架 -> 用户代码 -> 库/框架。对于IoC编程模式,一般我们会将我们的行为类插入到库/框架中,库/框架则会在相应的执行点将控制权转移到用户代码,然后用户代码在执行结束后再将控制权返回到库/框架。
在Spring文档是这样阐述的:
It is a process whereby objects define their dependencies (that is, the other objects they work with) only through constructor arguments, arguments to a factory method, or properties that are set on the object instance after it is constructed or returned from a factory method. The container then injects those dependencies when it creates the bean. This process is fundamentally the inverse (hence the name, Inversion of Control) of the bean itself controlling the instantiation or location of its dependencies by using direct construction of classes or a mechanism such as the Service Locator pattern.
大致意思就是:对象通过构造参数、Factory方法参数或Setter方法参数指定的依赖项,容器会在后面bean创建的时候进行注入(通过使用类的直接构造或类似于服务定位器模式的机制来控制其依赖项的实例化或位置),这基本反转了bean的创建流程(因此得名,控制反转)。
正因为此,IoC也被称为dependency injection(DI),即依赖注入。但是严格来说它们并不等价,DI仅仅是IoC众多实现方式中的一种,它的实现方式还包括回调(callbacks)、调度程序(schedulers)、事件循环(event loops)和模板方法(the template method)等。
总的来说,所谓IoC控制反转就是,"it calls me rather me calling the framework"。
IoC一词并非起源于Spring,而是起源于1988年《Object-Oriented Programming》杂志中Johnson和Foote的一篇论文《Designing Reusable Classes》。关于
IoC、DI等更多详情可以阅读以下资料:
Container
在Spring中,IoC容器主要负责对bean进行实例化、配置和组装,其中对于这些bean需要我们通过XML或Java代码等方式声明在Metadata配置中以让容器进行读取并获得指导。
在
Spring中,IoC容器所管理的对象称之为bean,它是由IoC容器实例化、组装和管理的对象。
下图从宏观视角来给出Spring是如何工作的。
                              +
                              |
                              | Your Business Objects(POJOs)
                              |
                              v
                   +----------+-----------+
                   |                      |
+----------------->+ The Spring Container |
  Configuration    |                      |
     Metadata      +----------+-----------+
                              |
                              | produces
                              |
                              v
                  +-----------+-------------+
                  |                         |
                  | Fully configured system |
                  |      Ready for Use      |
                  |                         |
                  +-------------------------+
从上图中显示,在IoC容器中通过结合业务对象类和Metadata配置来创建和初始化容器类(例如,ApplicationContext),以此来得到一个配置完全并可执行的系统或应用。
需要注意,容器本身并不会对
Metadata配置的格式作任何限制,即对于存储的配置格式是LDAP、RDBMS还是XML都没有任何限制。所有这些不同格式的配置,容器都是通过扩展类(例如XmlBeanDefinitionReader、AutowiredAnnotationBeanPostProcessor等)进行解析,并存储为BeanDefinition来进行处理,这也大幅增加了容器的灵活性和可扩展性。
ApplicationContext
Spring使用了ApplicationContext表示IoC容器,它会读取Metadata配置中的指令对bean进行实例化、配置和组装。因此,在将业务对象类和Metadata配置注入到容器ApplicationContext后,我们就可以使用它来获取对应的bean实例,例如:
// create and configure beans
ApplicationContext context = ...;
// retrieve configured instance
IocService service = context.getBean("iocService", IocService.class);
在开发过程中一个比较好的做法是通过依赖注入的方式来配置应用实例。换句话说,我们应该通过容器
Push配置到相应的地方;而不是主动从容器中Pull相应的配置,比如主动通过ApplicationContext来获取对象(以任何形式)。
BeanFactory
实际上,ApplicationContext中bean相关的能力都源自于BeanFactory(继承自BeanFactory),所以我们也能通过BeanFactory完成bean的实例化、配置和组装。即:
// create and configure beans
BeanFactory factory = ...;
// retrieve configured instance
IocService service = factory.getBean("iocService", IocService.class);
本质上,BeanFactory相当于是应用组件的注册中心,持有并集中了大量的应用组件的配置信息(例如,持有大量的bean定义,每个bean定义都具有独一无二的名字)。当然,我们也可以将BeanFactory看作是IoC容器的"客户端",通过这个"客户端"我们可以完成会IoC容器访问。
ApplicationContext vs. BeanFactory
虽说ApplicationContext与BeanFactory都能完成bean的实例化、配置和组装,但是我们一般更加推荐使用ApplicationContext。因为ApplicationContext不但包含了BeanFactory所有的能力,而且它还会将几种特殊的bean(特别是后置处理器BeanPostProcessor)加入到容器中激活Spring的一些特性(例如,注解的处理或者AOP代理的处理)。
当然,如果想在bean的处理流程上得到完全的控制,我们也可以直接使用BeanFactory。对于这种情况,默认是不会有上述ApplicationContext的特性,而如果要加入这些特性则需要额外将这些特殊的bean配置进BeanFactory,例如:
-
将特殊的
BeanPostProcessor应用到BeanFactory// BeanFactory的默认实现 DefaultListableBeanFactory factory = new DefaultListableBeanFactory(); // populate the factory with bean definitions XmlBeanDefinitionReader reader = new XmlBeanDefinitionReader(factory); reader.loadBeanDefinitions(new FileSystemResource("beans.xml")); // now register any needed BeanPostProcessor instances factory.addBeanPostProcessor(new AutowiredAnnotationBeanPostProcessor()); // now start using the factory -
将特殊的
BeanFactoryPostProcessor应用到BeanFactory// BeanFactory的默认实现 DefaultListableBeanFactory factory = new DefaultListableBeanFactory(); // populate the factory with bean definitions XmlBeanDefinitionReader reader = new XmlBeanDefinitionReader(factory); reader.loadBeanDefinitions(new FileSystemResource("beans.xml")); // bring in some property values from a Properties file // PropertySourcesPlaceholderConfigurer属于BeanFactoryPostProcessor的一种实现 PropertySourcesPlaceholderConfigurer cfg = new PropertySourcesPlaceholderConfigurer(); cfg.setLocation(new FileSystemResource("jdbc.properties")); // now actually do the replacement cfg.postProcessBeanFactory(factory);
不难看出,将特殊的bean逐个注册到BeanFactory中是一件十分烦杂的事情,所以这就是为什么Spring更加推荐使用ApplicationContext。
BeanFactoryPostProcessor和BeanPostProcessor对于许多容器的功能特性是必不可少的,例如注解处理和AOP代理等功能都是通过它来实现的。
最后,这里列出了BeanFactory和ApplicationContext提供功能的对比:
Feature |
BeanFactory |
ApplicationContext |
|---|---|---|
Bean instantiation/wiring |
Yes |
Yes |
Integrated lifecycle management |
No |
Yes |
Automatic BeanPostProcessor registration |
No |
Yes |
Automatic BeanFactoryPostProcessor registration |
No |
Yes |
Convenient MessageSource access (for internationalization) |
No |
Yes |
Built-in ApplicationEvent publication mechanism |
No |
Yes |
Spring官方推荐: 除非有特别充分的理由,否则推荐使用ApplicationContext。
Metadata
根据上文所述,Metadata配置主要提供于容器读取并指导容器完成对bean的实例化、配置和组装。而在配置Metadata时,我们是可以通过XML和Java的方式完成配置的。
通过XML配置Metadata
通过XML的方式对Metadata进行配置则需要将需要声明的bean配置为<bean/>元素(包含在<beans/>中),如下所示:
<?xml version="1.0" encoding="UTF-8"?>
<beans xmlns="http://www.springframework.org/schema/beans"
    xmlns:xsi="http://www.w3.org/2001/XMLSchema-instance"
    xsi:schemaLocation="http://www.springframework.org/schema/beans
        https://www.springframework.org/schema/beans/spring-beans.xsd">

    <bean id="..." class="...">
        <!-- collaborators and configuration for this bean go here -->
    </bean>

    <bean id="..." class="...">
        <!-- collaborators and configuration for this bean go here -->
    </bean>

    <!-- more bean definitions go here -->

</beans>
下面列出一些常见的XML标签和属性:
| 标签 | 描述 | 更多 | ||||||
| <beans> | <beans>用于包含需要声明的<bean> | - | ||||||
| default-init-method | default-init-method指定当前<beans>下的全部<bean>的默认初始化方法 | - | ||||||
| default-destroy-method | default-destroy-method指定当前<beans>下的全部<bean>的默认销毁方法 | - | ||||||
| default-lazy-init | default-lazy-init指定当前<beans>下的全部<bean>都为lazy-init | - | ||||||
| default-autowire-candidates | default-autowire-candidates指定当前<beans>下的全部<bean>只有匹配其设置的一个/多个模式时才能成为自动装配的候选者 | - | ||||||
| <bean> | <bean>表示要声明的bean | - | ||||||
| id | id属性是一个唯一表示bean的字符串 | - | ||||||
| name | name属性用于指定bean的名字 | - | ||||||
| class | class属性使用全限定类名来指定bean的类型 | - | ||||||
| factory-bean | factory-bean属性用于指定构建bean的实例工厂方法所在bean的名称,不过注意class属性需要设置为空 | - | ||||||
| factory-method | factory-method属性用于指定构建bean的静态/实例工厂方法的名称,如指定实例工厂方法则需要配合factory-bean属性 | - | ||||||
| depends-on | depends-on属性显式指定在初始化当前bean前需要强制初始化一个或多个bean。另外,depends-on属性在基于初始化的顺序上还可以控制了其销毁的顺序。 | - | ||||||
| lazy-init | lazy-init属性用于标识当前bean为延迟初始化,容器会在它第一次被请求时才创建bean实例,而不是在启动时初始化。但是需要注意,当这个lazy-init的bean是单例且作为非lazy-init的bean依赖时,容器还是会在启动时创建它。 | - | ||||||
| autowire | autowire属性用于指定bean为自动装配模式 | - | ||||||
| init-method | init-method属性用于指定bean的初始化方法(无参无返回值的方法) | - | ||||||
| destroy-method | destroy-method属性用于指定bean的销毁方法(无参无返回值的方法) | - | ||||||
| scope | scope属性用于指定bean的作用域 | - | ||||||
| <constructor-arg> | <constructor-arg>标签表示构造器注入所需指定的参数 | - | ||||||
| ref | ref属性用于指定构造参数所引用的bean实例id,如果构造参数没有存在歧义可以仅仅按照参数的顺序进行声明 | - | ||||||
| type | type属性用于指定构造参数的类型,需要配置value或ref属性使用 | - | ||||||
| index | index属性用于指定构造参数的索引,对于解析多个存在歧义的参数可通过index属性来解决 | - | ||||||
| name | name属性用于指定构造参数的名字,对于解析多个存在歧义的参数可通过name属性来解决 | - | ||||||
| value | value属性用于指定构造参数的值(基本类型),一般配合type、index和name属性使用 | - | ||||||
| <property> | <property>标签表示bean属性 | - | ||||||
| ref | ref属性用于指定属性所引用的bean实例id | - | ||||||
| type | type属性用于指定属性的类型,需要配置value或ref属性使用 | - | ||||||
| name | name属性用于指定属性的名字 | - | ||||||
| value | value属性用于指定属性的值(基本类型),一般配合type和name属性使用 | - | ||||||
通过Java配置Metadata
通过Java的方式对Metadata进行配置主要是通过注解声明。如下所示:
@Configuration
public class AppConfig {

    @Bean
    public MyService myService() {
        return new MyServiceImpl();
    }
}
下面列出一些常见的Java注解和属性:
| 注解 | 描述 | 更多 |
|---|---|---|
@Configuration |
@Configuration是一个类级别注解,它用于标识当前类是bean定义的配置类(容器会扫描@Configuration注解类中声明的bean,并且@Configuration类本身也会作为bean被注册到容器中)。 |
跳转 |
@Component |
@Component是一个类级别注解,它用于标识当前类是一个可被容器检测到的bean组件(容器会扫描@Component注解类中声明的bean)。 |
跳转 |
@Controller |
@Controller是一个类级别注解,它是由@Component注解衍生出的专用于标识Controller层的注解,本质上还是@Component。 |
跳转 |
@Service |
@Service是一个类级别注解,它是由@Component注解衍生出的专用于标识Service层的注解,本质上还是@Component。 |
跳转 |
@Repository |
@Repository是一个类级别注解,它是由@Component注解衍生出的专用于标识Repository层的注解,本质上还是@Component。 |
跳转 |
@Bean |
@Bean是一个方法级别注解,它用于将当前方法返回的对象声明为bean,即将当前方法返回的对象注册到容器中。需要注意,它需要与@Configuration或@Component联合使用。 |
跳转 |
@Autowired |
@Autowired是一个构造器级别、方法级别、参数级别和字段级别的注解,它用于标识当前修饰的元素使用Spring依赖注入机制进行自动装配。 |
跳转 |
@Primary |
@Primary是一个类级别和方法级别的注解,它用于标识当前bean作为依赖注入到其他实例时具有更高的优先级(当单值依赖在执行自动装配时,如果存在多个候选者,@Primary注解所修饰候选者具有更高的优先级)。 |
跳转 |
@Scope |
@Scope是一个类级别和方法级别的注解,它用于指定当前bean的作用域。需要注意,它仅在具体bean类(@Component组件)或工厂方法(@Bean方法)上有效。 |
跳转 |
@Qualifier |
@Qualifier是一个类级别、方法级别、参数级别和字段级别的注解,它用于在自动装配时对候选者进行标识(指定限定符)。 |
跳转 |
@Resource |
@Resource为JSR-250规范的注解,可修饰类、方法和字段,主要用于标识需要自动装配的属性。其中,我们可通过name属性指定需注入的bean名称,默认它会使用字段名或Setter方法属性名作为需注入的bean名称。 |
跳转 |
@Value |
@Value是一个方法级别、参数级别和字段级别的注解,它用于指定被修饰元素的值表达式。 |
跳转 |
@PostConstruct |
@PostConstruct为JSR-250规范的注解,可修饰方法,主要用于标识bean的初始化方法。 |
跳转 |
@PreDestroy |
@PreDestroy为JSR-250规范的注解,可修饰方法,主要用于标识bean的销毁方法。 |
跳转 |
@Inject |
@Inject为JSR-330规范的注解,可修饰构造器、方法和字段,主要用于标识当前修饰的元素使用Spring依赖注入机制进行自动装配(作用与@Autowired相同)。 |
跳转 |
@Named |
@Named为JSR-330规范的注解,可修饰类,主要用于标识当前类是一个可被容器检测到的bean组件,作用与@Component相同。 |
跳转 |
@ManagedBean |
@ManagedBean为JSR-250规范的注解,可修饰类,主要用于标识当前类是一个可被容器检测到的bean组件,作用与@Component相同。 |
跳转 |
Bean
通过上述步骤即把配置读取到容器中,然后容器会再进一步生成相应的bean实例。无论是通过哪种方式,对于注册到容器中的bean都会被定义为BeanDefinition,其主要包含以下属性:
| 属性 | 描述 |
|---|---|
Class |
Class属性表示当前bean的类型。 |
Name |
Name属性表示当前bean的名称。 |
Scope |
Scope属性表示当前bean的作用域。 |
Constructor arguments |
Constructor arguments属性表示当前bean的构造参数。 |
Properties |
Properties属性表示当前bean的属性。 |
Autowiring mode |
Autowiring mode属性表示当前bean的自动装配模式。 |
Lazy initialization mode |
Lazy initialization mode属性表示当前bean是否延迟初始化。 |
Initialization method |
Initialization method属性表示当前bean的初始化方法。 |
Destruction method |
Destruction method属性表示当前bean的销毁方法。 |
关于BeanDefinition,它主要有三种实现,分别是RootBeanDefinition、ChildBeanDefinition和GenericBeanDefinition:
BeanDefinition实现 |
描述 |
|---|---|
RootBeanDefinition |
RootBeanDefinition是一个标准的BeanDefinition,在配置阶段中可作为一个独立的BeanDefinition。 |
ChildBeanDefinition |
ChildBeanDefinition是一个具有继承关系的BeanDefinition,它会继承父BeanDefinition的属性和覆盖父BeanDefinition方法。例如,对于init方法、destroy方法和静态工厂方法ChildBeanDefinition是会覆盖继承的父BeanDefinition(如有),而depends on、autowire mode、dependency check、singleton、lazy init等属性则是直接忽略父BeanDefinition,直接以ChildBeanDefinition的为准。 |
GenericBeanDefinition |
GenericBeanDefinition是一个具有一站式功能的标准BeanDefinition。除了与其他BeanDefinition具有相同的功能外,它还能通过parentName属性灵活/动态地设置其父BeanDefinition。在大多数场景中,GenericBeanDefinition都可以有效地替代ChildBeanDefinition。 |
在
Spring 2.5引入了GenericBeanDefinition后,我们应该将GenericBeanDefinition作为以程序方式注册bean的首选类。因为通过GenericBeanDefinition我们可以动态地定义父BeanDefinition(通过parentName属性),而不是将角色"硬编码"为RootBeanDefinition或者ChildBeanDefinition。当然,如果能提前确定父/子关系的话,我们也可以使用RootBeanDefinition/ChildBeanDefinition。
这样,IoC容器完成了将Metadata配置转换为(含以上属性(不限于))BeanDefinition的过程。在完成转换后,IoC容器就可以根据BeanDefinition的定义来创建并初始化bean实例了。
不难看出,
BeanDefinition实际上类似于Class,我们对bean的所有配置都已经定义到BeanDefinition里,然后再通过BeanDefinition来创建对象实例。
Bean实例化
对于Bean的实例化,我们可以通过构造器和工厂方法两种方式进行创建,而不论是构造器还是工厂方法都可以通过XML和Java进行声明。
一般,
IoC容器会通过BeanDefinition中的class属性(强制)来找到需要实例化的类。但是,class属性所标识的类不一定就是需要实例化的bean,我们可以将它看作是用于实例化bean的类,可以表示bean本身的类型,也可以表示bean工厂方法所在的类。
通过构造器实例化
通过XML&&构造器配置实例
在XML配置中,如果没有特别指定,容器就会通过构造器来创建bean实例。
<bean id="exampleBean" class="examples.ExampleBean"/>

<bean name="anotherExample" class="examples.ExampleBeanTwo"/>
通过Java&&构造器配置实例
在Java配置中,通过@Configuration和@Component注解及其衍生注解(典型的有: @Controller、@Service、@Repository)声明的类会被当作bean注册到容器中。对于这种两种方式,IoC也会使用它们的构造器来创建bean实例。
@Configuration
public class MyConfig {}
@Configuration一般用于标识bean定义的来源类。
@Component
public class MyComponent {}
@Component一般用于标识Spring的通用组件类。为了起到区分作用,Spring通过元注解组合@Component的方式衍生出三个更专用的注解,分别是持久层的@Repository、服务层的@Service和表示层的@Controller。通过这种方式的区分,我们可以对业务层级进行更针对性地处理,例如对不同层级作增强处理(AOP)。另外,官方可能也会在未来的发行版中对相应的注解添加额外的语义(例如,对于@Repository注解提供持久层异常自动转换的支持(已支持))。
通过工厂方法实例化
通过XML&&工厂方法配置实例
在XML配置中,我们可以在<bean>标签中设置factory-method属性来指定创建bean实例的工厂方法,其中工厂方法又分为静态工厂方法和实例工厂方法。
-
静态工厂方法
对于静态工厂方法,我们需要在
<bean>标签中设置class属性来指定工厂方法的所在类,并通过factory-method属性来指定工厂方法。<bean id="clientService" class="examples.ClientService" factory-method="createInstance"/>public class ClientService { private static ClientService clientService = new ClientService(); private ClientService() {} public static ClientService createInstance() { return clientService; } } -
实例工厂方法
对于实例工厂方法,我们需要在
<bean>标签中设置factory-bean属性来指定bean实例,并通过factory-method属性来指定工厂方法(注意,class属性需留空)。上述使用实例工厂方法创建
bean实例,可以简单的概括为使用现有bean实例的非静态方法来创建bean实例。<!-- the factory bean, which contains a method called createInstance() --> <bean id="serviceLocator" class="examples.DefaultServiceLocator"> <!-- inject any dependencies required by this locator bean --> </bean> <!-- the bean to be created via the factory bean --> <bean id="clientService" factory-bean="serviceLocator" factory-method="createClientServiceInstance"/>public class DefaultServiceLocator { private static ClientService clientService = new ClientServiceImpl(); public ClientService createClientServiceInstance() { return clientService; } }通过这种方式,我们也可以在一个工厂类中声明多个实例工厂方法,如下例所示:
<bean id="serviceLocator" class="examples.DefaultServiceLocator">
    <!-- inject any dependencies required by this locator bean -->
</bean>

<bean id="clientService"
    factory-bean="serviceLocator"
    factory-method="createClientServiceInstance"/>

<bean id="accountService"
    factory-bean="serviceLocator"
    factory-method="createAccountServiceInstance"/>
public class DefaultServiceLocator { private static ClientService clientService = new ClientServiceImpl(); private static AccountService accountService = new AccountServiceImpl(); public ClientService createClientServiceInstance() { return clientService; } public AccountService createAccountServiceInstance() { return accountService; } }
通过Java&&工厂方法配置实例
对于Java配置的方式(使用工厂方法来创建bean实例),在Spring官方文档中并没有明确展开。但,实际上笔者在阅读源码时发现了通过Java的方式也能使用工厂方法来创建bean实例,并且它也区分了静态工厂方法和实例工厂方法。
-
实例工厂方法
在
Java配置的方式中,Spring会把@Configuration和@Component注解类中的标识了@Bean的实例方法当作是实例工厂方法来处理。即,使用这种方式创建的bean实例都是通过实例工厂方法来完成的。@Configuration public class MyConfig { @Bean public MyService myService() { return new MyService(); } }@Component public class MyComponent { @Bean public MyService myService() { return new MyService(); } } -
静态工厂方法
与实例工厂方法类似,
Spring会把@Configuration和@Component注解类中的标识了@Bean的静态方法当作是静态工厂方法来处理。即,使用这种方式创建的bean实例都是通过静态工厂方法来完成的。@Configuration public class MyConfig { @Bean public static MyService myService() { return new MyService(); } }@Component public class MyComponent { @Bean public static MyService myService() { return new MyService(); } }
抛开静态工厂方法与实例工厂方法的术语,对于上述通过@Bean来声明bean实例的方式有两个关键的区别:
-
@Configuration类与@Component类中声明@Bean方法的区别当
@Bean方法声明在@Configuration类中时,我们称之为Full模式;而当@Bean方法声明在@Component类中时,我们称之为Lite模式。在Full模式下,@Bean方法之间的相互调用会被重定向到IoC容器中,从而避免bean实例的重复创建,这也被称为inter-bean references;而在Lite模式下,@Bean方法之间的相互调用并不支持inter-bean references,它们之间的相互调用仅仅会被当作是普通的工厂方法调用(标准的Java调用),即会再次创建对象实例。需要注意,因为
Full模式是通过CGLIB动态代理的方式来完成的,所以在配置@Bean工厂方法时不能将其设置为private和final。与此相反,Lite模式由于不需要使用CGLIB动态代理,不但去除了这样的限制,而且也降低了服务的启动时间和加载时间。对于
Lite模式,除了可以将@Bean方法声明在@Component注解类中实现外,我们还可以使用@Component、@ComponentScan、@Import、@ImportResource或者将@Bean方法声明在普通Java类(无任何注解标注)中来实现。而在Spring5.2后新增了属性proxyBeanMethods(proxyBeanMethods表示是否开启代理,默认为true表示开启),当proxyBeanMethods=false时也表示Lite模式,即@Configuration(proxyBeanMethods = false)。关于
Full模式和Lite模式的更多详情可以阅读以下资料: -
静态
@Bean方法与实例@Bean方法的区别当使用静态
@Bean方法时,它可以在它所在的@Configuration或@Component类尚未实例化前完成实例化,这对我们通过@Bean来声明后置处理器(BeanFactoryPostProcessor或BeanPostProcessor)时特别有用,因为这避免了实例化后置处理器时提前触发了其他部分的实例化从而导致不可预知的异常。需要注意,由于
Full模式是通过CGLIB动态代理的方式来完成的(只对实例方法有效),所以对于@Bean静态方法的调用并不会被IoC容器所拦截(即使在@Configuration类中也不会),即对@Bean静态方法的调用仅仅被当作是标准的Java方法(直接返回一个独立的对象实例)。从另一方面来看,由于@Bean静态方法属于Lite模式,无需遵守Full模式下的相关限制(例如,不能是private或final),所以我们可以在任何我们觉得合适的地方声明@Bean静态方法。关于静态
@Bean方法与实例@Bean方法的更多详情可阅读以下资料:
通过FactoryBean实例化
另外,对于一些构建起来比较复杂的bean实例我们可以通过FactoryBean来完成。对于FactoryBean,在使用上我们需要将它声明为bean,这样Spring就会将FactoryBean及其FactoryBean#getObject方法返回的对象都注册到IoC容器中。其中,对于FactoryBean指定或默认生成的名称是其FactoryBean#getObject所创建的bean实例名称,而FactoryBean实例本身的名称则需在指定或默认生成的名称前加上前缀&,即&beanName。
public class MyServiceFactoryBean implements FactoryBean {
    /**
     * 表示当前FactoryBean生成对象是否为单例
     */
    @Override
    public boolean isSingleton() {
        return true;
    }

    /**
     * 表示当前FactoryBean生成对象类型
     */
    @Override
    public Class getObjectType() {
        return MyService.class;
    }

    /**
     * 方法返回FactoryBean需要创建的对象实例
     */
    @Override
    public Object getObject() {
        return new MyServiceImpl();
    }
}
需要注意,对于FactoryBean#isSingleton方法标识当前FactoryBean#getObject生成对象是否为单例的用法需要与FactoryBean实例本身的作用域结合使用。例如,如果需要令FactoryBean#getObject所生成的对象为单例作用域,那么我们不但需要让FactoryBean#isSingleton方法返回true,而且还需让FactoryBean实例本身作用域为单例作用域;否则Spring都会按照多例作用域Prototype来处理。
关于
FactoryBean的更多细节可阅读以下资料:
Bean依赖
在Spring中,我们可以使用依赖注入(dependency injection,简称DI)的方式定义bean依赖(推荐),这样IoC容器就会在创建bean的时候将这些依赖注入到实例中,即使用构造器参数、工厂方法参数或实例属性(对象实例化后被设置)对其依赖完成注入。
在软件工程中,依赖注入(
dependency injection)是一种设计模式,通过分离对象构造和对象使用来实现程序上的松耦合,即一个对象(或方法)对于它所需要(依赖)的其它对象(或方法)应该采用接收的方式,而不是在内部创建它们。这样,对象(或方法)本身就不需要关注它所需要的对象(或方法)是如何构造的了。关于
DI的更多详情可阅读以下资料:
依赖注入
在使用上,我们可以通过构造器参数、工厂方法参数、Setter方法等完成bean的依赖注入。而由于构造器注入与工厂方法注入几乎等价,所以下面将注入方式分为两种,即基于构造器注入和基于Setter方法注入。
通过构造器注入依赖
对于构造器注入,我们首先需要将相应的依赖声明为构造器参数,即:
public class SimpleBean {

    private final OneInjectBean oneInjectBean;
    private final TwoInjectBean twoInjectBean;

    public SimpleBean(OneInjectBean oneInjectBean, TwoInjectBean twoInjectBean) {
        this.oneInjectBean = oneInjectBean;
        this.twoInjectBean = twoInjectBean;
    }
}
然后,我们再将对应的bean实例及其依赖进行标记,以让IoC容器完成实例化和依赖注入。下面我们分别从XML的方式和Java的方式展开描述。
通过XML&&构造器配置依赖
在XML配置中,我们可以使用标签<constructor-arg>来标记构造参数及需要被注入的依赖。
<beans>
    <bean id="simpleBean" class="com.example.SimpleBean">
        <constructor-arg ref="oneInjectBean"/>
        <constructor-arg ref="twoInjectBean"/>
    </bean>

    <bean id="oneInjectBean" class="com.example.OneInjectBean"/>
    <bean id="twoInjectBean" class="com.example.TwoInjectBean"/>
</beans>
需要注意,此处仅使用了ref属性来引用对应的依赖是因为它们之间并没有引起歧义,如果参数之间存在歧义或者构造参数顺序与XML配置不一致时,就需要添加type属性或index属性。
更多详情可阅读:
通过Java&&构造器配置依赖
在Java配置中,我们可以使用注解@Autowired或@Inject来标记需要使用依赖注入的构造器。
@Component
public class SimpleBean {

    private final OneInjectBean oneInjectBean;
    private final TwoInjectBean twoInjectBean;

    @Autowired
    public SimpleBean(OneInjectBean oneInjectBean, TwoInjectBean twoInjectBean) {
        this.oneInjectBean = oneInjectBean;
        this.twoInjectBean = twoInjectBean;
    }
}
需要注意:
- 自
Spring4.3起,如果需要实例化的bean只定义了一个构造器,则可以不用在构造器上添加@Autowired注解或@Inject注解。但是,如果需要实例化的bean存在多个构造器,且其中没有默认构造器(无参),这时我们就需要至少在一个构造器上标记@Autowired注解。- 自
Spring4.3起,Spring才开始支持@Configuration类的构造器注入。
而对于使用工厂方法来实例化bean(即通过@Bean注解标记的方法)则只需要在方法参数上指定需要注入的依赖即可。
@Configuration
public class MyConfig {

    @Bean
    public SimpleBean simpleBean(OneInjectBean oneInjectBean, TwoInjectBean twoInjectBean) {
        return new SimpleBean(oneInjectBean, twoInjectBean);
    }
}
更多详情可阅读:
通过Setter注入依赖
对于Setter方法注入,我们首先需要在bean中定义对应依赖的Setter方法,即:
public class SimpleBean {

    private OneInjectBean oneInjectBean;
    private TwoInjectBean twoInjectBean;

    public void setOneInjectBean(OneInjectBean oneInjectBean) {
        this.oneInjectBean = oneInjectBean;
    }

    public void setTwoInjectBean(TwoInjectBean twoInjectBean) {
        this.twoInjectBean = twoInjectBean;
    }

}
这样,Spring就可以在bean实例化后通过调用对应的Setter方法来完成依赖注入。同样的,对于Setter方法的依赖注入也可以分为XML和Java两种方式进行配置,下面笔者将各自展开描述。
通过XML&&Setter配置依赖
在XML配置中,我们可以在<bean>标签中添加<property>标签来标记需要注入的属性,这样IoC容器就会在bean实例化后调用属性相应的Setter方法完成依赖注入。
<beans>
    <bean id="simpleBean" class="com.example.SimpleBean">
        <property name="oneInjectBean" ref="oneInjectBean"/>
        <property name="twoInjectBean" ref="twoInjectBean"/>
    </bean>

    <bean id="oneInjectBean" class="com.example.OneInjectBean"/>
    <bean id="twoInjectBean" class="com.example.TwoInjectBean"/>
</beans>
与构造器注入类似,<property>标签也支持通过type和value属性来指定对应的属性类型和属性值。
更多详情可阅读:
通过Java&&Setter配置依赖
在Java配置中,我们可以使用注解@Autowired、@Inject或@Resource在属性对应的Setter方法上进行标记,以完成Setter方法的依赖注入。
@Component
public class SimpleBean {

    private OneInjectBean oneInjectBean;
    private TwoInjectBean twoInjectBean;

    @Autowired
    public void setOneInjectBean(OneInjectBean oneInjectBean) {
        this.oneInjectBean = oneInjectBean;
    }

    @Autowired
    public void setTwoInjectBean(TwoInjectBean twoInjectBean) {
        this.twoInjectBean = twoInjectBean;
    }

}
更多详情可阅读:
构造器注入 vs. Setter注入
Spring团队提倡我们应该更多地通过构造器注入,因为通过构造器注入你可以将依赖对象声明为不可变对象,并且可以确保注入的依赖不为空。另外,如果通过这种方式进行注入而造成大量的构造参数也可以提前提醒我们这里存在bad code smell,因为这意味着当前类可能存在太多的职责,我们应该进行重构来适当的分离类的职责以更好地解决问题。而对于Setter方法的注入,Spring团队则建议将它用于一些可选的/可切换的依赖项上,这样我们就可以很轻易地对其依赖进行重新配置或重新注入。另外,在配置这些可选依赖项时可在类中分配合理的默认值,否则就必须在使用依赖项的地方进行非空检查。总的来说,我们可以混合使用构造器注入与Setter方法注入,其中对于一些必须的依赖项通过构造器来强制注入,而对于一些可选依赖项则通过Setter方法来进行注入。
更多详情可阅读:
扩展特性
自动装配
上文提及用于依赖注入的@Autowired注解实际上是用来标记Spring的自动装配模式的,所谓自动装配即Spring通过查询IoC容器(ApplicationContext)中的bean来帮我们自动解析并装配相应的bean依赖。
对于bean的自动装配,Spring提供了四种不同的模式让我们选择:
| 模式 | 说明 |
|---|---|
no |
(默认)没有自动装配。在这种模式下bean依赖必须通过ref属性来指定。 |
byName |
通过属性名字自动装配。Spring会查询与属性名字相同的bean进行自动装配。例如,当bean被配置为通过byName模式完成自动装配,那么对于它名为master的属性,Spring会从IoC容器中查询出同样名为master的bean,若存在则将它自动装配到对应属性中。 |
byType |
通过属性类型自动装配。Spring会查询与属性类型相同的bean进行自动装配,但是前提是容器中正好存在一个与它属性类型相匹配的bean。如果容器中存在多个类型相匹配的bean则会抛出异常;而如果没有类型相匹配的bean则不会发生任何事情(即属性未被设置)。 |
constructor |
类似于byType模式,但适用于构造器参数。与byType模式不同的是,如果容器中没有一个bean与构造器参数类型相匹配的话,则会抛出异常。 |
其中,在byType或constructor自动装配的模式下,我们可以自动装配数组和集合。在这种情况下IoC容器中所有与之类型相匹配的bean都会被注入到对应的数组或集合中。
同样在使用上我们可以使用XML的方式和Java的方式进行配置,即:
-
通过
XML配置自动装配在
XML配置中,我们可以在<bean/>标签中指定autowire属性来设置bean的自动装配模式,例如:public class SimpleBean { private OneInjectBean oneInjectBean; private TwoInjectBean twoInjectBean; public SimpleBean(OneInjectBean oneInjectBean, TwoInjectBean twoInjectBean) { this.oneInjectBean = oneInjectBean; this.twoInjectBean = twoInjectBean; } public void setOneInjectBean(OneInjectBean oneInjectBean) { this.oneInjectBean = oneInjectBean; } public void setTwoInjectBean(TwoInjectBean twoInjectBean) { this.twoInjectBean = twoInjectBean; } }如果我们使用
byName模式,则可以像如下这样配置:<beans> <bean id="simpleBean" class="com.example.SimpleBean" autowire="byName"/> <bean id="oneInjectBean" class="com.example.OneInjectBean"/> <bean id="twoInjectBean" class="com.example.TwoInjectBean"/> </beans>如果我们使用
byType模式,则可以像如下这样配置:<beans> <bean id="simpleBean" class="com.example.SimpleBean" autowire="byType"/> <bean id="oneInjectBean" class="com.example.OneInjectBean"/> <bean id="twoInjectBean" class="com.example.TwoInjectBean"/> </beans>如果我们使用
constructor模式,则可以像如下这样配置:<beans> <bean id="simpleBean" class="com.example.SimpleBean" autowire="constructor"/> <bean id="oneInjectBean" class="com.example.OneInjectBean"/> <bean id="twoInjectBean" class="com.example.TwoInjectBean"/> </beans> -
通过
Java配置自动装配与
XML配置不同,通过Java配置我们只需要在构造器、Setter方法或者属性上标记@Autowired注解即可,例如:需要注意,通过这种方式只能使用
byType模式进行自动装配。如果我们以构造器的方式配置自动装配,则可以像如下这样配置:
@Component
public class SimpleBean {

    private OneInjectBean oneInjectBean;
    private TwoInjectBean twoInjectBean;

    @Autowired
    public SimpleBean(OneInjectBean oneInjectBean, TwoInjectBean twoInjectBean) {
        this.oneInjectBean = oneInjectBean;
        this.twoInjectBean = twoInjectBean;
    }
}
如果我们以
Setter方法的方式自动装配,则可以像如下这样配置:@Component public class SimpleBean { private OneInjectBean oneInjectBean; private TwoInjectBean twoInjectBean; @Autowired public void setOneInjectBean(OneInjectBean oneInjectBean) { this.oneInjectBean = oneInjectBean; } @Autowired public void setTwoInjectBean(TwoInjectBean twoInjectBean) { this.twoInjectBean = twoInjectBean; } }如果我们以属性的方式自动装配,则可以像如下这样配置:
@Component
public class SimpleBean {
    @Autowired
    private OneInjectBean oneInjectBean;
    @Autowired
    private TwoInjectBean twoInjectBean;
}
在自动装配的使用上,
Spring团队推荐:
- 对于自动装配应该在整个项目中一致使用才能达到最佳的效果。如果在普遍不使用自动装配的应用中,对某一两个
bean使用自动装配可能会让人感到困惑。- 在大规模的应用中,更多的是使用默认配置(即
no模式)。因为明确的指定依赖可以提供更好的控制性和清晰性,并且在某种程度上它记录了一个系统的整体结构。
另外,我们还可以通过将bean的autowire-candidate属性设置为false来使它不会成为其他bean依赖的自动装配候选者(但这并不意味着排除了bean本身不能使用自动装配对其依赖进行配置,而是它不能是其他bean自动装配的候选者)。其中,需要注意的是autowire-candidate属性只能影响到基于类型的自动装配(即byType或者constructor),它并不会影响到基于名称的自动装配(即byName),即使指定的bean并没有成为自动装配候选者也会得到解析。与上述其它属性类似,对于非自动装配候选者的配置也存在XML的方式和Java方式,具体如下所示:
-
通过
XML配置bean为非自动装配候选者在
XML配置中,要将bean配置为非自动装配候选者,则需要在bean标签中将autowire-candidate属性设置为false,即:<beans> <bean id="simpleBean" class="com.example.SimpleBean" autowire-candidate="false"/> </beans>除此之外,对于
XML配置我们还可以在顶级<beans/>元素的default-autowire-candidates属性上指定一个或多个匹配模式(多个模式之间用逗号分隔),使得它包含的所有的<bean>只有在模式匹配的前提下才能成为自动装配的候选者。需要注意的是,<bean>中autowire-candidate属性(需显式设置true或者false)的优先级是比其父标签<beans/>元素的default-autowire-candidates属性要高的。<beans default-autowire-candidates="*Repository"> <bean id="simpleBean" class="com.example.SimpleBean"/> <bean id="simpleRepository" class="com.example.SimpleRepository"/> </beans>此处的
default-autowire-candidates="*Repository"表示只有名称以Repository结尾的<bean>(在父标签<beans>中)才能成为自动装配的候选者。 -
通过
Java配置bean为非自动装配候选者在
Java配置中,要将bean配置为非自动装配候选者,则需要在@Bean注解中将autowireCandidate属性设置为false,即:@Configuration public class MyConfig { @Bean(autowireCandidate = false) public SimpleBean simpleBean(OneInjectBean oneInjectBean, TwoInjectBean twoInjectBean) { return new SimpleBean(oneInjectBean, twoInjectBean); } }
关于自动装配的优/劣势:
优势:
- 自动装配可以显著减少属性或构造器参数配置的需要。
- 自动装配可以随着对象变化而更新配置。例如,如果需要向
bean添加依赖,自动装配可以在无需修改配置的前提下完成。劣势:
- 自动装配中属性和构造器参数的配置会被显式依赖项所覆盖。
- 自动装配不适用于简单属性及其类型数组,例如
Primitive(原始类型)、String和Class。- 自动装配精确性没有显式装配高,并且它会影响到
IoC容器中对象关系的记录。- 自动装配使得我们无法在
IoC容器文档生成工具中获得装配信息。- 自动装配可能会在多个
bean与依赖项相匹配的时候抛出异常。如果依赖项是数组、集合或Map等类型时可能并不会存在问题,但是对于期望单个值的依赖项则会因为没有得到唯一的bean实例而抛出异常。而对于这种情况我们可以有以下几种选择:
- 放弃自动装配转而使用显式装配。
- 通过将
bean的autowire-candidate属性设置为false来避免自动装配。- 通过将
bean设置为primary来指定某个bean为primary候选者。- 基于注解实现更细粒度的控制。
更多详情可阅读一下资料:
延迟初始化
在默认情况下,IoC容器在初始化时会对所有单例bean进行实例化。除此之外,对于一些特殊的需要我们也可以将单例bean的实例化进行延迟,这样它就不会在容器初始化时被创建,而是在第一次向IoC容器请求bean时才进行实例化。
一般我们是推荐
bean跟着容器初始化一起创建的,因为这可以在启动的时候立即发现配置或环境出现问题而引发的错误,而不是在运行过程中才发现问题。
同样的,在使用上我们可以使用XML的方式和Java的方式进行配置,即:
-
通过
XML的方式配置延迟初始化在
XML配置中,我们可以将<bean/>标签上的lazy-init属性设置true或false来控制是否延长初始化。<beans> <!-- 通过指定lazy-init属性为true即可让SimpleBean不会在容器启动时进行实例化 --> <bean id="simpleBean" class="com.example.SimpleBean" lazy-init="true"/> </beans>另外,我们还可以通过在
<beans/>元素上使用default-lazy-init属性来让它所包含的<bean>都实现延迟初始化。<beans default-lazy-init="true"> <!-- no beans will be pre-instantiated... --> </beans> -
通过
Java的方式配置延迟初始化在
Java配置中,我们可以通过@Lazy注解来达到与lazy-init同样的效果(即延迟初始化)。其中,@Lazy存在以下几种不同的声明方式:通过将
@Lazy注解声明在@Component及其衍生类(@Controller、@Service或@Repository)上以让它实现延迟初始化。@Lazy @Component public class SimpleBean { }通过将
@Lazy注解声明在@Bean方法上以让它实现延迟初始化。@Configuration public class MyConfig { @Lazy @Bean public SimpleBean simpleBean(OneInjectBean oneInjectBean, TwoInjectBean twoInjectBean) { return new SimpleBean(oneInjectBean, twoInjectBean); } }通过将
@Lazy注解声明在@Configuration类上以让它所包含的所有@Bean方法都被延迟初始化。另外,我们也可以在@Configuration中的@Bean上加上@Lazy(value=false)(显式设置为不延迟初始化)来覆盖类上指定的默认行为(延迟初始化)。@Lazy @Configuration public class MyConfig { @Bean public SimpleBean1 simpleBean1(OneInjectBean oneInjectBean, TwoInjectBean twoInjectBean) { return new SimpleBean1(oneInjectBean, twoInjectBean); } @Lazy(value=false) @Bean public SimpleBean2 simpleBean2(OneInjectBean oneInjectBean, TwoInjectBean twoInjectBean) { return new SimpleBean2(oneInjectBean, twoInjectBean); } }通过将
@Lazy注解声明在依赖的@Autowired或@Inject注解上以让依赖延迟注入。通过这种方式,Spring会首先会对@Lazy的依赖注入一个lazy-resolution代理,在依赖被调用时才会去检索或创建依赖实例(这可能会由于依赖不存在而抛出异常)。@Component public class SimpleBean { @Lazy @Autowired private OneInjectBean oneInjectBean; @Lazy @Autowired private TwoInjectBean twoInjectBean; }@Component public class SimpleBean { private OneInjectBean oneInjectBean; private TwoInjectBean twoInjectBean; @Lazy @Autowired public SimpleBean(OneInjectBean oneInjectBean, TwoInjectBean twoInjectBean) { this.oneInjectBean = oneInjectBean; this.twoInjectBean = twoInjectBean; } }@Component public class SimpleBean { private OneInjectBean oneInjectBean; private TwoInjectBean twoInjectBean; @Lazy @Autowired public void setOneInjectBean(OneInjectBean oneInjectBean) { this.oneInjectBean = oneInjectBean; } @Lazy @Autowired public void setTwoInjectBean(TwoInjectBean twoInjectBean) { this.twoInjectBean = twoInjectBean; } }除此之外,对于依赖的延迟注入除了可以使用
@Lazy注解我们还可以使用org.springframework.beans.factory.ObjectFactory、jakarta.inject.Provider或org.springframework.beans.factory.ObjectProvider来代替,即将它们作为注入点。@Component public class SimpleBean { @Autowired private ObjectProvider<OneInjectBean> oneInjectBean; @Autowired private ObjectProvider<TwoInjectBean> twoInjectBean; }@Component public class SimpleBean { private ObjectProvider<OneInjectBean> oneInjectBean; private ObjectProvider<TwoInjectBean> twoInjectBean; @Autowired public SimpleBean(ObjectProvider<OneInjectBean> oneInjectBean, ObjectProvider<TwoInjectBean> twoInjectBean) { this.oneInjectBean = oneInjectBean; this.twoInjectBean = twoInjectBean; } }@Component public class SimpleBean { private ObjectProvider<OneInjectBean> oneInjectBean; private ObjectProvider<TwoInjectBean> twoInjectBean; @Autowired public void setOneInjectBean(ObjectProvider<OneInjectBean> oneInjectBean) { this.oneInjectBean = oneInjectBean; } @Autowired public void setTwoInjectBean(ObjectProvider<TwoInjectBean> twoInjectBean) { this.twoInjectBean = twoInjectBean; } }
需要注意,当延迟初始化
bean是普通单例bean(非延迟初始化)的依赖时,容器在启动期间还是会创建这个延迟初始化的bean,这是因为单例bean仅仅会在容器启动时被创建,之后它的依赖将无法再被注入进去了。对于这种情况,我们可以通过将依赖也声明为lazy(例如,在依赖属性上加上注解@Lazy)来解决。更多详情可阅读一下资料:
依赖显式化
对于存在依赖关系的bean(使用了Java(通过@Autowired等注解)或XML(通过ref属性或标签等)的方式声明了依赖项),IoC容器会在初始化时会根据它们的依赖关系(顺序)逐个进行实例化。然而,对于一些没那么直接的依赖关系(例如,数据库驱动程序的注册)通过这种方式则无法实现。因此,Spring提供了depends-on属性让我们可以显示地指定bean的依赖关系,以此来强制它们的初始化顺序。
需要注意,通过这种方式来指定初始化顺序仅仅适用于单例
bean。
同样的,在使用上我们可以使用XML的方式和Java的方式进行配置,即:
-
通过
XML方式配置depneds-on在
XML配置中,我们可以在<bean/>标签中将depends-on属性设置为需要依赖的bean名称来显式指定它们依赖关系的,以此强制它们的初始化顺序。<beans> <bean id="simpleBean1" class="com.example.SimpleBean1" depends-on="simpleBean2"/> <bean id="simpleBean2" class="com.example.SimpleBean2"/> </beans>如果
bean对多个bean存在依赖,则可以通过分隔符(逗号、空格和分号都是有效的分隔符)来间隔多个bean名称。<beans> <bean id="simpleBean1" class="com.example.SimpleBean1" depends-on="simpleBean2,simpleBean3"/> <bean id="simpleBean2" class="com.example.SimpleBean2"/> <bean id="simpleBean3" class="com.example.SimpleBean3"/> </beans> -
通过
Java方式配置depneds-on在
Java配置中,我们可以在@Component及其衍生类(@Controller、@Service或@Repository)中或者@Bean方法上使用注解@DependsOn来达到目的,其中对于@DependsOn注解的用法与XML中depends-on属性的用法相同。@DependsOn(value={"simpleBean2","simpleBean3"}) @Component public class SimpleBean1 { } @Component public class SimpleBean2 { } @Component public class SimpleBean3 { }@Configuration public class MyConfig { @DependsOn(value={"simpleBean2","simpleBean3"}) @Bean public SimpleBean1 simpleBean1() { return new SimpleBean1(); } @Bean public SimpleBean2 simpleBean2() { return new SimpleBean2(); } @Bean public SimpleBean3 simpleBean3() { return new SimpleBean3(); } }
需要注意,
depends-on属性不但可以指定依赖间的初始化顺序,对于单例bean它还会根据其初始化顺序间接指定其销毁的顺序。即,在给定bean销毁前必须先销毁依赖它的所有bean。更多详情可阅读一下资料:
常见问题
自引用
自Spring 4.3,@Autowired注解开始支持自引用(即,自己引用自己)。然而,实际上@Autowired的自引用在Spring中充当的是一种后备策略,即一般情况下@Autowired的自引用并不会在依赖注入候选者的名单中,只有在其它候选者都不满足的情况下它才会作为一种后备被注入到依赖中。可选地,我们也可以使用其它解决方案来实现自引用,即可以使用@Resource注解指定唯一bean名称的方式来实现自引用。
除此之外,将以@Bean方法声明的bean注入到同一配置类中实际上也是一种自引用的场景。对于这种情况,我们可以将相应的@Bean方法声明为@Lazy或static,目的是让@Bean方法的生命周期与配置类本身进行分离,否则容器只会在兜底阶段才考虑这些bean(而是选择其他配置类中相匹配的bean作为主要候选者(如果存在))。
更多详情可阅读一下资料:
循环依赖
在IoC容器启动或者第一次请求bean时会触发相应bean(默认情况下单例bean会在容器启动时被创建)以及其依赖项、依赖项的依赖项(等等)的创建。在这过程中可能会触发bean的循环依赖,例如:
@Component
public class Component1 {

    private Component2 component2;

    @Autowired
    public Component1(Component2 component2){
        this.component2 = component2;
    }
}

@Component
public class Component2 {

    private Component1 component1;

    @Autowired
    public Component2(Component1 component1) {
        this.component1 = component1;
    }
}
对于像上述这样使用构造器注入的情况,在发生循环依赖时IoC会在运行时检测出来,并且抛出BeanCurrentlyInCreationException异常。在发生循环依赖时抛出异常可能并不是我们想要的,所以Spring也提供了其他的注入方式来解决循环依赖的问题(不但检测出循环依赖,而且也解决循环依赖),例如在以Setter方式配置依赖注入时,若发生循环依赖,它会迫使其中一个bean在完全初始化之前注入到另一个bean中(经典的鸡和蛋场景),具体用法如下:
@Component
public class Component1 {

    private Component2 component2;

    @Autowired
    public void setComponent2(Component2 component2){
        this.component2 = component2;
    }
}

@Component
public class Component2 {

    private Component1 component1;

    @Autowired
    public void setComponent1(Component1 component1){
        this.component1 = component1;
    }
}
更多详情可阅读一下资料:
Bean作用域
在Spring中,IoC容器中的每个bean都会被指定一个作用域(默认是singleton),通过这个作用域我们就可以指定每次生成bean实例的存活时间。其中,Spring(默认)提供了以下六种可选值(有四种只有在Web应用中可以使用):
| 作用域 | 描述 |
|---|---|
singleton |
(默认)将单个bean的作用域限定为每个容器只有单个对象实例。 |
prototype |
将单个bean的作用域限定为任意数量的对象实例。 |
request |
将单个bean的作用域限定为单个HTTP请求的生命周期。也就是说,每个HTTP请求都有自己的bean实例(仅在Web应用的上下文中有效)。 |
session |
将单个bean的作用域限定为HTTP会话的生命周期(仅在Web应用的上下文中有效)。 |
application |
将单个bean的作用域限定为ServletContext的生命周期(仅在Web应用的上下文中有效)。 |
websocket |
将单个bean的作用域限定为WebSocket的生命周期(仅在Web应用的上下文中有效)。 |
作用域的可选值
Singleton
当bean的作用域为singleton时,它仅会在容器中存在一个共享实例,并且所有与它ID匹配的请求容器都会返回指定的bean。换句话说,当您定义了一个作用域为singleton的bean,IoC容器会在bean实例首次创建后将它存储到单例bean的缓存中,并且后续对它的所有请求和引用都会返回缓存中的实例。
下图展示了singleton作用域的工作原理:
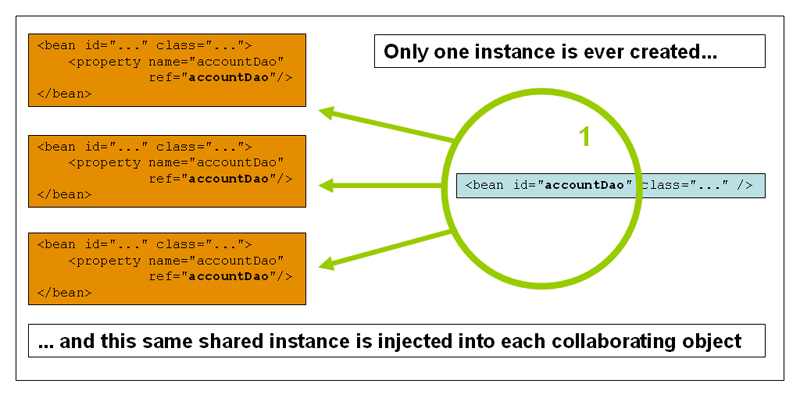
Spring概念中的单例bean与Gang of Four (GoF)设计模式书中定义的单例模式有所不同。GoF中的singleton是对象作用域的硬编码,每个ClassLoader只创建特定类的一个实例;而Spring的singleton作用域则是每个容器只创建特定类的一个实例,即每个IoC容器仅会创建特定类(通过BeanDefinition定义的类)的一个实例(在Spring中,singleton作用域是bean的默认作用域)。更多详情可阅读一下资料:
Prototype
当bean的作用域为prototype(非单例)时,它会在每次对容器请求bean时(通过bean注入或者调用getBean())都会创建一个新的bean实例。
通常,我们应该对所有有状态的
bean使用prototype作用域,而对无状态的bean使用singleton作用域。
下图说明了Spring的prototype作用域的工作原理:
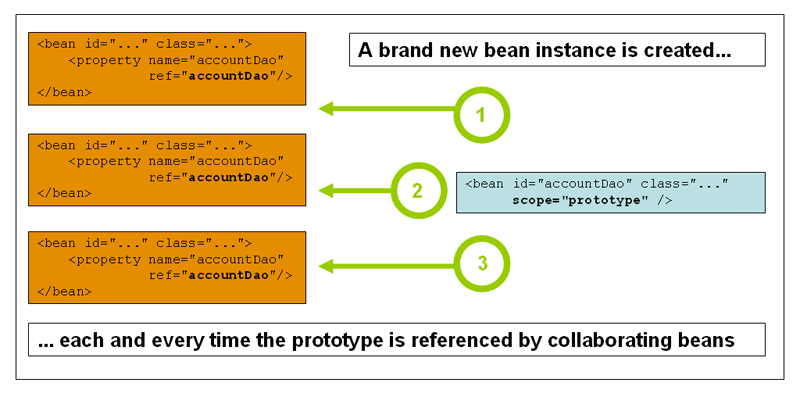
与其他bean作用域相比,Spring并不会管理prototype作用域bean的完整生命周期。对于prototype作用域的bean,容器会在实例化、配置和组装后直接将其传递给客户端,而没有像单例模式那样进行缓存。也正因如此,容器并不会在prototype作用域的bean销毁时执行其所配置的销毁方法(bean生命周期回调)。所以,在prototype作用域的bean销毁时我们必须显式地清理对象及释放它所持有的资源。
需要注意,当将
prototype作用域的bean作为依赖注入到singleton作用域的bean时,prototype作用域的bean仅仅会singleton作用域的bean初始化时进行创建和注入。之后如果再次请求prototype作用域的bean(新)实例时,容器是不会再次将它注入到singleton作用域的bean中的,这是因为对于singleton作用域的bean仅仅是会在容器实例化bean时完成依赖项的解析和注入。而对于这种情况我们可以通过方法注入Method Injection的方式或作用域代理ScopedProxyMode的方式来实现重复注入。更多详情可阅读一下资料:
Web Scope
对于Request, Session, Application和Websocket等作用域只有在Web应用时才能生效,如果我们在普通容器中使用这些作用域则抛出IllegalStateException异常。
Request
当bean的作用域为request时,它会在每次HTTP请求创建新的bean实例。也就是说,对于request作用域的bean生命周期会被限制在一次HTTP请求,在请求处理完成时request作用域的bean将会被销毁。我们可以根据需要改变实例的内部状态,因为通过其他HTTP请求生成的bean实例并不能看见这些改变。
更多详情可阅读一下资料:
Session
当bean的作用域为session时,它会在每次HTTP会话创建新的bean实例。也就是说,对于session作用域的bean生命周期会被限制在一次HTTP会话,在HTTP会话被销毁时session作用域的bean也将会被销毁。我们可以根据需要改变实例的内部状态,因为通过其他HTTP会话生成的bean实例并不能看见这些改变。
更多详情可阅读一下资料:
Application
当bean的作用域为application时,它会在整个Web应用程序创建新的bean实例。也就是说,对于application作用域的bean生命周期会被限制在ServletContext,并作为常规ServletContext属性存储。这有点类似于Spring的单例bean,但在两个重要方面有所不同:
Application作用域的bean是每个ServletContext的单例,而不是每个ApplicationContext(在任何给定的Web应用程序中一个ServletContext可能有多个ApplicationContext)。Application作用域的bean是公开的,可作为ServletContext属性被访问。
更多详情可阅读一下资料:
WebSocket
当bean的作用域为WebSocket时,它会与WebSocket会话的生命周期相关联,适用于跨WebSocket应用。
更多详情可阅读一下资料:
作用域的配置
对于bean作用域,我们可以分别通过XML的方式和Java的方式进行配置.
-
通过
XML方式配置在基于
XML的配置中,我们可以使用<bean/>标签的scope属性来指定其作用域。<beans> <!-- 默认是singleton作用域 --> <bean id="simpleBean" class="com.example.SimpleBean"/> <!-- singleton作用域 --> <bean id="simpleBean" class="com.example.SimpleBean" scope="singleton"/> <!-- prototype作用域 --> <bean id="simpleBean" class="com.example.SimpleBean" scope="prototype"/> <!-- request作用域 --> <bean id="simpleBean" class="com.example.SimpleBean" scope="request"/> <!-- session作用域 --> <bean id="simpleBean" class="com.example.SimpleBean" scope="session"/> <!-- application作用域 --> <bean id="simpleBean" class="com.example.SimpleBean" scope="application"/> </beans> -
通过
Java方式配置在基于
Java的配置中,我们可以在@Component类或者@Bean方法上使用@Scope注解并设置其scopeName属性来声明bean的作用域。而对于WebScope作用域,Spring还通过元注解组合的方式新增了对应的注解@RequestScope、@SessionScope和@ApplicationScope。// 默认为singleton @Scope @Component public class SimpleBean { }@Scope(scopeName="singleton") @Component public class SimpleBean { }@Scope(scopeName="prototype") @Component public class SimpleBean { }// 等价于@Scope(scopeName="request") @RequestScope @Component public class SimpleBean { }// 等价于@Scope(scopeName="session") @SessionScope @Component public class SimpleBean { }// 等价于@Scope(scopeName="application") @ApplicationScope @Component public class SimpleBean { }
更多详情可阅读一下资料:
作用域的依赖
由于作用域的不同,IoC容器中bean存活的生命周期也有所差别。如果需要将生命周期较短的bean注入到生命周期更长的bean,直接的依赖注入可能会产生问题。对于这种情况,我们可以使用AOP代理来代替不同作用域的bean,即我们需要注入的是一个(与作用域对象具有相同接口的)代理对象,它会从对应的作用域中检索出真正的目标实例,并将方法的调用委托给它。
-
通过
XML方式配置注入代理在
XML配置中,我们可以在<bean>中加入子标签<aop:scoped proxy/>以表示对该bean生成代理对象。<beans> <!-- a singleton-scoped bean injected with a proxy to the above bean --> <bean id="simpleBean" class="com.example.SimpleBean"> <property name="oneInjectBean" ref="oneInjectBean"/> <property name="twoInjectBean" ref="twoInjectBean"/> </bean> <!-- a prototype-scoped bean exposed as a proxy --> <bean id="oneInjectBean" class="com.example.OneInjectBean" scope="prototype"> <!-- instructs the container to proxy the surrounding bean --> <aop:scoped-proxy/> </bean> <!-- a prototype-scoped bean exposed as a proxy --> <bean id="twoInjectBean" class="com.example.TwoInjectBean" scope="prototype"> <!-- instructs the container to proxy the surrounding bean --> <aop:scoped-proxy/> </bean> </beans>- 在
singleton bean上使用<aop:scoped proxy/>,对bean引用使用的是一个可序列化的代理对象,因此可以通过反序列化来重新获取实例。 - 在
prototype bean上使用<aop:scoped proxy/>,对注入代理每个方法的调用都会导致bean实例重新创建,然后再将调用转发到该实例中。
默认情况下,
IoC容器会使用CGLIB为标记有<aop:scoped proxy/>的bean创建代理对象。而如果将<aop:scoped proxy/>元素的proxy-target-class属性设置false,IoC容器则会通过JDK动态代理(基于JDK接口的标准代理)来为bean生成代理对象。- 根据
JDK动态代理的定义,在使用时我们不需要添加额外的库来生成代理对象,但是需要为bean实现至少一个接口。另外,需要注意对这种bean依赖的注入必须通过其接口之一来引用。 - 根据
CGLIB动态代理的定义,由于这种代理只会截获public方法的调用,所以我们不能在这种代理上调用非public方法,它们是不会被委托给目标实例的。
<beans>
    <!-- a singleton-scoped bean injected with a proxy to the above bean -->
    <bean id="simpleBean" class="com.example.SimpleBean">
        <property name="oneInjectBean" ref="oneInjectBean"/>
        <property name="twoInjectBean" ref="twoInjectBean"/>
    </bean>

    <!-- a prototype-scoped bean exposed as a proxy -->
    <bean id="oneInjectBean" class="com.example.DefaultOneInjectBean" scope="prototype">
        <!-- instructs the container to proxy the surrounding bean -->
        <aop:scoped-proxy proxy-target-class="false"/>
    </bean>
    <!-- a prototype-scoped bean exposed as a proxy -->
    <bean id="twoInjectBean" class="com.example.DefaultTwoInjectBean" scope="prototype">
        <!-- instructs the container to proxy the surrounding bean -->
        <aop:scoped-proxy proxy-target-class="false"/>
    </bean>
</beans>
需要注意,如果将
<aop:scoped proxy/>放在FactoryBean实现的<bean>时,作用域是FactoryBean本身,而不是从FactoryBean#getObject()返回的对象。另外,如果需要设置大量的代理对象,我们可以在
component-scan上使用scoped-proxy属性来指定。其中,可选值为no、interfaces和targetClass。<beans> <context:component-scan base-package="org.example" scoped-proxy="targetClass"/> </beans> - 在
-
通过
Java方式配置注入代理在
Java配置中,我们可以在@Scope注解上通过指定proxyMode()属性来设置其作用域代理,它的可选值可在ScopedProxyMode枚举中找到,默认为不创建代理(即ScopedProxyMode.DEFAULT或者ScopedProxyMode.NO)。ScopedProxyMode描述 DEFAULT默认,等价于 ScopedProxyMode.NO。可通过在component-scan上设置ScopedProxyMode属性进行变更。NO此类型表示不创建代理。 INTERFACES此类型表示通过 JDK动态代理创建代理类。TARGET_CLASS此类型表示通过 CGLIB动态代理创建代理类。@Scope(scopeName="singleton") @Component public class SimpleBean1 { @Autowired private SimpleBean2 simpleBean2; } @Scope(scopeName="prototype", proxyMode=ScopedProxyMode.TARGET_CLASS) @Component public class SimpleBean2 { }如果需要设置大量的代理对象,我们可以在
@ComponentScan注解上使用scopedProxy属性来指定。其中,可选值为no、interfaces和targetClass。@Configuration @ComponentScan(basePackages = "org.example", scopedProxy = ScopedProxyMode.TARGET_CLASS) public class AppConfig { }另外,除了通过代理类的方式将生命周期较短的
bean注入到生命周期更长的bean外,我们还可以通过将注入点(即构造参数、Setter参数或自动装配字段)声明为ObjectFactory<MyTargetBean>来实现,这样每次调用ObjectFactory#getObject()来获取依赖对象就会按需检索依赖实例(无需保留或单独存储实例)。ObjectFactory<MyTargetBean>作为一个扩展变量,你还可以声明ObjectProvider<MyTargetBean>,它实现了ObjectFactory<MyTargetBean>并提供了几个额外的访问方法,比如getIfAvailable()和getIfUnique()。另外,对于JSR-330规范它也有相同作用的变体Provider,类似的可以通过Provider<MyTargetBean>的方法Provider#get()来检索依赖实例。
更多详情可阅读一下资料:
Bean生命周期
Lifecycle接口
Initialization和Destruction
当bean实现了InitializingBean和DisposableBean接口时,IoC容器就会在bean初始化和销毁时分别调用InitializingBean#afterPropertiesSet方法(hook)和DisposableBean#destroy方法(hook)让bean能在特定的生命周期上执行特定的操作。
@Component
public class SimpleBean implements InitializingBean {

    @Override
    public void afterPropertiesSet() {
        // do some initialization work
    }
}
IoC容器会在设置完所有必要的属性后调用org.springframework.beans.factory.InitializingBean接口类(如有)来指定初始化工作,其中InitializingBean接口只有一个方法,即:void afterPropertiesSet() throws Exception;
@Component
public class SimpleBean implements DisposableBean {

    @Override
    public void destroy() {
        // do some destruction work (like releasing pooled connections)
    }
}
IoC容器会在bean被销毁时调用org.springframework.beans.factory.DisposableBean接口类(如有)来指定销毁工作,其中DisposableBean接口只有一个方法,即:void destroy() throws Exception;
实际上,除了实现相应的接口方法外Spring更推荐我们使用JSR-250标准中@PostConstruct注解(初始化)和@PreDestroy注解(注销)来标记bean的初始化方法(hook)和销毁方法(hook),因为通过注解的方式可以让bean无需耦合Spring指定的接口(如果不想使用JSR-250注解但是又不想耦合Spring指定的接口,可以考虑在bean配置中指定init-method属性和destroy-method属性)。具体用法如下所示:
-
通过
XML配置的方式在
XML中,我们可以通过<bean/>标签的init-method属性和destroy-method属性分别指定初始化方法和销毁方法。<bean id="simpleBean" class="com.example.SimpleBean" init-method="init" destroy-method="cleanup"/>public class SimpleBean { public void init() { // do some initialization work } public void cleanup() { // do some destruction work (like releasing pooled connections) } } -
通过
Java配置的方式在
Java中,我们可以通过@Bean注解的initMethod属性和destroyMethod属性分别指定初始化方法和销毁方法。@Configuration public class MyConfig { @Bean(initMethod="init", destroyMethod="cleanup") public SimpleBean simpleBean() { return new SimpleBean(); } }public class SimpleBean { public void init() { // do some initialization work } public void cleanup() { // do some destruction work (like releasing pooled connections) } }而在
Spring 2.5后,我们可以通过@PostConstruct注解和@PreDestroy注解分别指定初始化方法和销毁方法。@Configuration public class MyConfig { @Bean public SimpleBean simpleBean() { return new SimpleBean(); } }// 直接用@Component也可以 public class SimpleBean { @PostConstruct public void init() { // do some initialization work } @PreDestroy public void cleanup() { // do some destruction work (like releasing pooled connections) } }
实际上,Spring是使用BeaPostProcessor来处理任何生命周期相关的接口的,如果需要自定义更多特性或其他Spring没有提供的生命周期行为,我们可以为此实现一个专用的BeanPostProcessor。另外,需要注意Spring会在bean完成所有依赖注入后立即调用配置的初始化方法,这意味着在bean执行初始化方法时AOP拦截器尚未应用于bean。
Spring建议我们即使不使用InitializingBean和DisposableBean等接口来执行初始化方法和销毁方法,对于生命周期的接口方法命名也应该是整个项目统一的(存在一个标准,例如init()、initialize()、dispose()等名称编写方法),这样我们就可以在需要时低成本地使用XML中<beans>的default-init-method属性和default-destroy-method属性来指定它当中所有<bean>的初始化方法和销毁方法。<beans default-init-method="init" default-destroy-method="cleanup"> <bean id="simpleBean" class="com.example.SimpleBean"/> </beans>当然,我们也可以在
bean中设置init-method和destroy-method属性来覆盖其父级的默认方法(default-init-method和default-destroy-method)。
总的来说,我们可以通过三种方式来控制bean生命周期行为(从Spring2.5):
InitializingBean和DisposableBean接口init()和destroy()方法(自定义)@PostConstruct和@PreDestroy注解.
对于上述三种方式我们可以组合使用。如果一个bean配置了多种生命周期机制,并且每种机制都配置了不同的方法名,那么每个配置的方法都会按照以下顺序执行:
- 对同一个
bean的多种初始化方法执行顺序:@PostConstruct注解方法InitializingBean#afterPropertiesSet()方法init()方法(自定义配置)
- 对同一个
bean的多种销毁方法执行顺序:@PreDestroy注解方法DisposableBean#destroy()方法destroy()方法(自定义配置)
其中,如果对不同的方式都配置了相同的方法名称,则该方法将运行一次。
更多详情可阅读一下资料:
Startup和Shutdown
除了上述提及在特定生命周期触发的钩子方法外,Spring还提供了定义了生命周期中用于启动和停止的Lifecycle接口(可用于启动和停止某些进程)。
public interface Lifecycle {

    void start();

    void stop();

    boolean isRunning();
}
在Spring中,任何实现了Lifecycle接口的(被Spring管理的)对象都会在ApplicationContext(IoC容器)收到启动和停止信号时被级联触发。在实现上,它是通过LifecycleProcessor来实现这一点:
/**
 * LifecycleProcessor继承了Lifecycle接口,并且添加了两种额外的方法,用于响应刷新和关闭的上下文。
 */
public interface LifecycleProcessor extends Lifecycle {

    void onRefresh();

    void onClose();
}
需要注意
Spring并没有保证在bean销毁前一定会有停止通知发出,一般来说Lifecycle实现会在接收到销毁方法(destruction)的回调前先收到停止的通知(Lifecycle#stop),但是对于在上下文生命周期内的热更新或者在停止刷新的间隔内它们只会收到销毁方法(destruction)的回调。
虽然Lifecycle接口定义了用于启动和停止的方法,但是这并不意味着它会在上下文刷新时自动启动。如果需要更细粒度地控制自动启动和特定bean的优雅停止,可以考虑继承SmartLifecycle接口。
public interface SmartLifecycle extends Lifecycle, Phased {

    boolean isAutoStartup();

    void stop(Runnable callback);
}
SmartLifecycle除了扩展Lifecycle外,还增加了Phased的扩展。对于两个存在依赖关系的对象它们启动和停止的顺序是十分重要的,比如依赖方在其依赖之后开始,并在其依赖之前停止。但是,在开发过程中我们并不一定能知道两个具体对象的直接依赖关系,而是只知道某种类型的对象应该在另一种类型的对象之前开始,对于这种情况我们就需要用到Phased的扩展了:public interface Phased { int getPhase(); }
Phased接口主要用于指定对象的启动相位,即在启动时相位最低的对象首先启动,在停止时则按照相反的顺序进行停止。因此对于getPhase()方法返回Integer.MIN_VALUE的对象将是最先启动和最后停止的对象;在频谱的另一端,Integer.MAX_VALUE的phase值则表示该对象应该最后启动并首先停止。另外,默认情况下任何未实现SmartLifecycle的“正常”Lifecycle对象的phase都是0,所以任何负phase值表示对象应该在这些标准组件之前开始(并在他们之后停止),反之亦然。
SmartLifecycle在Lifecycle的基础上增加了可接收Runnable参数的stop方法,默认会在执行完Lifecycle#stop方法后立即调用Runnable#run方法(同一调用线程)。在加入这个方法后,我们可以很轻易的实现SmartLifecycle组件的异步关闭(通过回调的方式实现)以支持功能的需要,例如LifecycleProcessor的默认实现DefaultLifecycleProcessor会在执行组件停止时对每个phase对象组的执行时间(含Runnable回调的执行)设置有超时时间,对于这种情况我们就可以启动异步关闭了(如有需要)。
默认情况下每个
phase组的超时时间为30秒。我们也可以通过在上下文中定义一个名为lifecycleProcessor的bean来覆盖默认的生命周期处理器实例。而如果要修改超时时间,添加以下配置即可:<bean id="lifecycleProcessor" class="org.springframework.context.support.DefaultLifecycleProcessor"> <!-- timeout value in milliseconds --> <property name="timeoutPerShutdownPhase" value="10000"/> </bean>
另外,LifecycleProcessor接口还定义了刷新回调方法onRefresh()(hook)和关闭回调方法onClose()(hook),其中前者会在上下文刷新时(在所有对象都被实例化和初始化之后)被触发,默认情况下处理器会检查每个SmartLifecycle的isAutoStartup()方法,当它返回true时当前实例就会在该执行点被自动启动,而不是等待上下文的start方法被显式调用来启动(与上下文刷新不同,在标准的上下文实现中start是不会自动发生的);而后者则会在上下文关闭时被触发,效果与显式调用stop方法类似,只不过时机是发生在上下文被关闭。
对于在非
WEB应用环境下使用IoC容器,如果想要对每个单例bean优雅地执行关闭,则需要配置和实现相对应的destroy方法(释放资源),并且需要想向JVM注册一个shutdown的hook方法,即调用ConfigurableApplicationContext接口的registerShutdownHook()方法(在基于Web应用环境的ApplicationContext实现已经存在相关代码,所以无需额外配置)。import org.springframework.context.ConfigurableApplicationContext; import org.springframework.context.support.ClassPathXmlApplicationContext; public final class Boot { public static void main(final String[] args) throws Exception { ConfigurableApplicationContext ctx = new ClassPathXmlApplicationContext("beans.xml"); // add a shutdown hook for the above context... ctx.registerShutdownHook(); // app runs here... // main method exits, hook is called prior to the app shutting down... } }更多详情可阅读一下资料:
Aware接口
Spring提供了各种可感知的回调接口,让bean可以向容器表明它们需要某种基础设施依赖。下面我们来看看几个比较常见的Aware接口:
-
ApplicationContextAware当
ApplicationContext(IoC容器)创建一个org.springframework.context.ApplicationContextAware对象实例时,该实例就会通过ApplicationContextAware#setApplicationContext提供这个ApplicationContext的实例引用给我们。public interface ApplicationContextAware { void setApplicationContext(ApplicationContext applicationContext) throws BeansException; }在获取到
ApplicationContext后我们就可以通过它(以编程的方式)来创建和获取更多的bean了。虽然有时候这种能力很有用,但是我们更应该避免以这种方式来操作bean,因为这会导致业务代码耦合到Spring并且它也不遵循IoC风格。除此之外,我们还可以通过自动装配的方式来获取
ApplicationContext。即,通过构造参数、Setter方法参数或字段属性等自动装配的方式来对ApplicationContext进行注入。 -
BeanNameAware当
ApplicationContext(IoC容器)创建一个org.springframework.beans.factory.BeanNameAware对象实例时,该实例就会通过BeanNameAware#setBeanName提供所关联bean实例的名称给我们。public interface BeanNameAware { void setBeanName(String name) throws BeansException; }需要注意,
BeanNameAware#setBeanName方法会在普通bean属性填充后初始化方法回调(InitializingBean#afterPropertiesSet方法或者指定init-method方法)前被调用。 -
更多
Aware接口除了
ApplicationContextAware和BeanNameAware外,Spring还提供了广泛的Aware回调接口:Name Injected Dependency ApplicationContextAware Declaring ApplicationContext. ApplicationEventPublisherAware Event publisher of the enclosing ApplicationContext. BeanClassLoaderAware Class loader used to load the bean classes. BeanFactoryAware Declaring BeanFactory. BeanNameAware Name of the declaring bean. LoadTimeWeaverAware Defined weaver for processing class definition at load time. MessageSourceAware Configured strategy for resolving messages (with support for parameterization and internationalization). NotificationPublisherAware Spring JMX notification publisher. ResourceLoaderAware Configured loader for low-level access to resources. ServletConfigAware Current ServletConfig the container runs in. Valid only in a web-aware Spring ApplicationContext. ServletContextAware Current ServletContext the container runs in. Valid only in a web-aware Spring ApplicationContext.
更多详情可阅读一下资料:
Bean加载
在完成对bean的配置后,我们就可以使用Spring提供的方式对bean进行加载了,例如,通过将配置文件或配置类设置到容器ApplicationContext中进行加载;或者也可以通过@ComponentScan注解扫描指定路径上的配置文件进行加载,又或者通过@Import注解直接导入配置类的方式进行加载。
通过ApplicationContext加载
对于传统Java编程的方式,我们可以将配置文件或者配置类设置到ApplicationContext中来加载bean,其中根据不同的文件类型可分为FileSystemXmlApplicationContext、ClassPathXmlApplicationContext和AnnotationConfigApplicationContext。
-
通过
XML配置的方式对于
XML配置的方式,我们可以通过将文件系统路径和classpath路径分别配置到FileSystemXmlApplicationContext和ClassPathXmlApplicationContext中进行bean的加载。ApplicationContext classPathContext = new ClassPathXmlApplicationContext("beans.xml"); MyService service = classPathContext.getBean("myService", MyService.class);ApplicationContext fileSystemContext = new FileSystemXmlApplicationContext("resources/beans.xml"); MyService service = fileSystemContext.getBean("myService", MyService.class); -
通过
Java配置的方式对于
Java配置的方式,我们可以将@Configuration、@Component等配置类设置到AnnotationConfigApplicationContext中进行bean的加载。ApplicationContext annotationConfigContext = new AnnotationConfigApplicationContext(MyConfig.class); MyService service = annotationConfigContext.getBean("myService", MyService.class);除此之外,我们也可以在
ApplicationContext中调用getBeanFactory()获取BeanFactory(默认实现为DefaultListableBeanFactory),然后调用BeanFactory(默认实现为DefaultListableBeanFactory)的registerSingleton()和registerBeanDefinition()方法来注册容器外的对象以创建对应的bean实例。
更多详情可阅读一下资料:
通过@ComponentScan加载
除了使用传统Java编程的方式,Spring还提供了自动检测的方式来加载bean,即通过使用@ComponentScan注解类完成对指定范围内bean的自动检测(扫描),并最终将对应BeanDefinition实例注册到容器中(例如ApplicationContext)。
当使用
@ComponentScan进行自动检测时AutowiredAnnotationBeanPostProcessor和CommonAnnotationBeanPostProcessor都会被隐式包含在内。如果是通过它的XML方式进行配置(使用<context:component-scan>),则可以通过将annotation-config属性设置为false来禁用AutowiredAnnotationBeanPostProcessor和CommonAnnotationBeanPostProcessor的注册。
@Configuration
@ComponentScan(basePackages = "org.example")
public class AppConfig {
    // ...
}
默认情况下,@Component、@Repository、@Service、@Controller、@Configuration注解及其衍生注解都会被检测到,并且我们还可以通过在@ComponentScan注解上设置includeFilters或excludeFilters属性配置自定义过滤器修改和扩展此行为,其中每个过滤器都需要配置type和expression属性。下表描述了过滤的选项:
Filter Type |
Example Expression |
Description |
|---|---|---|
annotation (default) |
org.example.SomeAnnotation |
在目标组件的类级别上存在相应的注解。 |
assignable |
org.example.SomeClass |
目标组件可分配给所指定的类(或接口)。 |
aspectj |
org.example..*Service+ |
目标组件相匹配的AspectJ类型表达式。 |
regex |
org\.example\.Default.* |
目标组件相匹配的正则表达式(类名)。 |
custom |
org.example.MyTypeFilter |
org.springframework.core.type.TypeFilter接口的自定义实现。 |
如果需要禁用默认的扫描过滤策略,我们可以通过在注解上设置useDefaultFilters=false或在<component-scan/>标签上设置use-default-filters为'false'来禁用(默认过滤器)。这可以有效地禁用了对@Component、@Repository、@Service、@Controller、@RestController或@Configuration注解及其衍生注解的自动检测。
更多详情可阅读一下资料:
通过@Import加载
另外,我们还可以通过@Import注解来添加额外的配置类(例如,@Configuration类)。
本章节主要讨论如何使用
@Import注解来添加额外的配置类,而对于使用<import>标签(若以XML的方式配置)或者使用@ImportResource注解(若以Java的方式配置)来引用其他的XML配置文件在这里就不展开讨论了,有兴趣的读者可进一步阅读相关资料进行了解。
/**
* Indicates one or more <em>component classes</em> to import — typically
* {@link Configuration @Configuration} classes.
*
* <p>Provides functionality equivalent to the {@code <import/>} element in Spring XML.
* Allows for importing {@code @Configuration} classes, {@link ImportSelector} and
* {@link ImportBeanDefinitionRegistrar} implementations, as well as regular component
* classes (as of 4.2; analogous to {@link AnnotationConfigApplicationContext#register}).
*
* <p>{@code @Bean} definitions declared in imported {@code @Configuration} classes should be
* accessed by using {@link org.springframework.beans.factory.annotation.Autowired @Autowired}
* injection. Either the bean itself can be autowired, or the configuration class instance
* declaring the bean can be autowired. The latter approach allows for explicit, IDE-friendly
* navigation between {@code @Configuration} class methods.
*
* <p>May be declared at the class level or as a meta-annotation.
*
* <p>If XML or other non-{@code @Configuration} bean definition resources need to be
* imported, use the {@link ImportResource @ImportResource} annotation instead.
*
* @see Configuration
* @see ImportSelector
* @see ImportBeanDefinitionRegistrar
* @see ImportResource
*/
@Target(ElementType.TYPE)
@Retention(RetentionPolicy.RUNTIME)
@Documented
public @interface Import {
/**
* {@link Configuration @Configuration}, {@link ImportSelector},
* {@link ImportBeanDefinitionRegistrar}, or regular component classes to import.
*/
Class<?>[] value();
}
通过@Import注解我们不但可以加载一些典型的配置类(例如@Configuration和@Component注解类及其衍射注解的类),而且还可以还可以加载ImportSelector和ImportBeanDefinitionRegistrar类进行更灵活的配置。
我们可以将
@Import作为一个元注解(meta-annotation)衍射出更多灵活的用户,典型的就是添加相应的@EnableXxxx注解来使相应的第三方组件生效。而对于@Import中指定ImportSelector和ImportBeanDefinitionRegistrar则更是众多第三方框架整个Spring的关键所在。
-
常规配置类
对于常规配置类(例如
@Configuration和@Component注解类及其衍射注解的类)的导入会将配置类本身及其所包含的bean配置注册和加载到IoC容器中。@Configuration public class ConfigA { @Bean public A a() { return new A(); } } @Configuration @Import(ConfigA.class) public class ConfigB { @Bean public B b() { return new B(); } } public static void main(String[] args) { ApplicationContext ctx = new AnnotationConfigApplicationContext(ConfigB.class); // now both beans A and B will be available... A a = ctx.getBean(A.class); B b = ctx.getBean(B.class); } -
ImportSelector对于
ImportSelector的导入则可以更灵活地进行bean的注册和加载。/** * Interface to be implemented by types that determine which @{@link Configuration} * class(es) should be imported based on a given selection criteria, usually one or * more annotation attributes. * * <p>An {@link ImportSelector} may implement any of the following * {@link org.springframework.beans.factory.Aware Aware} interfaces, * and their respective methods will be called prior to {@link #selectImports}: * <ul> * <li>{@link org.springframework.context.EnvironmentAware EnvironmentAware}</li> * <li>{@link org.springframework.beans.factory.BeanFactoryAware BeanFactoryAware}</li> * <li>{@link org.springframework.beans.factory.BeanClassLoaderAware BeanClassLoaderAware}</li> * <li>{@link org.springframework.context.ResourceLoaderAware ResourceLoaderAware}</li> * </ul> * * <p>Alternatively, the class may provide a single constructor with one or more of * the following supported parameter types: * <ul> * <li>{@link org.springframework.core.env.Environment Environment}</li> * <li>{@link org.springframework.beans.factory.BeanFactory BeanFactory}</li> * <li>{@link java.lang.ClassLoader ClassLoader}</li> * <li>{@link org.springframework.core.io.ResourceLoader ResourceLoader}</li> * </ul> * * <p>{@code ImportSelector} implementations are usually processed in the same way * as regular {@code @Import} annotations, however, it is also possible to defer * selection of imports until all {@code @Configuration} classes have been processed * (see {@link DeferredImportSelector} for details). * * @author Chris Beams * @author Juergen Hoeller * @since 3.1 * @see DeferredImportSelector * @see Import * @see ImportBeanDefinitionRegistrar * @see Configuration */ public interface ImportSelector { /** * Select and return the names of which class(es) should be imported based on * the {@link AnnotationMetadata} of the importing @{@link Configuration} class. * @return the class names, or an empty array if none */ String[] selectImports(AnnotationMetadata importingClassMetadata); /** * Return a predicate for excluding classes from the import candidates, to be * transitively applied to all classes found through this selector's imports. * <p>If this predicate returns {@code true} for a given fully-qualified * class name, said class will not be considered as an imported configuration * class, bypassing class file loading as well as metadata introspection. * @return the filter predicate for fully-qualified candidate class names * of transitively imported configuration classes, or {@code null} if none * @since 5.2.4 */ @Nullable default Predicate<String> getExclusionFilter() { return null; } }在
ImportSelector的实现类中,我们需要在selectImports方法中返回需要加载的@Configuration类名称(通过Class.getName()获取),这样Spring容器会从selectImports方法的返回值获取需要加载的@Configuration类及其所包含的bean。需要注意,IoC容器在获取的同时会通过getExclusionFilter()方法进一步执行过滤。除此之外,我们还可以通过ImportSelector的衍生类DeferredImportSelector来延迟加载@Configuration类。DeferredImportSelector会在其他所有@Configuration类加载后再进行加载,而不同DeferredImportSelector之间则是通过Ordered接口或@Order注解来指定其执行顺序的。对于
selectImports方法的AnnotationMetadata参数则表示@Import注解所修饰类的元信息。 -
ImportBeanDefinitionRegistrar与
ImportSelector相似,将ImportBeanDefinitionRegistrar传入@Import同样可以对额外的bean进行注册和加载。与之相比,ImportBeanDefinitionRegistrar更接近底层,是直接通过构建BeanDefinition注册到容器中的。ImportBeanDefinitionRegistrar除了可以配置到@Import外,还能配置到ImportSelector#selectImports方法中。/** * Interface to be implemented by types that register additional bean definitions when * processing @{@link Configuration} classes. Useful when operating at the bean definition * level (as opposed to {@code @Bean} method/instance level) is desired or necessary. * * <p>Along with {@code @Configuration} and {@link ImportSelector}, classes of this type * may be provided to the @{@link Import} annotation (or may also be returned from an * {@code ImportSelector}). * * <p>An {@link ImportBeanDefinitionRegistrar} may implement any of the following * {@link org.springframework.beans.factory.Aware Aware} interfaces, and their respective * methods will be called prior to {@link #registerBeanDefinitions}: * <ul> * <li>{@link org.springframework.context.EnvironmentAware EnvironmentAware}</li> * <li>{@link org.springframework.beans.factory.BeanFactoryAware BeanFactoryAware} * <li>{@link org.springframework.beans.factory.BeanClassLoaderAware BeanClassLoaderAware} * <li>{@link org.springframework.context.ResourceLoaderAware ResourceLoaderAware} * </ul> * * <p>Alternatively, the class may provide a single constructor with one or more of * the following supported parameter types: * <ul> * <li>{@link org.springframework.core.env.Environment Environment}</li> * <li>{@link org.springframework.beans.factory.BeanFactory BeanFactory}</li> * <li>{@link java.lang.ClassLoader ClassLoader}</li> * <li>{@link org.springframework.core.io.ResourceLoader ResourceLoader}</li> * </ul> * * <p>See implementations and associated unit tests for usage examples. * * @author Chris Beams * @author Juergen Hoeller * @since 3.1 * @see Import * @see ImportSelector * @see Configuration */ public interface ImportBeanDefinitionRegistrar { /** * Register bean definitions as necessary based on the given annotation metadata of * the importing {@code @Configuration} class. * <p>Note that {@link BeanDefinitionRegistryPostProcessor} types may <em>not</em> be * registered here, due to lifecycle constraints related to {@code @Configuration} * class processing. * <p>The default implementation delegates to * {@link #registerBeanDefinitions(AnnotationMetadata, BeanDefinitionRegistry)}. * @param importingClassMetadata annotation metadata of the importing class * @param registry current bean definition registry * @param importBeanNameGenerator the bean name generator strategy for imported beans: * {@link ConfigurationClassPostProcessor#IMPORT_BEAN_NAME_GENERATOR} by default, or a * user-provided one if {@link ConfigurationClassPostProcessor#setBeanNameGenerator} * has been set. In the latter case, the passed-in strategy will be the same used for * component scanning in the containing application context (otherwise, the default * component-scan naming strategy is {@link AnnotationBeanNameGenerator#INSTANCE}). * @since 5.2 * @see ConfigurationClassPostProcessor#IMPORT_BEAN_NAME_GENERATOR * @see ConfigurationClassPostProcessor#setBeanNameGenerator */ default void registerBeanDefinitions(AnnotationMetadata importingClassMetadata, BeanDefinitionRegistry registry, BeanNameGenerator importBeanNameGenerator) { registerBeanDefinitions(importingClassMetadata, registry); } /** * Register bean definitions as necessary based on the given annotation metadata of * the importing {@code @Configuration} class. * <p>Note that {@link BeanDefinitionRegistryPostProcessor} types may <em>not</em> be * registered here, due to lifecycle constraints related to {@code @Configuration} * class processing. * <p>The default implementation is empty. * @param importingClassMetadata annotation metadata of the importing class * @param registry current bean definition registry */ default void registerBeanDefinitions(AnnotationMetadata importingClassMetadata, BeanDefinitionRegistry registry) { } }在
ImportBeanDefinitionRegistrar中,我们可以在registerBeanDefinitions方法上构建相应的BeanDefinition,将它注册到BeanDefinitionRegistry,并最终加载到IoC容器。不过需要注意的是,由于@Configuration相关生命周期的限制BeanDefinitionRegistryPostProcessor是不可以在这里被注册的。对于
registerBeanDefinitions方法的AnnotationMetadata参数则表示@Import注解所修饰的类的元信息。
更多详情可阅读一下资料:
Bean扩展
Bean的继承
在bean的定义中会包含很多配置的信息,其中包括构造参数、属性值和特定于容器的信息,例如初始化方法、静态工厂方法名称等,这很有可能会造成项目存在大量重复bean定义。为了避免这种情况,Spring提供了bean的继承,即我们可以通过继承的方式从父定义中继承bean中的配置信息,而在子定义中则按照需要对某些值进行新增或覆盖。
一般来说,在IoC容器中bean会被定义为RootBeanDefinition,而继承父定义的bean则被定义为ChildBeanDefinition。但这也不是绝对的,如果我们直接通过ApplicationContext以编程的方式将bean注册为ChildBeanDefinition也是可以的。只不过我们更普遍地会在XML的bean定义中使用parent来设置其父定义,这同时也会让当前bean被注册为ChildBeanDefinition(子定义)。
<bean id="simpleBean" class="com.example.SimpleBean">
    <property name="name" value="parent"/>
    <property name="age" value="1"/>
</bean>

<bean id="childSimpleBean" class="com.example.SimpleBean" parent="simpleBean" >
    <property name="name" value="override"/>
    <!-- the age property value of 1 will be inherited from parent -->
</bean>
通过这种方式,子定义会从父定义中继承相对应的属性和方法,包括作用域、初始化方法、销毁方法或者静态工厂方法等(如有指定都可覆盖父定义);而剩余的其他配置总会以子定义为准(忽略父定义),包括depends on、autowire mode、dependency check、singleton和lazy init。另外,较为特殊的class属性也能被继承,如果子定义中没有指定class属性是可以从父定义中继承来使用的;而如果子定义对父定义的class属性进行覆盖则必须与父定义兼容,即必须接受父类的属性。需要注意,如果父定义并未指定其class属性,则需要将它的abstract属性设置为true。
<bean id="simpleBean" abstract="true">
    <property name="name" value="parent"/>
    <property name="age" value="1"/>
</bean>

<bean id="childSimpleBean" class="com.example.SimpleBean" parent="simpleBean" >
    <property name="name" value="override"/>
    <!-- the age property value of 1 will be inherited from parent -->
</bean>
对于被标记为abstract的bean仅仅只能作为子定义的模版而不能被实例化(如果强行获取会报错)。也正因如此,IoC容器在执行preInstantiateSingletons()方法时会忽略被标记为abstract的bean(默认情况下,ApplicationContext会预实例化所有单例bean。如果我们只想将某个bean作为子定义的模版(指定了class属性),则需要确保将其abstract属性设置为true,否则ApplicationContext将试图预实例化它)。
需要注意,与
XML配置不同的是在Java配置中并没有bean定义继承的概念(类级别的继承层次结构与此无关)。更多详情可阅读一下资料:
Bean的注解
@Autowired
对于@Autowired注解,我们可以将它标记在构造器、字段或配置方法(含Setter方法)上,这样Spring就会根据依赖注入的机制完成自动装配了。
-
构造器的自动装配
如果给定的
bean只有一个构造器被标注了@Autowired且required属性为true(required属性默认为true),则表示在实例化bean时会通过此构造器进行自动装配。需要注意,对于required属性为true的@Autowired只能被标注在一个构造器上。@Component public class SimpleBean { private final OneInjectBean oneInjectBean; private final TwoInjectBean twoInjectBean; @Autowired public SimpleBean(OneInjectBean oneInjectBean, TwoInjectBean twoInjectBean) { this.oneInjectBean = oneInjectBean; this.twoInjectBean = twoInjectBean; } }如果给定的
bean存在多个构造器被标注了required属性为false的@Autowired(即有多个候选者),则在实例化bean时会选择能满足匹配最多依赖的构造器进行自动装配;如果标注的多个构造器都没有满足时(没有候选者满足匹配),则会选择primary/default进行自动装配(如果存在)。@Component public class SimpleBean { private OneInjectBean oneInjectBean; private TwoInjectBean twoInjectBean; // 如果其他都不匹配时则会选择此构造函数,同时此处的@Autowired(required=false)并不是必须的 @Autowired(required=false) // 非必须 public SimpleBean() { } @Autowired(required=false) public SimpleBean(OneInjectBean oneInjectBean) { this.oneInjectBean = oneInjectBean; } // 预先被选择作自动装配 @Autowired(required=false) public SimpleBean(OneInjectBean oneInjectBean, TwoInjectBean twoInjectBean) { this.oneInjectBean = oneInjectBean; this.twoInjectBean = twoInjectBean; } }另外,从
Spring Framework 4.3开始,如果给定的bean只定义了一个构造器,即使没有添加@Autowired注解该构造器也会被用来执行自动装配。而如果存在有多个构造器可用且没有primary/default构造器,则必须至少在一个构造器上标注@Autowired注解。@Component public class SimpleBean { private final OneInjectBean oneInjectBean; private final TwoInjectBean twoInjectBean; public SimpleBean(OneInjectBean oneInjectBean, TwoInjectBean twoInjectBean) { this.oneInjectBean = oneInjectBean; this.twoInjectBean = twoInjectBean; } }需要注意:
- 对于标注了
@Autowired注解的构造器并不必须是public的。 - 对于将
@Autowired注解标注在构造器上时,它的required属性是针对所有参数的。
- 对于标注了
-
字段的自动装配
如果在字段上标注
@Autowired注解,则它会在构造器执行(注入)完成后在任何配置方法被调用(注入)前对其进行自动装配。@Component public class SimpleBean { @Autowired private final OneInjectBean oneInjectBean; @Autowired private final TwoInjectBean twoInjectBean; }此处需要注意,对于标注了
@Autowired注解的字段并不必须是public的。 -
方法的自动装配
如果在配置方法(
Setter方法是配置方法中的一个特例)上标注@Autowired注解,则方法上所有参数都将会被自动装配。@Component public class SimpleBean { private OneInjectBean oneInjectBean; private TwoInjectBean twoInjectBean; @Autowired public void injectOneInjectBean(OneInjectBean oneInjectBean) { this.oneInjectBean = oneInjectBean; } // Setter方法是配置方法注入的特例 @Autowired public void setTwoInjectBean(TwoInjectBean twoInjectBean) { this.twoInjectBean = twoInjectBean; } }需要注意:
- 对于标注了
@Autowired注解的配置方法并不必须是public的。 - 对于将
@Autowired注解标注在配置方法上时,它的required属性是针对所有参数的。
- 对于标注了
根据上文所述,如果我们要将@Autowired注解标注在方法(含构造方法和配置方法)上时,它的required属性是针对所有参数的。而如果我们需要对部分方法参数忽略required属性的语义,那么我们可以通过将参数声明为java.util.Optional(JDK8特性)或者在参数上标注JSR-305注解@Nullable(Spring Framework 5.0特性)。
@Component
public class SimpleBean {

    private final Optional<OneInjectBean> oneInjectBean;
    private final Optional<TwoInjectBean> twoInjectBean;

    @Autowired
    public SimpleBean(Optional<OneInjectBean> oneInjectBean, Optional<TwoInjectBean> twoInjectBean) {
        this.oneInjectBean = oneInjectBean;
        this.twoInjectBean = twoInjectBean;
    }
}
@Component
public class SimpleBean {

    private final OneInjectBean oneInjectBean;
    private final TwoInjectBean twoInjectBean;

    @Autowired
    public SimpleBean(@Nullable OneInjectBean oneInjectBean, @Nullable TwoInjectBean twoInjectBean) {
        this.oneInjectBean = oneInjectBean;
        this.twoInjectBean = twoInjectBean;
    }
}
对于
@Autowired注解,我们可以通过它的required属性来标注依赖是否必须注入,默认情况下对于所有标注了@Autowired(包含指定required为true)的方法和字段都视为必须注入。而对于非必需的依赖我们可以通过将required设置为false让容器跳过不满足的注入点,否则注入可能会因运行时“未找到类型匹配”错误而失败。
另外,对于数组(Array)、集合(Collection)或哈希表(Map)等依赖的自动装配IoC容器会将所有与之类型相匹配的bean进行注入。其中,所声明Map的键(KEY)必须是字符串(用于表示bean名称,即其键(KEY)即为bean名称);而所声明Collection会按照Ordered接口或@Order注解(标准@Priority注解也可以)所指定的顺序值进行排序(如果存在),如果不存在Ordered接口或@Order注解则会按照注册到容器的顺序进行排序。
- 对于数组(
Array)、集合(Collection)或哈希表(Map)等依赖的自动装配必须至少匹配一个bean,否则将会启动发生错误(默认)。- 对于标准
javax.annotation.Priority注解是不能声明在@Bean方法上的,如果需要类似的功能可以使用@Order注解或者@Primary注解来代替。@Order注解仅仅可能会影响到依赖注入的优先级,而不会影响bean的启动顺序(启动顺序可由依赖关系或@DependsOn来决定)。
@Component
public class SimpleBean {
    @Autowired
    private InjectBean[] injectBeanArray;
    @Autowired
    private Collection<InjectBean> injectBeanCollection;
    @Autowired
    private Map<String,InjectBean> injectBeanMap;
}
需要注意,
@Autowired、@Inject、@Value和@Resource注解是通过BeanPostProcessor来实现的,所以这意味着我们不能在BeanPostProcessor或BeanFactoryPostProcessor(如果有)中应用这些注解来进行依赖注入。更多资料可阅读:
@Primary
对于@Primary注解,主要用于标注某个指定bean具有最高的依赖优先级。在自动装配时存在多个bean候选者匹配到单值依赖项而引发错误时,我们可以通过@Primary注解将某个候选者(bean)标注为primary(最高优先级),使得IoC容器可以选出唯一的候选者而避免错误的发生。
@Configuration
public class MovieConfiguration {

    @Bean
    @Primary
    public MovieCatalog firstMovieCatalog() { ... }

    @Bean
    public MovieCatalog secondMovieCatalog() { ... }

    // ...
}
基于上述配置,下面会将firstMovieCatalog自动装配到MovieRecommender:
@Component
public class MovieRecommender {

    @Autowired
    private MovieCatalog movieCatalog;

    // ...
}
更多资料可阅读:
@Qualifier
对于@Qualifier注解,主要用于通过指定bean限定符的方式缩小依赖(类型)匹配的范围。
与
@Primary注解相比,@Qualifier注解对于bean的选择进行了更多的控制。
@Configuration
public class MovieConfiguration {

    @Bean
    @Qualifier("firstMovieCatalog")
    public MovieCatalog firstMovieCatalog() { ... }

    @Bean
    @Qualifier("firstMovieCatalog")
    public MovieCatalog secondMovieCatalog() { ... }

    // ...
}
-
作用于字段
@Component public class MovieRecommender { @Autowired @Qualifier("firstMovieCatalog") private MovieCatalog movieCatalog; // ... } -
作用于参数
@Component
public class MovieRecommender {

    private MovieCatalog movieCatalog;

    @Autowired
    public void MovieRecommender(@Qualifier("firstMovieCatalog") MovieCatalog movieCatalog) {
        this.movieCatalog = movieCatalog;
    }

    // ...
}
实际上,即使没有添加
@Qualifier注解,bean也会存在默认限定符,即bean名称。从本质上讲@Autowired注解是通过限定符值来驱动依赖注入的,所以即使使用了默认限定符(bean名称)其语义上始终都是通过限定符来缩小类型匹配的范围的。
需要注意,@Qualifier注解所指定的限定符与bean id所表示的唯一性有所不同,@Qualifier限定符想表达的是特定组件的特征标识而不必须是唯一性标识,仅仅充当过滤bean的标准。也就是说对于类型集合的依赖注入,我们可以将相同@Qualifier限定符注入到一起(@Qualifier适用于类型集合)。。
@Configuration
public class MyConfig {

    @Bean
    @Qualifier("injectBeanCollection")
    public InjectBean firstInjectBean() { ... }

    @Bean
    @Qualifier("injectBeanCollection")
    public InjectBean secondInjectBean() { ... }

    @Bean
    @Qualifier("injectBeanMap")
    public InjectBean thirdInjectBean() { ... }

    @Bean
    @Qualifier("injectBeanMap")
    public InjectBean fourInjectBean() { ... }

    // ...
}
@Component
public class SimpleBean {
    @Autowired
    @Qualifier("injectBeanCollection")
    private Collection<InjectBean> injectBeanCollection;

    @Autowired
    @Qualifier("injectBeanMap")
    private Map<String, InjectBean> injectBeanMap;
}
如上述例子所示,IoC容器会将firstInjectBean和secondInjectBean注入到injectBeanCollection,而thirdInjectBean和fourInjectBean注入到injectBeanMap。
实际上,
Spring并不首推将@Autowired注解应用于通过名称来标识需要注入的依赖,而是更推荐使用JSR-250的@Resource注解。因为虽然@Resource注解与@Autowired注解作用相似,但是语义上却有所不同。@Resource注解在语义上定义为通过其唯一名称标识特定目标组件(与类型无关);而@Autowired注解的语义则为在按类型选出候选的bean后,再根据所指定限定符从中选出匹配的候选者(与类型有关)。更多详情可阅读一下资料:
@Resource
对于@Resource注解(JSR-250标准),它主要用于标记当前应用程序所需要的资源(例如,bean依赖)。在Spring中,IoC容器会对标注了@Resource注解的属性字段和配置方法(包含Setter方法,但不包含构造方法)执行依赖注入。
@Component
public class SimpleBean {

    private OneInjectBean oneInjectBean;
    private TwoInjectBean twoInjectBean;

    @Resource(name="oneInjectBean")
    public void setOneInjectBean(OneInjectBean oneInjectBean) {
        this.oneInjectBean = oneInjectBean;
    }

    @Resource(name="twoInjectBean")
    public void setTwoInjectBean(TwoInjectBean twoInjectBean) {
        this.twoInjectBean = twoInjectBean;
    }

}
@Component
public class SimpleBean {

    @Resource(name="oneInjectBean")
    private OneInjectBean oneInjectBean;

    @Resource(name="twoInjectBean")
    private TwoInjectBean twoInjectBean;

}
其中,我们需要在@Resource注解上设置name属性来指定需要注入的bean名称。若没有设置name属性,Spring则会根据字段名称或方法参数名称为其生成默认名称。另外,与@Autowired类似的是如果无法通过名称寻找出相应的bean,则会根据类型匹配出对应的bean(primary)。例如,下面oneInjectBean字段会首先查找名称为oneInjectBean的bean,如果查找失败则会继续通过OneInjectBean类型匹配出对应的bean(primary)。
@Component
public class SimpleBean {

    @Resource
    private OneInjectBean oneInjectBean;

}
更多详情可阅读:
@Value
对于@Value注解,它主要用于向被标注了注解的属性字段和配置方法/构造方法参数提供值表达式,通过它我们就可以轻易地完成表达式驱动或属性驱动的依赖注入。一般,我们会@Value注解中使用SpEL(Spring Expression Language)表达式来注入值(#{systemProperties.myProp}风格或者${my.app.myProp}风格)。
@Component
public class SimpleBean {
    @Value("#{systemProperties['user.catalog'] + 'Catalog' }")
    private String injectValueString;

    @Value("#{{'Thriller': 100, 'Comedy': 300}}")
    private Map<String, Integer> injectValueMap;

}
@Component
public class SimpleBean {

    @Value("${properties.injectValue}")
    private String injectValueString;

    // 提供默认值
    @Value("${properties.injectValue:defaultValueString}")
    private String injectDefaultValueString;

}
对于${my.app.myProp}风格的属性占位符是通过Spring提供的一个默认较宽松的嵌入值解析器来实现的,使用此解析器会尝试解析属性值,在无法解析的情况下会将属性名称(也就是属性key)作为值注入。如果我们想对不存在的值保持较为严格的控制,应该声明一个PropertySourcesPlaceholderConfigurer类型的bean。
@Configuration
public class AppConfig {

    // 通过这种方式配置的PropertySourcesPlaceholderConfigurer,@Bean方法必须是静态的
    @Bean
    public static PropertySourcesPlaceholderConfigurer propertyPlaceholderConfigurer() {
        return new PropertySourcesPlaceholderConfigurer();
    }
}
通过上述配置我们可以确保Spring在初始化时将所有占位符都解析成功,如果存在任何占位符不能被解析则会初始化失败并抛出异常。
在
Spring Boot中会默认配置一个PropertySourcesPlaceholderConfigurer类型的bean,通过它我们就可以从application.properties和application.yml文件中读取属性配置了。另外需要注意,因为@Value注解的处理实际是在BeanPostProcessor中执行的,所以我们不能在BeanPostProcessor或BeanFactoryPostProcessor中使用@Value注解。更多详情可阅读一下资料:
@PostConstruct/@PreDestroy
对于@PostConstruct/@PreDestroy注解,它们主要用于标注生命周期的初始化回调方法和销毁回调方法。
@Component
public class SimpleBean {

    @PostConstruct
    public void init() {
        // initialization...
    }

    @PreDestroy
    public void destroy() {
        // destruction...
    }
}
在使用@PostConstruct/@PreDestroy注解前,我们需要将CommonAnnotationBeanPostProcessor注册到IoC容器让其生效。CommonAnnotationBeanPostProcessor不仅可以识别JSR-250生命周期相关的注解:javax.annotation.PostConstruct和javax.annotation.PreDestroy(在Spring 2.5中引入),还能识别和处理@Resource注解。
更多详情可阅读如下资料:
JSR 330注解
自Spring3.0开始,Spring提供了对JSR-330标准注解(依赖注入)的支持,这些注解会被Spring以相同的方式进行扫描的。
对于JSR-330标准注解的使用,我们必须添加相关的Jar包。而如果使用Maven,则可以添加如下依赖到pom.xml配置文件中:
<dependency>
    <groupId>javax.inject</groupId>
    <artifactId>javax.inject</artifactId>
    <version>1</version>
</dependency>
@Inject
对于@Inject注解,它主要作用与@Autowired相似(可将@Autowired替代为@Inject),即标记需要自动装配的依赖(标记注入点)。其中@Inject注解可用在属性字段、配置方法和构造方法上。
import javax.inject.Inject;

@Component
public class SimpleBean {

    private OneInjectBean oneInjectBean;

    private TwoInjectBean twoInjectBean;

    @Inject
    private ThirdInjectBean thirdInjectBean;


    @Inject
    public SimpleBean(OneInjectBean oneInjectBean) {
        this.oneInjectBean = oneInjectBean;
    }

    @Inject
    public void setTwoInjectBean(TwoInjectBean twoInjectBean){
        this.twoInjectBean =  twoInjectBean;
    }
}
与@Autowired注解相同,我们可以使用Provider来声明bean的依赖注入点,从而允许根据需要访问生命周期更短的bean;或者允许通过Provider.get()方法来延迟获取bean实例。
import javax.inject.Inject;
import javax.inject.Provider;

@Component
public class SimpleBean {

    private Provider<OneInjectBean> oneInjectBean;
    private Provider<TwoInjectBean> twoInjectBean;

    @Inject
    public SimpleBean(Provider<OneInjectBean> oneInjectBean, Provider<TwoInjectBean> twoInjectBean) {
        this.oneInjectBean = oneInjectBean;
        this.twoInjectBean = twoInjectBean;
    }
}
与@Autowired注解相同,我们可以使用java.util.Optional和@Nullable来标识需注入的依赖可为空。
而相比于
@Autowired,java.util.Optional和@Nullable可能更适用在@Inject上,因为@Inject注解并没有required属性。
import javax.inject.Inject;

@Component
public class SimpleBean {

    private Optional<OneInjectBean> oneInjectBean;

    private TwoInjectBean twoInjectBean;

    @Inject
    public void setTwoInjectBean(Optional<OneInjectBean> oneInjectBean){
        this.oneInjectBean =  oneInjectBean;
    }

    @Inject
    public void setTwoInjectBean(@Nullable TwoInjectBean twoInjectBean){
        this.twoInjectBean =  twoInjectBean;
    }
}
与@Autowired注解类似,我们可以配合JSR-330标准提供的@Named注解(作用与@Qualifier注解类似)对注入bean的限定符进行指定。
import javax.inject.Inject;
import javax.inject.Named;

@Component
public class SimpleBean {

    private OneInjectBean oneInjectBean;

    @Inject
    public SimpleBean(@Named("oneInjectBean") OneInjectBean oneInjectBean) {
        this.oneInjectBean = oneInjectBean;
    }

}
更多详情可阅读如下资料:
@Named/@ManagedBean
在JSR 330的标准注解中,我们可以使用@javax.inject.Named或javax.annotation.ManagedBean来代替@Component来标注容器中的组件。
import javax.inject.Inject;
import javax.inject.Named;

// 与@Component具有同样的特性:默认不指定名称同样可以
// @Named
// @ManagedBean
// @ManagedBean("simpleBean") could be used as well
@Named("simpleBean")
public class SimpleBean {

    private OneInjectBean oneInjectBean;

    private TwoInjectBean twoInjectBean;

    @Inject
    public void setTwoInjectBean(OneInjectBean oneInjectBean){
        this.oneInjectBean =  oneInjectBean;
    }

    @Inject
    public void setTwoInjectBean(TwoInjectBean twoInjectBean){
        this.twoInjectBean =  twoInjectBean;
    }
}
与@Component相反,JSR-330中的@Named和JSR-250中的ManagedBean注解的元注解衍生类并不能发挥作用,即不能通过元注解组合的方式衍生出新的业务注解。
更多详情可阅读如下资料:
Bean的作用域(自定义)
Spring的bean作用域机制是可扩展的,我们不但可以定义自己的作用域,甚至还可以重新定义现有除了singleton和prototype的作用域(不推荐)。那么,如果我们要自定义bean的作用域,则需要实现org.springframework.beans.factory.config.Scope接口。
/**
 * Strategy interface used by a {@link ConfigurableBeanFactory},
 * representing a target scope to hold bean instances in.
 * This allows for extending the BeanFactory's standard scopes
 * {@link ConfigurableBeanFactory#SCOPE_SINGLETON "singleton"} and
 * {@link ConfigurableBeanFactory#SCOPE_PROTOTYPE "prototype"}
 * with custom further scopes, registered for a
 * {@link ConfigurableBeanFactory#registerScope(String, Scope) specific key}.
 *
 * <p>{@link org.springframework.context.ApplicationContext} implementations
 * such as a {@link org.springframework.web.context.WebApplicationContext}
 * may register additional standard scopes specific to their environment,
 * e.g. {@link org.springframework.web.context.WebApplicationContext#SCOPE_REQUEST "request"}
 * and {@link org.springframework.web.context.WebApplicationContext#SCOPE_SESSION "session"},
 * based on this Scope SPI.
 *
 * <p>Even if its primary use is for extended scopes in a web environment,
 * this SPI is completely generic: It provides the ability to get and put
 * objects from any underlying storage mechanism, such as an HTTP session
 * or a custom conversation mechanism. The name passed into this class's
 * {@code get} and {@code remove} methods will identify the
 * target object in the current scope.
 *
 * <p>{@code Scope} implementations are expected to be thread-safe.
 * One {@code Scope} instance can be used with multiple bean factories
 * at the same time, if desired (unless it explicitly wants to be aware of
 * the containing BeanFactory), with any number of threads accessing
 * the {@code Scope} concurrently from any number of factories.
 *
 * @author Juergen Hoeller
 * @author Rob Harrop
 * @since 2.0
 * @see ConfigurableBeanFactory#registerScope
 * @see CustomScopeConfigurer
 * @see org.springframework.aop.scope.ScopedProxyFactoryBean
 * @see org.springframework.web.context.request.RequestScope
 * @see org.springframework.web.context.request.SessionScope
 */
public interface Scope {

    /**
     * Return the object with the given name from the underlying scope,
     * {@link org.springframework.beans.factory.ObjectFactory#getObject() creating it}
     * if not found in the underlying storage mechanism.
     * <p>This is the central operation of a Scope, and the only operation
     * that is absolutely required.
     * @param name the name of the object to retrieve
     * @param objectFactory the {@link ObjectFactory} to use to create the scoped
     * object if it is not present in the underlying storage mechanism
     * @return the desired object (never {@code null})
     * @throws IllegalStateException if the underlying scope is not currently active
     */
    Object get(String name, ObjectFactory<?> objectFactory);

    /**
     * Remove the object with the given {@code name} from the underlying scope.
     * <p>Returns {@code null} if no object was found; otherwise
     * returns the removed {@code Object}.
     * <p>Note that an implementation should also remove a registered destruction
     * callback for the specified object, if any. It does, however, <i>not</i>
     * need to <i>execute</i> a registered destruction callback in this case,
     * since the object will be destroyed by the caller (if appropriate).
     * <p><b>Note: This is an optional operation.</b> Implementations may throw
     * {@link UnsupportedOperationException} if they do not support explicitly
     * removing an object.
     * @param name the name of the object to remove
     * @return the removed object, or {@code null} if no object was present
     * @throws IllegalStateException if the underlying scope is not currently active
     * @see #registerDestructionCallback
     */
    @Nullable
    Object remove(String name);

    /**
     * Register a callback to be executed on destruction of the specified
     * object in the scope (or at destruction of the entire scope, if the
     * scope does not destroy individual objects but rather only terminates
     * in its entirety).
     * <p><b>Note: This is an optional operation.</b> This method will only
     * be called for scoped beans with actual destruction configuration
     * (DisposableBean, destroy-method, DestructionAwareBeanPostProcessor).
     * Implementations should do their best to execute a given callback
     * at the appropriate time. If such a callback is not supported by the
     * underlying runtime environment at all, the callback <i>must be
     * ignored and a corresponding warning should be logged</i>.
     * <p>Note that 'destruction' refers to automatic destruction of
     * the object as part of the scope's own lifecycle, not to the individual
     * scoped object having been explicitly removed by the application.
     * If a scoped object gets removed via this facade's {@link #remove(String)}
     * method, any registered destruction callback should be removed as well,
     * assuming that the removed object will be reused or manually destroyed.
     * @param name the name of the object to execute the destruction callback for
     * @param callback the destruction callback to be executed.
     * Note that the passed-in Runnable will never throw an exception,
     * so it can safely be executed without an enclosing try-catch block.
     * Furthermore, the Runnable will usually be serializable, provided
     * that its target object is serializable as well.
     * @throws IllegalStateException if the underlying scope is not currently active
     * @see org.springframework.beans.factory.DisposableBean
     * @see org.springframework.beans.factory.support.AbstractBeanDefinition#getDestroyMethodName()
     * @see DestructionAwareBeanPostProcessor
     */
    void registerDestructionCallback(String name, Runnable callback);

    /**
     * Resolve the contextual object for the given key, if any.
     * E.g. the HttpServletRequest object for key "request".
     * @param key the contextual key
     * @return the corresponding object, or {@code null} if none found
     * @throws IllegalStateException if the underlying scope is not currently active
     */
    @Nullable
    Object resolveContextualObject(String key);

    /**
     * Return the <em>conversation ID</em> for the current underlying scope, if any.
     * <p>The exact meaning of the conversation ID depends on the underlying
     * storage mechanism. In the case of session-scoped objects, the
     * conversation ID would typically be equal to (or derived from) the
     * {@link javax.servlet.http.HttpSession#getId() session ID}; in the
     * case of a custom conversation that sits within the overall session,
     * the specific ID for the current conversation would be appropriate.
     * <p><b>Note: This is an optional operation.</b> It is perfectly valid to
     * return {@code null} in an implementation of this method if the
     * underlying storage mechanism has no obvious candidate for such an ID.
     * @return the conversation ID, or {@code null} if there is no
     * conversation ID for the current scope
     * @throws IllegalStateException if the underlying scope is not currently active
     */
    @Nullable
    String getConversationId();

}
在Scope接口中有四种方法:
-
Scope#get方法从基础作用域返回对象:Object get(String name, ObjectFactory<?> objectFactory)例如,会话作用域实现返回会话作用域的
bean,如果不存在则会将bean绑定session后(以供将来引用)返回一个bean的新实例。 -
Scope#remove方法从基础作用域中删除对象:Object remove(String name)例如,会话作用域实现从底层会话中删除会话作用域的
bean并且返回该对象,如果没有找到指定名称的bean实例则返回null。 -
Scope#registerDestructionCallback方法注册了一个回调,当此作用域对象被销毁时会调用此方法(回调):void registerDestructionCallback(String name, Runnable destructionCallback) -
Scope#getConversationId方法获取基础作用域的对话标识符:String getConversationId()这个标识符对于每个作用域都是不同的。对于会话作用域的实现,此标识符可以是会话标识符。
在实现自定义Scope实现后,我们需要通过ConfigurableBeanFactory#registerScope方法向IoC容器注册新的Scope作用域。
void registerScope(String scopeName, Scope scope);
其中,registerScope方法的第一个参数是与作用域关联的唯一名称,例如singleton、prototype等;registerScope方法的第二个参数是向IoC容器注册和使用的自定义Scope实例。
为了便于理解,下面我们编写了一个自定义Scope实现,并向IoC容器完成注册。
Scope threadScope = new SimpleThreadScope();
beanFactory.registerScope("thread", threadScope);
这样我们就可以创建遵守自定义Scope范围规则的bean定义了:
<bean id="..." class="..." scope="thread">
或
@Scope(scopeName="thread")
@Component
public class SimpleBean {
}
更多详情可阅读以下资料:
Bean的后置处理器
BeanFactoryPostProcessor
BeanFactoryPostProcessor是BeanFactory的后置处理器。在BeanFactory实例化后,IoC容器会在BeanFactoryPostProcessor中(如有)读取Metadata配置,并在实例化任何bean(除了BeanFactoryPostProcessor)之前提供入口让其可对Metadata配置进行修改。简单来说,BeanFactoryPostProcessor即是可在容器实例化任何bean(除了BeanFactoryPostProcessor)前对读取的Metadata配置进行修改。另外,如果存在多个BeanFactoryPostProcessor进行处理时,我们可以通过继承接口Ordered来指定其执行的顺序。
BeanFactoryPostProcessor的作用域是容器级的,即BeanFactoryPostProcessor仅仅在当前容器有效。- 在
BeanFactoryPostProcessor中与bean实例一起工作从技术上讲是可行的(例如,通过使用BeanFactory.getBean()),但是这样做会导致过早实例化而违背了标准容器的生命周期,从而可能产生一些负面的影响,比如绕过了bean后处理器BeanPostProcessor的处理。BeanFactoryPostProcessor的延迟初始化标记会被忽略,因为如果没有其他bean引用BeanFactoryPostProcessor的情况下该后处理器将根本不会被实例化,这并不是预期的结果(对于下文提及的BeanPostProcessors同样如此)。
/**
 * Factory hook that allows for custom modification of an application context's
 * bean definitions, adapting the bean property values of the context's underlying
 * bean factory.
 *
 * <p>Useful for custom config files targeted at system administrators that
 * override bean properties configured in the application context. See
 * {@link PropertyResourceConfigurer} and its concrete implementations for
 * out-of-the-box solutions that address such configuration needs.
 *
 * <p>A {@code BeanFactoryPostProcessor} may interact with and modify bean
 * definitions, but never bean instances. Doing so may cause premature bean
 * instantiation, violating the container and causing unintended side-effects.
 * If bean instance interaction is required, consider implementing
 * {@link BeanPostProcessor} instead.
 *
 * <h3>Registration</h3>
 * <p>An {@code ApplicationContext} auto-detects {@code BeanFactoryPostProcessor}
 * beans in its bean definitions and applies them before any other beans get created.
 * A {@code BeanFactoryPostProcessor} may also be registered programmatically
 * with a {@code ConfigurableApplicationContext}.
 *
 * <h3>Ordering</h3>
 * <p>{@code BeanFactoryPostProcessor} beans that are autodetected in an
 * {@code ApplicationContext} will be ordered according to
 * {@link org.springframework.core.PriorityOrdered} and
 * {@link org.springframework.core.Ordered} semantics. In contrast,
 * {@code BeanFactoryPostProcessor} beans that are registered programmatically
 * with a {@code ConfigurableApplicationContext} will be applied in the order of
 * registration; any ordering semantics expressed through implementing the
 * {@code PriorityOrdered} or {@code Ordered} interface will be ignored for
 * programmatically registered post-processors. Furthermore, the
 * {@link org.springframework.core.annotation.Order @Order} annotation is not
 * taken into account for {@code BeanFactoryPostProcessor} beans.
 *
 * @author Juergen Hoeller
 * @author Sam Brannen
 * @since 06.07.2003
 * @see BeanPostProcessor
 * @see PropertyResourceConfigurer
 */
@FunctionalInterface
public interface BeanFactoryPostProcessor {

    /**
     * Modify the application context's internal bean factory after its standard
     * initialization. All bean definitions will have been loaded, but no beans
     * will have been instantiated yet. This allows for overriding or adding
     * properties even to eager-initializing beans.
     * @param beanFactory the bean factory used by the application context
     * @throws org.springframework.beans.BeansException in case of errors
     */
    void postProcessBeanFactory(ConfigurableListableBeanFactory beanFactory) throws BeansException;

}
对于BeanFactoryPostProcessor的使用,我们可以像其他bean一样去部署。特别地,如果其声明在ApplicationContext中时,ApplicationContext会在适当的时候将其运行使得可以改变定义在容器内的Metadata配置(如有)。
更多详情请阅读:
BeanPostProcessor
BeanPostProcessor接口定义了两个接口方法让我们可以实现它来提供自定义实例化逻辑、依赖关系解析逻辑等(可覆盖容器的默认行为)。当我们配置了多个BeanPostProcessor实例时,可以通过实现Ordered接口并设置其中的order属性来控制每个BeanPostProcessor实例的执行顺序。
BeanPostProcessor的作用域是容器级的,即BeanPostProcessor仅仅在当前容器有效。也就是说,如果您在一个容器中定义BeanPostProcessor,它只会对该容器中的bean进行后置处理post-process,而不会对另一个容器中的bean进行后置处理post-process。
/**
 * Factory hook that allows for custom modification of new bean instances —
 * for example, checking for marker interfaces or wrapping beans with proxies.
 *
 * <p>Typically, post-processors that populate beans via marker interfaces
 * or the like will implement {@link #postProcessBeforeInitialization},
 * while post-processors that wrap beans with proxies will normally
 * implement {@link #postProcessAfterInitialization}.
 *
 * <h3>Registration</h3>
 * <p>An {@code ApplicationContext} can autodetect {@code BeanPostProcessor} beans
 * in its bean definitions and apply those post-processors to any beans subsequently
 * created. A plain {@code BeanFactory} allows for programmatic registration of
 * post-processors, applying them to all beans created through the bean factory.
 *
 * <h3>Ordering</h3>
 * <p>{@code BeanPostProcessor} beans that are autodetected in an
 * {@code ApplicationContext} will be ordered according to
 * {@link org.springframework.core.PriorityOrdered} and
 * {@link org.springframework.core.Ordered} semantics. In contrast,
 * {@code BeanPostProcessor} beans that are registered programmatically with a
 * {@code BeanFactory} will be applied in the order of registration; any ordering
 * semantics expressed through implementing the
 * {@code PriorityOrdered} or {@code Ordered} interface will be ignored for
 * programmatically registered post-processors. Furthermore, the
 * {@link org.springframework.core.annotation.Order @Order} annotation is not
 * taken into account for {@code BeanPostProcessor} beans.
 *
 * @author Juergen Hoeller
 * @author Sam Brannen
 * @since 10.10.2003
 * @see InstantiationAwareBeanPostProcessor
 * @see DestructionAwareBeanPostProcessor
 * @see ConfigurableBeanFactory#addBeanPostProcessor
 * @see BeanFactoryPostProcessor
 */
public interface BeanPostProcessor {

    /**
     * Apply this {@code BeanPostProcessor} to the given new bean instance <i>before</i> any bean
     * initialization callbacks (like InitializingBean's {@code afterPropertiesSet}
     * or a custom init-method). The bean will already be populated with property values.
     * The returned bean instance may be a wrapper around the original.
     * <p>The default implementation returns the given {@code bean} as-is.
     * @param bean the new bean instance
     * @param beanName the name of the bean
     * @return the bean instance to use, either the original or a wrapped one;
     * if {@code null}, no subsequent BeanPostProcessors will be invoked
     * @throws org.springframework.beans.BeansException in case of errors
     * @see org.springframework.beans.factory.InitializingBean#afterPropertiesSet
     */
    @Nullable
    default Object postProcessBeforeInitialization(Object bean, String beanName) throws BeansException {
        return bean;
    }

    /**
     * Apply this {@code BeanPostProcessor} to the given new bean instance <i>after</i> any bean
     * initialization callbacks (like InitializingBean's {@code afterPropertiesSet}
     * or a custom init-method). The bean will already be populated with property values.
     * The returned bean instance may be a wrapper around the original.
     * <p>In case of a FactoryBean, this callback will be invoked for both the FactoryBean
     * instance and the objects created by the FactoryBean (as of Spring 2.0). The
     * post-processor can decide whether to apply to either the FactoryBean or created
     * objects or both through corresponding {@code bean instanceof FactoryBean} checks.
     * <p>This callback will also be invoked after a short-circuiting triggered by a
     * {@link InstantiationAwareBeanPostProcessor#postProcessBeforeInstantiation} method,
     * in contrast to all other {@code BeanPostProcessor} callbacks.
     * <p>The default implementation returns the given {@code bean} as-is.
     * @param bean the new bean instance
     * @param beanName the name of the bean
     * @return the bean instance to use, either the original or a wrapped one;
     * if {@code null}, no subsequent BeanPostProcessors will be invoked
     * @throws org.springframework.beans.BeansException in case of errors
     * @see org.springframework.beans.factory.InitializingBean#afterPropertiesSet
     * @see org.springframework.beans.factory.FactoryBean
     */
    @Nullable
    default Object postProcessAfterInitialization(Object bean, String beanName) throws BeansException {
        return bean;
    }

}
在IoC容器启动时,它会自动检测在Metadata声明的BeanPostProcessor(继承了BeanPostProcessor的bean),然后将它们(所有)及其直接引用的bean进行实例化并注册到容器中。后续容器在实例化其它bean时会有序地调用BeanPostProcessor实例对bean实例进行前置处理postProcessBeforeInitialization()和后置处理postProcessAfterInitialization(),前者会在bean实例在初始化前(在容器调用InitializingBean.afterPropertiesSet()或init方法前)对其进行操作或修改;而后者则会在bean实例初始化后对其进行操作或修改。
实际上,在BeanPostProcessor中我们可以对bean实例执行任何操作,例如对bean实例封装一层代理。我们经常使用Spring AOP的一部分基础类就是通过BeanPostProcessor对bean实例封装动态代理实现的,不过需要注意的是对于这些bean实例(无论是BeanPostProcessor实例还是它直接引用的bean实例)都是无法使用Spring AOP进行处理的,即没有切面aspect可以织入它们。若存在这样的情况(将需要织入BeanPostProcessor的bean注入到BeanPostProcessor)将会看到如下日志信息:
Bean someBean is not eligible for getting processed by all BeanPostProcessor interfaces (for example: not eligible for auto-proxying).
需要注意,如果我们是通过容器自动检测的方式对
BeanPostProcessor进行注册和实例化(推荐),则必须将其声明类型限定为BeanPostProcessor(含其实现类),不然容器将不能在创建其它bean之前通过类型自动检查到它,从而导致部分bean在实例化时无法被其所处理(BeanPostProcessor需要比较早的进行初始化以至于可以在其他bean实例化时对它们进行处理)。而如果我们想通过程序方式注册和实例化BeanPostProcessor,也可以使用Spring提供的ConfigurableBeanFactory#addBeanPostProcessor方法来完成,不过需要注意的是通过程序的方式注册BeanPostProcessor实例将不会遵循Ordered接口的语意,其执行顺序将取决于其注册顺序。另外,相比于自动注册,通过程序方式注册的BeanPostProcessor实例将在自动注册的BeanPostProcessor之前执行。更多详情请阅读:
Bean的方法注入
当协作bean之间的生命周期有所不同时,通过简单的依赖注入就可能会出现问题。如果单例bean A需要使用非单例(prototype)bean B,容器是无法在每次需要bean A时都为bean A提供新的bean B实例,因为容器只创建单例bean A一次,所以只有一次设置属性的机会。
一个解决方案是放弃控制反转。我们可以使用ApplicationContext在每次bean A需要时调用ApplicationContext#getBean来请求容器获取Bean B。
public class CommandManager implements ApplicationContextAware {

    private ApplicationContext applicationContext;

    public Object process(Map commandState) {
        // grab a new instance of the appropriate Command
        Command command = createCommand();
        // set the state on the (hopefully brand new) Command instance
        command.setState(commandState);
        return command.execute();
    }

    protected Command createCommand() {
        // notice the Spring API dependency!
        return this.applicationContext.getBean("command", Command.class);
    }

    public void setApplicationContext(ApplicationContext applicationContext) throws BeansException {
        this.applicationContext = applicationContext;
    }
}
但是一般不推荐使用上述方式,因为这需要业务代码与Spring框架耦合在一起。因此,Spring提供了另一种高级功能Method Injection,让我们可以干净利落地处理此情况。
Lookup Method Injection
Lookup Method Injection是一种可覆盖bean实例方法的能力。Lookup Method Injection实现Method Injection的方式主要是通过CGLIB库中的字节码来动态生成重写了指定方法的子类,并且在所覆盖方法中返回所指定的(相同容器中的)bean实例。
需要注意,因为
Lookup Method Injection是通过CGLIB动态代理来实现的,所以需要被覆盖的bean和需要被覆盖的方法都不能是final。另外,Lookup Method不适用于工厂方法,特别是不适用于Configuration类中的@Bean方法。因为在这种情况下容器并不负责创建实例,所以无法动态创建运行时生成的即时子类。
这里以CommandManager类为例,我们将通过Lookup Method Injection的方式覆盖createCommand()方法来获取bean实例。
public abstract class CommandManager {

   public Object process(Object commandState) {
       // grab a new instance of the appropriate Command interface
       Command command = createCommand();
       // set the state on the (hopefully brand new) Command instance
       command.setState(commandState);
       return command.execute();
   }

   // okay... but where is the implementation of this method?
   protected abstract Command createCommand();
}
对于被注入的方法(即,被覆盖的方法)签名格式如下所示:
<public|protected> [abstract] <return-type> theMethodName(no-arguments);需要注意,如果被注入的方法是
abstract,那么在动态生成的子类中将会实现它;而如果被注入的方法是非abstract,那么在动态生成的子类中将会覆盖原始类中的方法。
其中,对于Lookup Method Injection我们同样可以以XML的方式和以Java的方式进行配置,下面将分别对其进行阐述:
-
通过
XML的方式在
XML方式的配置中,我们通过lookup-method标签指定需要注入的方法createCommand(例子),这样每次调用createCommand方法时都会返回新的myCommand实例(bean实例)。需要注意,这里每次都返回新实例是因为作用域是prototype;而如果作用域是singleton,则每次返回的是相同的实例。<!-- a stateful bean deployed as a prototype (non-singleton) --> <bean id="myCommand" class="fiona.apple.AsyncCommand" scope="prototype"> <!-- inject dependencies here as required --> </bean> <!-- commandProcessor uses statefulCommandHelper --> <bean id="commandManager" class="fiona.apple.CommandManager"> <lookup-method name="createCommand" bean="myCommand"/> </bean>如果在
XML基础上结合Java注解的方式进行,那么我们可以使用@Lookup注解来代替lookup-method标签的声明(在需要注入的方法上标注@Lookup注解)。<!-- a stateful bean deployed as a prototype (non-singleton) --> <bean id="myCommand" class="fiona.apple.AsyncCommand" scope="prototype"> <!-- inject dependencies here as required --> </bean> <!-- commandProcessor uses statefulCommandHelper --> <bean id="commandManager" class="fiona.apple.CommandManager"></bean>public abstract class CommandManager { public Object process(Object commandState) { Command command = createCommand(); command.setState(commandState); return command.execute(); } @Lookup("myCommand") protected abstract Command createCommand(); }上述我们可以看到
@Lookup注解的属性上标注了被注入的bean名称来指示容器执行对该bean的查询和注入。而为了更简化地使用,我们也可以直接不加属性的标注@Lookup注解,这样容器就会通过类型匹配的方式获取和注入目标bean(解析方法返回类型)。<!-- a stateful bean deployed as a prototype (non-singleton) --> <bean id="myCommand" class="fiona.apple.AsyncCommand" scope="prototype"> <!-- inject dependencies here as required --> </bean> <!-- commandProcessor uses statefulCommandHelper --> <bean id="commandManager" class="fiona.apple.CommandManager"></bean>public abstract class CommandManager { public Object process(Object commandState) { Command command = createCommand(); command.setState(commandState); return command.execute(); } @Lookup protected abstract Command createCommand(); } -
通过
Java的方式在
Java的配置中,我们可以直接在@Component类中通过@Lookup注解来指定需要注入的方法,其中原理与上述一致。@Configuration public class MyConfig { @Bean @Scope("prototype") public AsyncCommand asyncCommand() { AsyncCommand command = new AsyncCommand(); // inject dependencies here as required return command; } }@Component public abstract class CommandManager { public Object process(Object commandState) { Command command = createCommand(); command.setState(commandState); return command.execute(); } @Lookup protected abstract Command createCommand(); }当然,更好的做法是提供非
abstract类和非abstract方法,让其通过覆盖的方法进行注入。@Configuration public class MyConfig { @Bean @Scope("prototype") public AsyncCommand asyncCommand() { AsyncCommand command = new AsyncCommand(); // inject dependencies here as required return command; } }@Component public class CommandManager { public Object process(Object commandState) { Command command = createCommand(); command.setState(commandState); return command.execute(); } @Lookup public Command createCommand(){ return null; } }除此之外,对于
@Bean方法我们也可以通过内部类的方式来实现相同的功能。@Configuration public class MyConfig { @Bean @Scope("prototype") public AsyncCommand asyncCommand() { AsyncCommand command = new AsyncCommand(); // inject dependencies here as required return command; } @Bean public CommandManager commandManager() { // return new anonymous implementation of CommandManager with createCommand() // overridden to return a new prototype Command object return new CommandManager() { protected Command createCommand() { return asyncCommand(); } } } }
更多详情可阅读:
Arbitrary Method Replacement
除了通过Lookup Method Injection实现方法注入外,我门还可以使用一种以替换的方式实现的方法注入(不太有用),即将bean中的任意方法替换为另一个方法实现。在基于XML的配置中,我们可以使用replace-method标签来指定将现有方法替换为另一个方法。
这里以MyValueCalculator类为例,我们将通过Arbitrary Method Replacement的方式替换computeValue方法。
public class MyValueCalculator {

    public String computeValue(String input) {
        // some real code...
    }

    // some other methods...
}
首先,我们需要实现org.springframework.beans.factory.support.MethodReplacer接口提供新的方法定义。
/**
 * meant to be used to override the existing computeValue(String)
 * implementation in MyValueCalculator
 */
public class ReplacementComputeValue implements MethodReplacer {

    public Object reimplement(Object o, Method m, Object[] args) throws Throwable {
        // get the input value, work with it, and return a computed result
        String input = (String) args[0];
        ...
        return ...;
    }
}
然后,在原有的bean定义中添加<replaced-method/>元素,指定MethodReplacer实例(bean实例)并在其中使用一个或多个<arg-type/>标签来指示被替换方法的方法签名(仅当存在多个方法重载时才需要指定方法签名)。
<bean id="myValueCalculator" class="x.y.z.MyValueCalculator">
    <!-- arbitrary method replacement -->
    <replaced-method name="computeValue" replacer="replacementComputeValue">
        <arg-type>String</arg-type>
    </replaced-method>
</bean>

<bean id="replacementComputeValue" class="a.b.c.ReplacementComputeValue"/>
这样,我们就完成了Arbitrary Method Replacement方式的方法注入了。
更多详情可阅读:
More
Environment
Environment(接口)表示当前应用环境的抽象,在Spring定义中它包含两大模块:Profiles和Properties。
Profiles相当于逻辑bean定义分组的抽象(bean在定义时可被分配一个profile(通过XML或者Java注解)),只有profile被激活分组才能将它所包含的bean定义注册到容器中。我们可以使用(与Profiles所关联的)Environment决定默认的profile和激活的profile。Properties相当于应用配置属性的抽象,其中属性来源可源于:properties files、JVM system properties、system environment variables、JNDI、servlet context parameters、ad-hoc Properties objects、Map objects等。我们可以使用Environment获取、解析和配置与其所关联的Properties属性。
Profiles
通过Profiles机制我们可以在不同环境Environment中将不同的bean注册到容器,例如:
- 对开发、测试和生产环境分别使用不同的数据源进行工作。
- 在生产环境注册监控设施,而在开发和测试环境下忽略监控设施的注册。
在使用上,我们仍然可以使用XML和Java注解的方式进行配置,不过由于篇幅的原因这里就不对XML的方式展示了,有兴趣的读者可以查阅相关资料。那么,下面我们将围绕着Java注解的方式展示说明。
在基于Java注解的配置方式中,我们可以将@Profile注解标注在类上或者@Bean方法上,使得它们只有在对应的profile被激活时才注册到容器中。
-
将
@Profile注解标注在配置类如果将
@Profile注解标注在@Configuration类,那么它所包含的所有@Bean方法和通过@Import引入的类都只能在对应的profile被激活时才能注册到容器中。@Configuration @Profile("development") public class DevConfig { @Bean public DataSource dataSource() { return ...; } } @Configuration @Profile("production") public class ProConfig { @Bean public DataSource dataSource() throws Exception { return ...; } } -
将
@Profile注解标注在@Bean方法@Configuration public class AppConfig { @Bean("dataSource") @Profile("development") public DataSource devDataSource() { return ...; } @Bean("dataSource") @Profile("production") public DataSource proDataSource() throws Exception { return ...; } }
除了直接使用
@Profile注解外,我们还能通过将@Profile变成元注解来衍生出各种自定义的组合注解使其生效,例如直接使用如下的@Production来代替@Profile("production"):@Target(ElementType.TYPE) @Retention(RetentionPolicy.RUNTIME) @Profile("production") public @interface Production { }
其中所设置的profile值,我们可以将它设置为简单profile名字(例如development或者production),也可以将它设置为profile表达式。其中,通过profile表达式我们就可以设置更多复杂的逻辑profile去表达我们想要指定的注册范围,具体如下所示:
!:profile值的逻辑“否”(NOT)&:profile值的逻辑“与”(AND)|:profile值的逻辑“或”(OR)
需要注意,我们不能在不使用括号的情况下直接使用混合
&和|,例如production & us-east | eu-central是无效表达式,要将它改成production & (us-east | eu-central)才能成立。
在完成上述对bean的分组后我们就可以向Spring指定我们需要激活的profile了。而对激活profile的指定存在几种不同的方式,最直接方式的就是使用Environment接口(通过ApplicationContext获取)来设置,即:
AnnotationConfigApplicationContext ctx = new AnnotationConfigApplicationContext();
ctx.getEnvironment().setActiveProfiles("development");
ctx.register(SomeConfig.class, StandaloneDataConfig.class, JndiDataConfig.class);
ctx.refresh();
另外,我们还可以通过spring.profiles.active属性来指定需要激活的profile(可以在system environment variables或者JVM system properties等配置中指定),例如:
-Dspring.profiles.active="development"
对于激活
profile的设置完全是可以多选的,例如:
通过
Environment接口设置多个激活profile(用逗号(,)隔开):ctx.getEnvironment().setActiveProfiles("profile1", "profile2");通过
spring.profiles.active属性设置多个激活profile(用逗号(,)隔开):-Dspring.profiles.active="profile1,profile2"
需要注意,如果我们没有设置激活profile,那么可能会由于某些bean的缺失导致Spring在启动时或者在运行时发生错误。对于这种情况,我们也可以这是默认的profile,即如果没有显式设置激活profile,那么默认profile组内的bean就会被创建;否则默认profile组内的bean就会被忽略。默认情况下,对于默认profile的值为default,我们也可以使用Environment#setDefaultProfiles方法或者设置spring.profiles.default属性对其进行修改。
@Configuration
@Profile("default")
public class DefaultDataConfig {

    @Bean
    public DataSource dataSource() {
        return ...;
    }
}
更多详情可阅读:
Properties
在Properties模型中会将不同的属性来源(PropertySource)组合为层级结构(可配置的),但在访问时我们不需要管每个配置在具体哪个层级,而是使用Spring的Environment接口(抽象)来方法,即:
ApplicationContext ctx = new GenericApplicationContext();
Environment env = ctx.getEnvironment();
boolean containsMyProperty = env.containsProperty("my-property");
System.out.println("Does my environment contain the 'my-property' property? " + containsMyProperty);
在实现上,Spring会将每个属性来源构造为PropertySource,也就是说在查询属性时实际上就是使用Environment是在一系列PropertySource中寻找出对应的属性。例如,Spring中的StandardEnvironment就包含了两个PropertySource,其一为JVM system properties属性集合(可通过System.getProperties()获取);其二为system environment variables属性集合(可通过System.getenv()获取)。如果在JVM system properties或者在system environment variables中包含my-property属性,那么env.containsProperty("my-property")的调用就会返回true。
对于
PropertySource,我们可以将它看作是一个属性来源中的键值对(集合)。
需要注意,实际上Environment是按照层级从上往下查询的,如果在上层PropertySource中查询到结果则会立刻返回(顶层优先法则),而不会继续往下查询并执行类似于合并的操作(也可以看作是顶层的属性将底层的覆盖了)。
默认情况下,
JVM system properties属性优先级高于system environment variables属性。对于常见的
StandardServletEnvironment,它完整的层级优先级如下所示(顶层是最高优先级):
- ServletConfig parameters (if applicable — for example, in case of a DispatcherServlet context)
- ServletContext parameters (web.xml context-param entries)
- JNDI environment variables (java:comp/env/ entries)
- JVM system properties (-D command-line arguments)
- JVM system environment (operating system environment variables)
除此之外,这种层级结构也是可配置的。比如,如果我们想将自定义的属性来源加入到Environment的查询中(类似于配置中心),那么我们只需将自定义的PropertySource实例加入到当前Environment的PropertySources集合即可。
ConfigurableApplicationContext ctx = new GenericApplicationContext();
// The MutablePropertySources API exposes a number of methods that allow for precise manipulation of the set of property sources.
MutablePropertySources sources = ctx.getEnvironment().getPropertySources();
sources.addFirst(new MyPropertySource());
在上述代码中,MyPropertySource属性来源就已经被设置为Environment查询的最高优先级。
或者我们也可以采用一种更简单的方式,即使用@PropertySource注解将PropertySource添加到Spring的Environment中。
/**
 * Given a file called app.properties that contains the key-value pair testbean.name=myTestBean
 */
@Configuration
@PropertySource("classpath:/com/myco/app.properties")
public class AppConfig {

    @Autowired
    Environment env;

    @Bean
    public TestBean testBean() {
        TestBean testBean = new TestBean();
        testBean.setName(env.getProperty("testbean.name"));
        return testBean;
    }
}
其中,对于@PropertySource注解中的资源路径中的占位符${…},Spring也可以使用已经注册到Environment中的属性来源(PropertySource)来进行解析。
@Configuration
@PropertySource("classpath:/com/${my.placeholder:default/path}/app.properties")
public class AppConfig {

    @Autowired
    Environment env;

    @Bean
    public TestBean testBean() {
        TestBean testBean = new TestBean();
        testBean.setName(env.getProperty("testbean.name"));
        return testBean;
    }
}
上述配置中,如果my.placeholder属性已经随着优先级更高的属性来源(PropertySource)被注册到Environment中,它将会得到解析;否则my.placeholder属性会使用默认值default/path(如果不存在默认值,则会抛出IllegalArgumentException异常)。
更多详情可阅读:
源码解析
Bean的创建
在Spring中,对Bean的实例化是在使用BeanFactory#getBean方法获取bean时完成的。在实现上,BeanFactory会委托于AbstractBeanFactory#doGetBean进一步处理:
public abstract class AbstractBeanFactory extends FactoryBeanRegistrySupport implements ConfigurableBeanFactory {
    /**
     * Return an instance, which may be shared or independent, of the specified bean.
     * @param name the name of the bean to retrieve
     * @param requiredType the required type of the bean to retrieve
     * @param args arguments to use when creating a bean instance using explicit arguments
     * (only applied when creating a new instance as opposed to retrieving an existing one)
     * @param typeCheckOnly whether the instance is obtained for a type check,
     * not for actual use
     * @return an instance of the bean
     */
    protected <T> T doGetBean(
            String name, @Nullable Class<T> requiredType, @Nullable Object[] args, boolean typeCheckOnly)
            throws BeansException {

        // transformedBeanName方法的转换主要应用于FactoryBean,
        // 在实现上它会去除name中所有的&前缀并赋值给beanName
        String beanName = transformedBeanName(name);
        Object beanInstance;

        // Eagerly check singleton cache for manually registered singletons.
        Object sharedInstance = getSingleton(beanName);
        if (sharedInstance != null && args == null) {
            // ...
            beanInstance = getObjectForBeanInstance(sharedInstance, name, beanName, null);
        }

        else {
            // Check if bean exists circular reference.
            // ...

            // Check if bean definition exists in this factory.
            // ...

            // ...

            // 经过此步骤的BeanDefinition可被称之为MergedBeanDefinition
            // 将给定的bean转化为RootBeanDefinition,当bean定义存在继承关系则会合并它的parent并返回RootBeanDefinition
            RootBeanDefinition mbd = getMergedLocalBeanDefinition(beanName); // getMergedBeanDefinition方法用于处理bean的继承特性,

            // 检查bean定义是否抽象
            // ...

            // Guarantee initialization of beans that the current bean depends on.
            String[] dependsOn = mbd.getDependsOn();
            // 假设dependsOn不为空
            for (String dep : dependsOn) {
                // 检查是否有循环依赖
                ...

                // 实例化依赖
                getBean(dep);
            }

            // Create bean instance.
            if (mbd.isSingleton()) {
                sharedInstance = getSingleton(beanName, () -> {
                    // 假设没有异常
                    return createBean(beanName, mbd, args);
                });
                beanInstance = getObjectForBeanInstance(sharedInstance, name, beanName, mbd);
            }

            else if (mbd.isPrototype()) {
                // It's a prototype -> create a new instance.
                Object prototypeInstance = createBean(beanName, mbd, args);
                beanInstance = getObjectForBeanInstance(prototypeInstance, name, beanName, mbd);
            }

            else {
                // 假设scopeName是有效的
                String scopeName = mbd.getScope();
                // 假设scope存在
                Scope scope = this.scopes.get(scopeName);

                Object scopedInstance = scope.get(beanName, () -> {
                    // 假设没有异常
                    return createBean(beanName, mbd, args);
                });
                beanInstance = getObjectForBeanInstance(scopedInstance, name, beanName, mbd);
            }

        }

        return adaptBeanInstance(name, beanInstance, requiredType);
    }
}
在AbstractBeanFactory#doGetBean中,首先会在单例作用域缓存中检测是否存在请求的bean实例,如果存在会直接从缓存中获取;否则会按照下列步骤对其进行创建:
- 获取/创建
MergedBeanDefinition - 获取/创建
depends-on指定的bean - 获取/创建
MergedBeanDefinition对应的bean - 获取/创建
bean中真正的实例对象 - 适配/转换
bean为目标的实例类型
MergedBeanDefinition(逻辑概念),表示的是一种被合并出来的BeanDefinition,其主要作用是处理存在继承关系的bean定义(BeanDefinition)。在AbstractBeanFactory#doGetBean中,Spring会直接通过getMergedLocalBeanDefinition方法来获取最终已处理完继承逻辑的BeanDefinition(若有继承关系,即MergedBeanDefinition);在实现上,getMergedLocalBeanDefinition方法会根据原始的BeanDefinition及其父BeanDefinition(如有)生成对应的副本,并最终返回RootBeanDefinition(也正因如此,Spring将这种合并出来的BeanDefinition称为MergedBeanDefinition(逻辑概念))。
我们可以看到无论是单例作用域还是其它类型的作用域(含prototype作用域)它们都会在作用域缓存中获取实例失败后使用AbstractBeanFactory#createBean方法对bean进行实例化。其中,AbstractBeanFactory#createBean方法为抽象方法,它的默认实现为AbstractAutowireCapableBeanFactory#createBean。
public abstract class AbstractBeanFactory extends FactoryBeanRegistrySupport implements ConfigurableBeanFactory {

    /**
     * Create a bean instance for the given merged bean definition (and arguments).
     * The bean definition will already have been merged with the parent definition
     * in case of a child definition.
     * <p>All bean retrieval methods delegate to this method for actual bean creation.
     * @param beanName the name of the bean
     * @param mbd the merged bean definition for the bean
     * @param args explicit arguments to use for constructor or factory method invocation
     * @return a new instance of the bean
     * @throws BeanCreationException if the bean could not be created
     */
    protected abstract Object createBean(String beanName, RootBeanDefinition mbd, @Nullable Object[] args)
            throws BeanCreationException;

}

/**
 * ...
 *
 * <p>Provides bean creation (with constructor resolution), property population,
 * wiring (including autowiring), and initialization. Handles runtime bean
 * references, resolves managed collections, calls initialization methods, etc.
 * Supports autowiring constructors, properties by name, and properties by type.
 *
 * ...
 */
public abstract class AbstractAutowireCapableBeanFactory extends AbstractBeanFactory
        implements AutowireCapableBeanFactory {

    @Override
    protected Object createBean(String beanName, RootBeanDefinition mbd, @Nullable Object[] args)
            throws BeanCreationException {

        RootBeanDefinition mbdToUse = mbd;

        //...

        // Give BeanPostProcessors a chance to return a proxy instead of the target bean instance.
        Object bean = resolveBeforeInstantiation(beanName, mbdToUse);
        if (bean != null) {
            return bean;
        }

        Object beanInstance = doCreateBean(beanName, mbdToUse, args);
        return beanInstance;
    }

    protected Object doCreateBean(String beanName, RootBeanDefinition mbd, @Nullable Object[] args)
            throws BeanCreationException {

        // Instantiate the bean.
        BeanWrapper instanceWrapper = createBeanInstance(beanName, mbd, args);

        // ...

        Object bean = instanceWrapper.getWrappedInstance();
        Class<?> beanType = instanceWrapper.getWrappedClass();
        if (beanType != NullBean.class) {
            mbd.resolvedTargetType = beanType;
        }

        // Allow post-processors to modify the merged bean definition.
        applyMergedBeanDefinitionPostProcessors(mbd, beanType, beanName);


        // To resolve circular references
        // ...

        // Initialize the bean instance.
        populateBean(beanName, mbd, instanceWrapper);
        Object exposedObject = initializeBean(beanName, bean, mbd);

        // To resolve circular references
        // ...


        // Register bean as disposable.
        // ...

        return exposedObject;
    }
}
前置知识:
为了更充分的理解
bean的实例化过程,在分析AbstractBeanFactory#createBean方法前,我们先来看一下Spring在bean的实例化过程存在的一些扩展点,具体如下所述:
BeanPostProcessor
BeanPostProcessor的语义中允许我们可以在bean执行初始化(initialization)前后对bean进行前置处理(BeanPostProcessor#postProcessBeforeInitialization)和后置处理(进行前置处理(BeanPostProcessor#postProcessAfterInitialization)。一般情况下(典型),我们可以在前置处理中对bean实例进行属性的填充;而在后置处理中对bean实例进行代理的封装。
InstantiationAwareBeanPostProcessor
InstantiationAwareBeanPostProcessor是BeanPostProcessor的扩展子接口,它在BeanPostProcessor语义的基础上新增了对bean实例化(instantiation)前后的扩展点,即实例化前置处理(InstantiationAwareBeanPostProcessor#postProcessBeforeInstantiation)和实例化后置处理(InstantiationAwareBeanPostProcessor#postProcessProperties),其中实例化的后置处理会发生在显式属性设置(applyPropertyValues)前。一般情况下(典型),我们可以在前置处理中阻止特定bean执行默认的实例化流程,例如对特定bean(比如,延迟初始化的bean)以代理的方式进行创建;而在后置处理中我们可以对bean实例实现额外的注入策略,例如字段注入。除此之外,InstantiationAwareBeanPostProcessor还提供了InstantiationAwareBeanPostProcessor#postProcessBeforeInstantiation扩展点让我们可以控制bean是否能执行字段的自动注入(已通过构造器或者工厂方法完成实例化)。
SmartInstantiationAwareBeanPostProcessor
SmartInstantiationAwareBeanPostProcessor是InstantiationAwareBeanPostProcessor的扩展子接口,它在InstantiationAwareBeanPostProcessor语义的基础上新增了更多可以干预bean的扩展点,具体如下所示:
扩展点 具体作用 predictBeanType预测最终从 postProcessBeforeInstantiation返回的bean类型,可用于判断出某些特定的进行处理。determineCandidateConstructors决定给定 bean可以使用的候选构造器,可用于决定bean在实例化时所使用的构造器。getEarlyBeanReference获取特定 bean早期的访问引用(即在bean实例完全初始化前提前获取),专用于解决循环依赖问题。一般情况下,对于
getEarlyBeanReference方法所返回的实例应该与BeanPostProcessor#postProcessBeforeInitialization和BeanPostProcessor#postProcessAfterInitialization所返回的实例相等(引用)。
DestructionAwareBeanPostProcessor
DestructionAwareBeanPostProcessor是BeanPostProcessor的扩展子接口,它在BeanPostProcessor语义的基础上新增了对bean销毁前的扩展点,即销毁前置处理(DestructionAwareBeanPostProcessor#postProcessBeforeDestruction)。一般情况下(典型),我们可以在前置处理中对bean执行销毁回调,例如上文所提及的DisposableBean#destroy方法和通过其它方式自定义的销毁方法。另外,DestructionAwareBeanPostProcessor还提供了DestructionAwareBeanPostProcessor#requiresDestruction扩展点,通过它我们可以决定给定的bean实例是否执行DestructionAwareBeanPostProcessor的销毁前置处理。
MergedBeanDefinitionPostProcessor
MergedBeanDefinitionPostProcessor是BeanPostProcessor的扩展子接口,它在BeanPostProcessor语义的基础上新增了对合并的bean定义(MergedBeanDefinition)属性设置前的扩展点,即属性设置前置处理(MergedBeanDefinitionPostProcessor#postProcessMergedBeanDefinition)。一般情况下(典型),我们可以通过MergedBeanDefinitionPostProcessor#postProcessMergedBeanDefinition在bean实例的后置处理器前准备一些元数据的缓存;或者在MergedBeanDefinitionPostProcessor#postProcessMergedBeanDefinition方法中执行对bean定义属性的修改。
MergedBeanDefinition概念源自bean继承特性的处理,实际上MergedBeanDefinition只是一个逻辑概念,本质上还是一个RootBeanDefinition,我们可以简单地将它看作是原始bean定义的副本。由于在实例化过程中也涵盖了bean继承特性的处理(在AbstractBeanFactory#doGetBean实现中使用getMergedLocalBeanDefinition方法获取最终RootBeanDefinition时,如果存在bean定义的继承关系则会处理父定义属性的继承),所以在最终用于创建bean实例的BeanDefinition也属于MergedBeanDefinition。综上所述,在结合
Spring提供的(上述提及的)各个扩展点后,最终执行流程如下所示:+------------------------------------------+ | InstantiationAwareBeanPostProcessor | | +----------------------------------+ | | | postProcessBeforeInstantiation | | | +----------------------------------+ | | +--------------------------------------+ | | | MergedBeanDefinitionPostProcessor | | | | +---------------+ | | | | | Instantiation | | | | | +---------------+ | | | | +----------------------------------+ | | | | | postProcessMergedBeanDefinition | | | | | +----------------------------------+ | | | +--------------------------------------+ | | +----------------------------------+ | | | postProcessProperties | | | +----------------------------------+ | +------------------------------------------+ | v +-------+-------+ | populateBean | +-------+-------+ | v +------------------+-------------------+ | BeanPostProcessor | | +----------------------------------+ | | | postProcessBeforeInitialization | | | +----------------------------------+ | | +---------------+ | | |Initialization | | | +---------------+ | | +----------------------------------+ | | | postProcessAfterInitialization | | | +----------------------------------+ | +--------------------------------------+更多关于上述扩展点的详情可阅读以下资料:
对于bean的创建,我们可以将它大致分为bean的实例化和bean的初始化,其中bean的实例化主要包括bean实例创建、bean属性加载和bean属性填充3个部分;而bean的初始化则是执行用户预设的初始化方法。下面我们将分点进行阐述:
除了使用预设的步骤创建
bean实例,我们还可以通过Spring提供的扩展点来自定义bean的创建步骤。具体地,Spring在创建bean实例前会提供了一个前置处理点resolveBeforeInstantiation方法让我们可以实现自定义的bean创建步骤。一般情况下(典型),我们会使用它(前置处理)来阻止特定
bean执行默认的实例化流程。例如,使用代理的方式来创建特定bean(比如,延迟初始化的bean)。/** * Apply before-instantiation post-processors, resolving whether there is a * before-instantiation shortcut for the specified bean. */ @Nullable protected Object resolveBeforeInstantiation(String beanName, RootBeanDefinition mbd) { Object bean = null; // ...优化避免无效遍历 // 假设存在InstantiationAwareBeanPostProcessor扩展点 Class<?> targetType = determineTargetType(beanName, mbd); if (targetType != null) { bean = applyBeanPostProcessorsBeforeInstantiation(targetType, beanName); if (bean != null) { bean = applyBeanPostProcessorsAfterInitialization(bean, beanName); } } return bean; } /** * Apply InstantiationAwareBeanPostProcessors to the specified bean definition * (by class and name), invoking their {@code postProcessBeforeInstantiation} methods. * <p>Any returned object will be used as the bean instead of actually instantiating * the target bean. A {@code null} return value from the post-processor will * result in the target bean being instantiated. */ @Nullable protected Object applyBeanPostProcessorsBeforeInstantiation(Class<?> beanClass, String beanName) { for (InstantiationAwareBeanPostProcessor bp : getBeanPostProcessorCache().instantiationAware) { Object result = bp.postProcessBeforeInstantiation(beanClass, beanName); if (result != null) { return result; } } return null; } @Override public Object applyBeanPostProcessorsAfterInitialization(Object existingBean, String beanName) throws BeansException { Object result = existingBean; for (BeanPostProcessor processor : getBeanPostProcessors()) { Object current = processor.postProcessAfterInitialization(result, beanName); if (current == null) { return result; } result = current; } return result; }在
resolveBeforeInstantiation方法中,Spring会在一系列InstantiationAwareBeanPostProcessors上逐个执行其前置处理方法postProcessBeforeInstantiation,并将首个非空返回值传递到一系列BeanPostProcessor中逐个执行其后置处理方法postProcessAfterInitialization,然后忽略后续的属性填充和初始化流程直接返回当前的处理结果。需要注意,若
InstantiationAwareBeanPostProcessors#postProcessBeforeInstantiation返回非空实例即意味着bean的实例化已经完成,并不会继续执行原有的实例化流程了。也正因如此,在通过InstantiationAwareBeanPostProcessors#postProcessBeforeInstantiation获取到非空实例后会将其传递到一系列的BeanPostProcessor执行初始化后置处理postProcessAfterInitialization。
1. Bean的实例化
1.1. 实例创建
对于bean实例的创建,Spring是通过createBeanInstance方法来实现的。
/**
 * Create a new instance for the specified bean, using an appropriate instantiation strategy:
 * factory method, constructor autowiring, or simple instantiation.
 */
protected BeanWrapper createBeanInstance(String beanName, RootBeanDefinition mbd, @Nullable Object[] args) {
    // Make sure bean class is actually resolved at this point.
    Class<?> beanClass = resolveBeanClass(mbd, beanName);

    // ...

    if (mbd.getFactoryMethodName() != null) {
        return instantiateUsingFactoryMethod(beanName, mbd, args);
    }

    // Shortcut when re-creating the same bean...
    // ...

    // Candidate constructors for autowiring?
    Constructor<?>[] ctors = determineConstructorsFromBeanPostProcessors(beanClass, beanName);
    if (ctors != null || mbd.getResolvedAutowireMode() == AUTOWIRE_CONSTRUCTOR ||
            mbd.hasConstructorArgumentValues() || !ObjectUtils.isEmpty(args)) {
        return autowireConstructor(beanName, mbd, ctors, args);
    }

    // Preferred constructors for default construction?
    ctors = mbd.getPreferredConstructors();
    if (ctors != null) {
        return autowireConstructor(beanName, mbd, ctors, null);
    }

    // No special handling: simply use no-arg constructor.
    return instantiateBean(beanName, mbd);
}

/**
 * Instantiate the bean using a named factory method. The method may be static, if the
 * mbd parameter specifies a class, rather than a factoryBean, or an instance variable
 * on a factory object itself configured using Dependency Injection.
 */
protected BeanWrapper instantiateUsingFactoryMethod(
        String beanName, RootBeanDefinition mbd, @Nullable Object[] explicitArgs) {
    return new ConstructorResolver(this).instantiateUsingFactoryMethod(beanName, mbd, explicitArgs);
}

/**
 * "autowire constructor" (with constructor arguments by type) behavior.
 * Also applied if explicit constructor argument values are specified,
 * matching all remaining arguments with beans from the bean factory.
 * <p>This corresponds to constructor injection: In this mode, a Spring
 * bean factory is able to host components that expect constructor-based
 * dependency resolution.
 */
protected BeanWrapper autowireConstructor(
        String beanName, RootBeanDefinition mbd, @Nullable Constructor<?>[] ctors, @Nullable Object[] explicitArgs) {
    return new ConstructorResolver(this).autowireConstructor(beanName, mbd, ctors, explicitArgs);
}

/**
 * Instantiate the given bean using its default constructor.
 */
protected BeanWrapper instantiateBean(String beanName, RootBeanDefinition mbd) {
    // 假设非方法注入
    Object beanInstance = getInstantiationStrategy().instantiate(mbd, beanName, this);
    BeanWrapper bw = new BeanWrapperImpl(beanInstance);
    initBeanWrapper(bw);
    return bw;
}
在createBeanInstance方法中主要使用了3种(我们熟知的)方法来创建bean实例,分别是:
- 通过指定工厂方法构建
- 通过指定构造器构建构建
- 通过默认构造器构建
其中,最为简单的无疑就是通过默认构造器来构建bean实例了。在实现上,这种方式会从BeanDefinition中获取Class类型,然后通过反射机制来获取它的无参构造器并以此来创建出具体的实例对象。
public class SimpleInstantiationStrategy implements InstantiationStrategy {

    @Override
    public Object instantiate(RootBeanDefinition bd, @Nullable String beanName, BeanFactory owner) {
        // 假设非方法注入
        Constructor<?>  constructorToUse = (Constructor<?>) bd.resolvedConstructorOrFactoryMethod;
        if (constructorToUse == null) {
            // 假设无异常
            final Class<?> clazz = bd.getBeanClass();
            constructorToUse = clazz.getDeclaredConstructor();
            bd.resolvedConstructorOrFactoryMethod = constructorToUse;

        }
        // 通过反射生成实例对象
        return BeanUtils.instantiateClass(constructorToUse);
    }
}
而其他两种更为复杂的方式则会先使用当前BeanFactory实例构造出ConstructorResolver实例:
/**
 * Delegate for resolving constructors and factory methods.
 *
 * <p>Performs constructor resolution through argument matching.
 */
class ConstructorResolver {

    private final AbstractAutowireCapableBeanFactory beanFactory;

    /**
     * Create a new ConstructorResolver for the given factory and instantiation strategy.
     * @param beanFactory the BeanFactory to work with
     */
    public ConstructorResolver(AbstractAutowireCapableBeanFactory beanFactory) {
        this.beanFactory = beanFactory;
    }

}
然后,再通过其中基于工厂方法的ConstructorResolver#instantiateUsingFactoryMethod和基于构造器的ConstructorResolver#autowireConstructor方法来执行bean实例的创建,下面我们来看看它们是如何实现的:
基于构造器创建bean实例
与通过默认构造器构建bean实例类似,在基于指定构造器创建bean实例的ConstructorResolver#autowireConstructor方法中会在选出最终的构造器和构造参数后将它们传入instantiate方法中通过反射机制实现bean实例的创建。
/**
 * Delegate for resolving constructors and factory methods.
 *
 * <p>Performs constructor resolution through argument matching.
 */
class ConstructorResolver {

    private final AbstractAutowireCapableBeanFactory beanFactory;

    /**
     * "autowire constructor" (with constructor arguments by type) behavior.
     * Also applied if explicit constructor argument values are specified,
     * matching all remaining arguments with beans from the bean factory.
     * <p>This corresponds to constructor injection: In this mode, a Spring
     * bean factory is able to host components that expect constructor-based
     * dependency resolution.
     */
    public BeanWrapper autowireConstructor(String beanName, RootBeanDefinition mbd,
            @Nullable Constructor<?>[] chosenCtors, @Nullable Object[] explicitArgs) {

        BeanWrapperImpl bw = new BeanWrapperImpl();
        this.beanFactory.initBeanWrapper(bw);

        // 最终选出的构造器
        Constructor<?> constructorToUse = ...;
        // 最终选出的构造参数
        Object[] argsToUse = ...;

        // ...

        bw.setBeanInstance(instantiate(beanName, mbd, constructorToUse, argsToUse));
        return bw;
    }

    private Object instantiate(
            String beanName, RootBeanDefinition mbd, Constructor<?> constructorToUse, Object[] argsToUse) {
        // 假设无异常
        InstantiationStrategy strategy = this.beanFactory.getInstantiationStrategy();
        return strategy.instantiate(mbd, beanName, this.beanFactory, constructorToUse, argsToUse);
    }
}

public class SimpleInstantiationStrategy implements InstantiationStrategy {
    @Override
    public Object instantiate(RootBeanDefinition bd, @Nullable String beanName, BeanFactory owner,
            final Constructor<?> ctor, Object... args) {
        // 假设非方法注入
        return BeanUtils.instantiateClass(ctor, args); // 通过反射生成实例对象
    }
}
不难看出,与无指定构造器构建的相比这种方式上加多了对构造器和构造参数的解析和获取,那么下面我们来看看这里是如何进行解析的:
为了更加方便分析源码逻辑,下面代码中将部分非必要的或者易于理解的场景的代码隐藏掉,其中包括但不限于: 异常处理场景、缓存处理场景、仅存在一个无参构造器场景(直接通过反射机制生成实例对象)、显式传入参数场景等。
// 最终选出的构造器
Constructor<?> constructorToUse = null;
// 最终选出的构造参数
Object[] argsToUse = null;

// 获取构造器候选者(假设已经排序完成)
Constructor<?>[] candidates = ...;

// ... 处理“仅存在一个无参构造器场景” (会直接返回)

// Need to resolve the constructor.
boolean autowiring = ...;

// 创建构造器对象
ConstructorArgumentValues resolvedValues = new ConstructorArgumentValues();
// 获取构造器参数
ConstructorArgumentValues cargs = mbd.getConstructorArgumentValues();
// 解析构造器参数
int minNrOfArgs = resolveConstructorArguments(beanName, mbd, bw, cargs, resolvedValues);

int minTypeDiffWeight = Integer.MAX_VALUE;

for (Constructor<?> candidate : candidates) {
    // 假设parameterCount >= minNrOfArgs
    int parameterCount = candidate.getParameterCount();

    if (constructorToUse != null && argsToUse != null && argsToUse.length > parameterCount) {
        // Already found greedy constructor that can be satisfied ->
        // do not look any further, there are only less greedy constructors left.
        break;
    }

    // ...

    // 解析构造器参数类型
    Class<?>[] paramTypes = candidate.getParameterTypes();
    // 解析构造器参数名称
    String[] paramNames = ...;
    // 创建参数持有器,其中会解析自动装配的bean引用
    ArgumentsHolder argsHolder = createArgumentArray(beanName, mbd, resolvedValues, bw, paramTypes, paramNames,
            getUserDeclaredConstructor(candidate), autowiring, candidates.length == 1);

    // 通过argsHolder与paramTypes获取类型差异权重
    int typeDiffWeight = ...;
    // Choose this constructor if it represents the closest match.
    if (typeDiffWeight < minTypeDiffWeight) {
        constructorToUse = candidate;
        argsToUse = argsHolder.arguments;
        minTypeDiffWeight = typeDiffWeight;
    }
    // ...
}
在经过大量的精简后,构造器和构造参数的整个解析和获取流程显著凸显了出来,在这里我们将它分为5个步骤:
- 获取所有构造器候选者
- 获取
bean定义中声明的构造参数 - 解析
bean定义中声明的构造参数 - 构建构造参数数组(传入最终构造器进行实例化)
- 选出最终的构造器和构造参数(不断地循环第
4步和第5步对构造器进行比较)
其中,在这里我们重点关注一下包含了构造器注入的第3点和第4点,即解析bean定义中声明的构造参数和构建构造参数数组(含依赖自动注入的处理)。
-
解析
bean定义中声明的构造参数在第
3步中,Spring主要使用了resolveConstructorArguments方法对bean定义中显式指定的构造参数进行解析,在实现上它会分别对索引匹配的构造参数和类型匹配的构造参数逐个进行解析,并最终将解析结果存储到ConstructorArgumentValues中。其中,具体到参数值的解析是委托给了BeanDefinitionValueResolver#resolveValueIfNecessary方法来完成,它在解析时如果遇到其他bean引用则会使用BeanFactory#getBean进行获取。/** * Resolve the constructor arguments for this bean into the resolvedValues object. * This may involve looking up other beans. * <p>This method is also used for handling invocations of static factory methods. */ private int resolveConstructorArguments(String beanName, RootBeanDefinition mbd, BeanWrapper bw, ConstructorArgumentValues cargs, ConstructorArgumentValues resolvedValues) { // ... BeanDefinitionValueResolver valueResolver = new BeanDefinitionValueResolver(this.beanFactory, beanName, mbd, converter); // 假设minNrOfArgs是正确的,无需更新 int minNrOfArgs = cargs.getArgumentCount(); // 处理索引匹配的参数 for (Map.Entry<Integer, ConstructorArgumentValues.ValueHolder> entry : cargs.getIndexedArgumentValues().entrySet()) { // 假设index符合条件 int index = entry.getKey(); ConstructorArgumentValues.ValueHolder valueHolder = entry.getValue(); // 解析参数值,对于其他bean的引用会使用BeanFactory#getBean进行获取 Object resolvedValue = valueResolver.resolveValueIfNecessary("constructor argument", valueHolder.getValue()); ConstructorArgumentValues.ValueHolder resolvedValueHolder = new ConstructorArgumentValues.ValueHolder(resolvedValue, valueHolder.getType(), valueHolder.getName()); // ... resolvedValues.addIndexedArgumentValue(index, resolvedValueHolder); } // 处理类型匹配的参数 for (ConstructorArgumentValues.ValueHolder valueHolder : cargs.getGenericArgumentValues()) { // 解析参数值,对于其他bean的引用会使用BeanFactory#getBean进行获取 Object resolvedValue = valueResolver.resolveValueIfNecessary("constructor argument", valueHolder.getValue()); ConstructorArgumentValues.ValueHolder resolvedValueHolder = new ConstructorArgumentValues.ValueHolder(resolvedValue, valueHolder.getType(), valueHolder.getName()); // ... resolvedValues.addGenericArgumentValue(resolvedValueHolder); } return minNrOfArgs; }至此,
Spring完成了对bean定义中显式指定的构造参数的解析。 -
构建构造参数数组
在第
4步中,Spring主要使用了createArgumentArray方法对第3步解析的参数值进行组装,其中通过索引匹配的构造参数优先级比通过类型匹配的构造参数高,即优先取通过索引匹配的构造参数。在遇到匹配不到解析值的参数,Spring会使用自动装配的方式在IoC容器中进行寻找和匹配(若配置了自动装配),其中对于自动装配参数的匹配是交由resolveAutowiredArgument方法来完成,在解析时如果遇到其他bean引用它也会使用BeanFactory#getBean进行获取。/** * Create an array of arguments to invoke a constructor or factory method, * given the resolved constructor argument values. */ private ArgumentsHolder createArgumentArray( String beanName, RootBeanDefinition mbd, @Nullable ConstructorArgumentValues resolvedValues, BeanWrapper bw, Class<?>[] paramTypes, @Nullable String[] paramNames, Executable executable, boolean autowiring, boolean fallback) throws UnsatisfiedDependencyException { ArgumentsHolder args = new ArgumentsHolder(paramTypes.length); // ... for (int paramIndex = 0; paramIndex < paramTypes.length; paramIndex++) { Class<?> paramType = paramTypes[paramIndex]; String paramName = (paramNames != null ? paramNames[paramIndex] : ""); // Try to find matching constructor argument value, either indexed or generic. ConstructorArgumentValues.ValueHolder valueHolder = null; if (resolvedValues != null) { ConstructorArgumentValues.ValueHolder valueHolder = null; if (resolvedValues != null) { // 分别从索引匹配的结果(优先)和类型匹配的结果中获取值。 valueHolder = resolvedValues.getArgumentValue(paramIndex, paramType, paramName, ...); // ... } } if (valueHolder != null) { // ... 将valueHolder赋值到args中 } else { // 假设autowiring为true,即标记了自动装配 MethodParameter methodParam = MethodParameter.forExecutable(executable, paramIndex); // ... // 解析自动装配的参数值,在选出最终的引用后会使用BeanFactory#getBean进行获取(若需要) Object autowiredArgument = resolveAutowiredArgument( methodParam, beanName, autowiredBeanNames, converter, fallback); // ... 将autowiredArgument赋值到args中 } } // ... return args; } /** * Look for an argument value that either corresponds to the given index * in the constructor argument list or generically matches by type. */ @Nullable public ValueHolder getArgumentValue(int index, @Nullable Class<?> requiredType, @Nullable String requiredName, @Nullable Set<ValueHolder> usedValueHolders) { // 优先使用索引匹配结果来获取值 ValueHolder valueHolder = getIndexedArgumentValue(index, requiredType, requiredName); if (valueHolder == null) { // 其次才使用类型匹配结果获取值 valueHolder = getGenericArgumentValue(requiredType, requiredName, usedValueHolders); } return valueHolder; }至此,
Spring完成了对bean定义中自动装配的解析和对构造参数的组装。
基于工厂方法创建bean实例
在基于工厂方法创建bean实例的ConstructorResolver#instantiateUsingFactoryMethod方法中会在选出最终的工厂实例、工厂方法和方法参数后将它们传入instantiate方法中通过反射机制实现bean实例的创建。
class ConstructorResolver {

    private final AbstractAutowireCapableBeanFactory beanFactory;

    /**
     * Instantiate the bean using a named factory method. The method may be static, if the
     * bean definition parameter specifies a class, rather than a "factory-bean", or
     * an instance variable on a factory object itself configured using Dependency Injection.
     * <p>Implementation requires iterating over the static or instance methods with the
     * name specified in the RootBeanDefinition (the method may be overloaded) and trying
     * to match with the parameters. We don't have the types attached to constructor args,
     * so trial and error is the only way to go here. The explicitArgs array may contain
     * argument values passed in programmatically via the corresponding getBean method.
     */
    public BeanWrapper instantiateUsingFactoryMethod(
            String beanName, RootBeanDefinition mbd, @Nullable Object[] explicitArgs) {

        BeanWrapperImpl bw = new BeanWrapperImpl();
        this.beanFactory.initBeanWrapper(bw);

        // 最终选出的工厂实例
        Object factoryBean = ...;
        // 最终选出的工厂方法
        Method factoryMethodToUse = ...;
        // 最终选出的工厂方法参数
        Object[] argsToUse = ...;

        // ...

        bw.setBeanInstance(instantiate(beanName, mbd, factoryBean, factoryMethodToUse, argsToUse));
        return bw;
    }

    private Object instantiate(String beanName, RootBeanDefinition mbd,
            @Nullable Object factoryBean, Method factoryMethod, Object[] args) {
        // 假设无异常
        InstantiationStrategy strategy = this.beanFactory.getInstantiationStrategy();
        return strategy.instantiate(mbd, beanName, this.beanFactory, factoryBean, factoryMethod, args);
    }
}

public class SimpleInstantiationStrategy implements InstantiationStrategy {
    @Override
    public Object instantiate(RootBeanDefinition bd, @Nullable String beanName, BeanFactory owner,
            @Nullable Object factoryBean, final Method factoryMethod, Object... args) {
        // 假设无异常
        ReflectionUtils.makeAccessible(factoryMethod);
        // 忽略其他逻辑
        Object result = factoryMethod.invoke(factoryBean, args);  // 通过反射调用工厂方法
        // 假设result不为null
        return result;
    }
}
也许在XML配置中,我们十分清晰通过工厂方法创建bean的概念,但在Java的配置方式中一般很难找到相关的概念。而实际上在Java的配置方式也是存在对应的概念的,也就是我们通过@Bean方法所声明的bean。其中,如果@Bean方法是实例方法则表示它是实例工厂方法,而如果@Bean方法是静态方法则表示它是静态工厂方法,那么自然而然的它们所在的@Configuration或者@Component配置类则是它们的工厂类factory-class或者工厂实例factory-bean。下面我们可以看到@Bean方法的解析代码:
/**
 * Reads a given fully-populated set of ConfigurationClass instances, registering bean
 * definitions with the given {@link BeanDefinitionRegistry} based on its contents.
 */
class ConfigurationClassBeanDefinitionReader {
    /**
     * Read the given {@link BeanMethod}, registering bean definitions
     * with the BeanDefinitionRegistry based on its contents.
     */
    private void loadBeanDefinitionsForBeanMethod(BeanMethod beanMethod) {
        ConfigurationClass configClass = beanMethod.getConfigurationClass();
        MethodMetadata metadata = beanMethod.getMetadata();
        String methodName = metadata.getMethodName();

        // ...

        ConfigurationClassBeanDefinition beanDef = new ConfigurationClassBeanDefinition(configClass, metadata, beanName);
        if (metadata.isStatic()) {
            /**
             * static @Bean method
             */
            // 对于静态工厂方法仅需设置工厂类
            if (configClass.getMetadata() instanceof StandardAnnotationMetadata sam) {
                beanDef.setBeanClass(sam.getIntrospectedClass());
            }
            else {
                beanDef.setBeanClassName(configClass.getMetadata().getClassName());
            }
            // 设置方法名字
            beanDef.setUniqueFactoryMethodName(methodName);
        }
        else {
            /**
             * instance @Bean method
             */
            // 对于实例工厂方法需设置工厂实例
            beanDef.setFactoryBeanName(configClass.getBeanName());
            // 设置方法名字
            beanDef.setUniqueFactoryMethodName(methodName);
        }

        // 设置方法对象
        if (metadata instanceof StandardMethodMetadata sam) {
            beanDef.setResolvedFactoryMethod(sam.getIntrospectedMethod());
        }

        // 设置为自动装配
        beanDef.setAutowireMode(AbstractBeanDefinition.AUTOWIRE_CONSTRUCTOR);

        // ...
    }
}
在loadBeanDefinitionsForBeanMethod方法中我们可以发现在解析@Bean时它会根据是否属于static分别对静态工厂方法和实例工厂方法进行赋值,即对于静态工厂方法设置factory-class(bean-class)和对应的静态方法;而对于实例工厂方法则设置factory-bean和对应的实例方法。另外,在loadBeanDefinitionsForBeanMethod方法中并没有对@Bean的方法参数进行解析,而是将autowire-mode属性设置为AUTOWIRE_CONSTRUCTOR,即在构造实例时通过自动装配的方式完成参数的赋值(可简单理解为使用构造参数自动装配的方式完成赋值)。
在了解这个概念后,下面我们再来看看Spring是如何对它进行解析的:
为了更加方便分析源码逻辑,下面代码中将部分非必要的或者易于理解的场景的代码隐藏掉,其中包括但不限于: 异常处理场景、缓存处理场景、仅存在一个无参工厂方法场景(直接通过反射机制生成实例对象)、显式传入参数场景等。
// 最终选出的工厂实例
Object factoryBean = null; // 静态工厂方法的factoryBean为null
// 最终选出的工厂方法
Method factoryMethodToUse = null;
// 最终选出的工厂方法参数
Object[] argsToUse = null;

// factoryBeanName属性指的是工厂实例bean的名称,而不是FactoryBean实例的名称
String factoryBeanName = mbd.getFactoryBeanName();
if (factoryBeanName != null) {
    //...
    factoryBean = this.beanFactory.getBean(factoryBeanName);
}

// ...

// 获取工厂方法候选者
List<Method> candidates = ...;

// ... 处理“仅存在一个无参工厂方法场景” (会直接返回)

boolean autowiring = ...;

// 获取工厂方法参数
ConstructorArgumentValues cargs = mbd.getConstructorArgumentValues();
// 获取工厂方法参数
ConstructorArgumentValues resolvedValues = new ConstructorArgumentValues();
// 解析工厂方法参数
int minNrOfArgs = resolveConstructorArguments(beanName, mbd, bw, cargs, resolvedValues);

int minTypeDiffWeight = Integer.MAX_VALUE;

for (Method candidate : candidates) {
    // 假设parameterCount >= minNrOfArgs
    int parameterCount = candidate.getParameterCount();

    // 解析工厂方法参数类型
    Class<?>[] paramTypes = candidate.getParameterTypes();
    // 解析工厂方法参数名称
    String[] paramNames = ...;
    // 创建参数持有器,其中会解析自动装配的bean引用
    ArgumentsHolder argsHolder = createArgumentArray(beanName, mbd, resolvedValues, bw,
            paramTypes, paramNames, candidate, autowiring, candidates.size() == 1);

    // 通过argsHolder与paramTypes获取类型差异权重
    int typeDiffWeight = ...;
    // Choose this factory method if it represents the closest match.
    if (typeDiffWeight < minTypeDiffWeight) {
        factoryMethodToUse = candidate;
        argsToUse = argsHolder.arguments;
        minTypeDiffWeight = typeDiffWeight;
    }
    // ...
}

// ...
在经过大量的精简后,工厂方法和方法参数的整个解析和获取流程显著凸显了出来,在这里我们将它分为5个步骤:
- 获取所有工厂方法候选者
- 获取
bean定义中声明的工厂方法参数 - 解析
bean定义中声明的工厂方法参数 - 构建工厂方法参数数组(传入最终工厂方法进行实例化)
- 选出最终的工厂方法和工厂方法参数(不断地循环第
4步和第5步对构造器进行比较)
如果阅读过上文关于“基于构造器创建bean实例“模块的源码分析,不难发现对于第3步和第4步的逻辑几乎是相同的,所以在这里笔者就不再展开分析了。其中,根据上文对@Bean工厂方法的解析我们可以得知对于@Bean方法参数的解析是在createArgumentArray方法中通过自动装配的方式完成的,而非通过resolveConstructorArguments方法完成解析的,这是因为在@Bean方法解析时并没有解析方法参数到ConstructorArgumentValues中,而是将方法解析对象的autowire-mode属性设置为AUTOWIRE_CONSTRUCTOR,即使用自动装配完成参数值的设置。
也许有细心的读者在分析“基于工厂方法构建bean实例”的过程中会发现它也采用了与“基于构造器构建bean实例”相同的方法与概念,即带有构造器字眼的参数和方法:ConstructorArgumentValues参数、ConstructorArgumentValues参数和resolveConstructorArguments方法等,这实际上是因为在工厂方法的执行过程中将方法参数充当了类似于构造器参数那样必须的存在,所以在逻辑相同的情况下复用了具有相同效果的参数与方法。与此同时,这样的设计方案也导致了在Spring处理循环依赖时无法有效的解决工厂方法参数上的循环依赖。
需要注意的是,
Spring在处理实例工厂方法时会首先通过BeanFactory#getBean向IoC容器请求(获取/创建)它的工厂实例(factory-bean),而静态工厂方法则不会触发这一步骤。
1.2. 属性前置处理
在完成bean实例的创建后,我们就可以进行属性的填充了。但是在属性填充前,Spring还提供了applyMergedBeanDefinitionPostProcessors方法让我们可以进行bean的属性前置处理,即将BeanDefinition传入每个MergedBeanDefinitionPostProcessor中的postProcessMergedBeanDefinition方法进行前置处理。
/**
 * Apply MergedBeanDefinitionPostProcessors to the specified bean definition,
 * invoking their {@code postProcessMergedBeanDefinition} methods.
 * @param mbd the merged bean definition for the bean
 * @param beanType the actual type of the managed bean instance
 * @param beanName the name of the bean
 * @see MergedBeanDefinitionPostProcessor#postProcessMergedBeanDefinition
 */
protected void applyMergedBeanDefinitionPostProcessors(RootBeanDefinition mbd, Class<?> beanType, String beanName) {
    for (MergedBeanDefinitionPostProcessor processor : getBeanPostProcessorCache().mergedDefinition) {
        processor.postProcessMergedBeanDefinition(mbd, beanType, beanName);
    }
}
1.3. 属性加载
在完成bean属性的前置处理后,我们就顺着执行流程进入到populateBean方法进行属性的填充了。
/**
 * Populate the bean instance in the given BeanWrapper with the property values
 * from the bean definition.
 */
protected void populateBean(String beanName, RootBeanDefinition mbd, @Nullable BeanWrapper bw) {
    // ...

    PropertyValues pvs = (mbd.hasPropertyValues() ? mbd.getPropertyValues() : null);

    int resolvedAutowireMode = mbd.getResolvedAutowireMode();
    if (resolvedAutowireMode == AUTOWIRE_BY_NAME || resolvedAutowireMode == AUTOWIRE_BY_TYPE) {
        MutablePropertyValues newPvs = new MutablePropertyValues(pvs);
        // Add property values based on autowire by name if applicable.
        if (resolvedAutowireMode == AUTOWIRE_BY_NAME) {
            autowireByName(beanName, mbd, bw, newPvs);
        }
        // Add property values based on autowire by type if applicable.
        if (resolvedAutowireMode == AUTOWIRE_BY_TYPE) {
            autowireByType(beanName, mbd, bw, newPvs);
        }
        pvs = newPvs;
    }

    // ... 属性后置处理

    // ... 检查依赖

    // ... 属性填充
}
在populateBean方法中Spring会根据自动装配的类型AUTOWIRE_BY_NAME(按照beanName进行匹配)和AUTOWIRE_BY_TYPE(按照beanType进行匹配)分别调用autowireByName方法和autowireByType完成装配。其中,为了可以更清晰地分析bean属性的加载过程,下面我们将基于autowireByName方法来进一步分析。
/**
 * Fill in any missing property values with references to
 * other beans in this factory if autowire is set to "byName".
 * @param beanName the name of the bean we're wiring up.
 * Useful for debugging messages; not used functionally.
 * @param mbd bean definition to update through autowiring
 * @param bw the BeanWrapper from which we can obtain information about the bean
 * @param pvs the PropertyValues to register wired objects with
 */
protected void autowireByName(
        String beanName, AbstractBeanDefinition mbd, BeanWrapper bw, MutablePropertyValues pvs) {

    String[] propertyNames = unsatisfiedNonSimpleProperties(mbd, bw);
    for (String propertyName : propertyNames) {
        if (containsBean(propertyName)) {
            // 通过BeanFactory#getBean加载propertyName对应的bean
            Object bean = getBean(propertyName);
            pvs.add(propertyName, bean);
            registerDependentBean(propertyName, beanName);
        }
    }
}
在autowireByName方法中我们可以看到Spring会对未加载的beanName传入BeanFactory#getBean中进行加载,并最终将它加入到MutablePropertyValues中。
1.4. 属性后置处理
在完成bean属性的加载后,Spring提供了一个基于InstantiationAwareBeanPostProcessor的扩展点postProcessProperties使得我们可以对加载后的属性进行后置处理,即将PropertyValues传入每个InstantiationAwareBeanPostProcessor中的postProcessProperties方法进行后置处理。
protected void populateBean(String beanName, RootBeanDefinition mbd, @Nullable BeanWrapper bw) {
    // ...

    PropertyValues pvs = (mbd.hasPropertyValues() ? mbd.getPropertyValues() : null);

    // ... 属性加载

    // 假设存在InstantiationAwareBeanPostProcessor扩展点
    if (pvs == null) {
        pvs = mbd.getPropertyValues();
    }
    for (InstantiationAwareBeanPostProcessor bp : getBeanPostProcessorCache().instantiationAware) {
        PropertyValues pvsToUse = bp.postProcessProperties(pvs, bw.getWrappedInstance(), beanName);
        if (pvsToUse == null) {
            return;
        }
        pvs = pvsToUse;
    }

    // ... 检查依赖

    // ... 属性填充
}
1.5. 属性填充
在完成一系列的bean属性处理后,Spring就通过applyPropertyValues执行属性的填充了,具体如下所示:
protected void populateBean(String beanName, RootBeanDefinition mbd, @Nullable BeanWrapper bw) {
    // ...

    PropertyValues pvs = (mbd.hasPropertyValues() ? mbd.getPropertyValues() : null);

    // ... 属性加载

    // ... 属性后置处理

    // ... 检查依赖

    if (pvs != null) {
        applyPropertyValues(beanName, mbd, bw, pvs);
    }
}

/**
 * Apply the given property values, resolving any runtime references
 * to other beans in this bean factory. Must use deep copy, so we
 * don't permanently modify this property.
 * @param beanName the bean name passed for better exception information
 * @param mbd the merged bean definition
 * @param bw the BeanWrapper wrapping the target object
 * @param pvs the new property values
 */
protected void applyPropertyValues(String beanName, BeanDefinition mbd, BeanWrapper bw, PropertyValues pvs) {
    // ...

    MutablePropertyValues mpvs = ...;
    List<PropertyValue> original = ...;

    BeanDefinitionValueResolver valueResolver = new BeanDefinitionValueResolver(this, beanName, mbd, ...);

    // Create a deep copy, resolving any references for values.
    List<PropertyValue> deepCopy = new ArrayList<>(original.size());
    boolean resolveNecessary = false;
    for (PropertyValue pv : original) {
        // ... Add pv to deepCopy after converting it
        deepCopy.add(pv after converting)
    }

    // ...

    // Set our (possibly massaged) deep copy.
    bw.setPropertyValues(new MutablePropertyValues(deepCopy));

}
在applyPropertyValues方法中,Spring会将所有的PropertyValue属性经过转换后添加到BeanWrapper的propertyValues属性后结束执行。
除此之外,如果我们想忽略
populateBean方法中属性填充的执行,那么我们可以使用Spring提供的一个扩展点InstantiationAwareBeanPostProcessor#postProcessAfterInstantiation让我们可以提前终止bean属性的填充,具体如下所示:protected void populateBean(String beanName, RootBeanDefinition mbd, @Nullable BeanWrapper bw) { // ... // Give any InstantiationAwareBeanPostProcessors the opportunity to modify the // state of the bean before properties are set. This can be used, for example, // to support styles of field injection. // 假设存在InstantiationAwareBeanPostProcessor扩展点 for (InstantiationAwareBeanPostProcessor bp : getBeanPostProcessorCache().instantiationAware) { if (!bp.postProcessAfterInstantiation(bw.getWrappedInstance(), beanName)) { return; } } // ... 属性加载 // ... 属性后置处理 // ... 检查依赖 // ... 属性填充 }
至此,bean的实例化阶段完成。
2. Bean的初始化
在完成bean的实例化后,Spring就开始执行initializeBean方法完成bean实例的初始化了。
/**
 * Initialize the given bean instance, applying factory callbacks
 * as well as init methods and bean post processors.
 * <p>Called from {@link #createBean} for traditionally defined beans,
 * and from {@link #initializeBean} for existing bean instances.
 * @param beanName the bean name in the factory (for debugging purposes)
 * @param bean the new bean instance we may need to initialize
 * @param mbd the bean definition that the bean was created with
 * (can also be {@code null}, if given an existing bean instance)
 * @return the initialized bean instance (potentially wrapped)
 */
protected Object initializeBean(String beanName, Object bean, @Nullable RootBeanDefinition mbd) {
    // 执行aware方法
    invokeAwareMethods(beanName, bean);

    Object wrappedBean = bean;

    // 假设可执行前置处理
    wrappedBean = applyBeanPostProcessorsBeforeInitialization(wrappedBean, beanName);

    // 假设没有异常
    invokeInitMethods(beanName, wrappedBean, mbd);

    // 假设可执行后置处理
    wrappedBean = applyBeanPostProcessorsAfterInitialization(wrappedBean, beanName);

    return wrappedBean;
}
在
bean实例的初始化前,首先会使用Aware接口注入部分bean属性(具体可阅读invokeAwareMethods方法),然后才真正开始bean实例的初始化流程。
根据上述初始化代码的分析,我们很轻易的就可以将bean的初始化流程分为3个步骤,即:
- 初始化前置处理
- 初始化实例
- 初始化后置处理
为了更清晰地阐述bean的初始化流程,下面笔者将分点逐个进行分析。
对于初始化的前置处理和后置处理
Spring主要是通过BeanPostProcessor来完成。对于BeanPostProcessor,它所提供的能力在Spring中常常发挥着重要的作用,例如常用的Spring注解和Spring AOP都是通过它来实现的。
2.1. 初始化前置处理
Bean的初始化前置处理主要通过applyBeanPostProcessorsBeforeInitialization方法完成。
@Override
public Object applyBeanPostProcessorsBeforeInitialization(Object existingBean, String beanName)
        throws BeansException {

    Object result = existingBean;
    for (BeanPostProcessor processor : getBeanPostProcessors()) {
        Object current = processor.postProcessBeforeInitialization(result, beanName);
        if (current == null) {
            return result;
        }
        result = current;
    }
    return result;
}
在实现上,applyBeanPostProcessorsBeforeInitialization方法中会将bean传入每个BeanPostProcessor中的postProcessBeforeInitialization方法进行前置处理,直到遍历所有的BeanPostProcessor或者在遇到第一个返回null时结束并返回结果。
2.2. 初始化实例
Bean的初始化处理主要是通过invokeInitMethods方法完成,下面我们可以看到invokeInitMethods方法的源码:
/**
 * Give a bean a chance to react now all its properties are set,
 * and a chance to know about its owning bean factory (this object).
 * This means checking whether the bean implements InitializingBean or defines
 * a custom init method, and invoking the necessary callback(s) if it does.
 */
protected void invokeInitMethods(String beanName, Object bean, @Nullable RootBeanDefinition mbd)
        throws Throwable {

    boolean isInitializingBean = (bean instanceof InitializingBean);
    if (isInitializingBean && (mbd == null || !mbd.hasAnyExternallyManagedInitMethod("afterPropertiesSet"))) {
        ((InitializingBean) bean).afterPropertiesSet();
    }

    if (mbd != null && bean.getClass() != NullBean.class) {
        String[] initMethodNames = mbd.getInitMethodNames();
        if (initMethodNames != null) {
            for (String initMethodName : initMethodNames) {
                if (StringUtils.hasLength(initMethodName) &&
                        !(isInitializingBean && "afterPropertiesSet".equals(initMethodName)) &&
                        !mbd.hasAnyExternallyManagedInitMethod(initMethodName)) {
                    invokeCustomInitMethod(beanName, bean, mbd, initMethodName);
                }
            }
        }
    }
}

/**
 * Invoke the specified custom init method on the given bean.
 * Called by invokeInitMethods.
 * <p>Can be overridden in subclasses for custom resolution of init
 * methods with arguments.
 */
protected void invokeCustomInitMethod(String beanName, Object bean, RootBeanDefinition mbd, String initMethodName)
        throws Throwable {
    // 假设存在initMethod
    Method initMethod = (mbd.isNonPublicAccessAllowed() ?
            BeanUtils.findMethod(bean.getClass(), initMethodName) :
            ClassUtils.getMethodIfAvailable(bean.getClass(), initMethodName));

    Method methodToInvoke = ClassUtils.getInterfaceMethodIfPossible(initMethod, bean.getClass());

    // 假设无异常
    ReflectionUtils.makeAccessible(methodToInvoke);
    methodToInvoke.invoke(bean);
}
根据对源码的分析,invokeInitMethods方法主要可分为两大步骤:
- 首先会判断当前
bean是否InitializingBean,若当前bean属于InitializingBean并且其中的afterPropertiesSet方法不属于外部管理(可简单理解为未使用@PostConstruct标注),则直接执行它的InitializingBean#afterPropertiesSet方法。 - 然后,再从
RootBeanDefinition中获取自定义的initMethod(通过配置属性指定的,具体可翻看上文),判断它是否属于InitializingBean的afterPropertiesSet方法或者被外部管理的initMethod,若都不属于则通过反射逐个调用。
关于
RootBeanDefinition中的externallyManagedInitMethods属性用于记录被外部管理的的initMethod,例如通过JSR-250的@PostConstruct注解所声明的initMethod就属于被外部管理的的initMethod。我们可以看到上述invokeInitMethods方法中出现的hasAnyExternallyManagedInitMethod方法是如何判断的:private Set<String> externallyManagedInitMethods; /** * Register an externally managed configuration initialization method — * for example, a method annotated with JSR-250's * {@link jakarta.annotation.PostConstruct} annotation. * <p>The supplied {@code initMethod} may be the * {@linkplain Method#getName() simple method name} for non-private methods or the * {@linkplain org.springframework.util.ClassUtils#getQualifiedMethodName(Method) * qualified method name} for {@code private} methods. A qualified name is * necessary for {@code private} methods in order to disambiguate between * multiple private methods with the same name within a class hierarchy. */ public void registerExternallyManagedInitMethod(String initMethod) { if (this.externallyManagedInitMethods == null) { this.externallyManagedInitMethods = new LinkedHashSet<>(1); } this.externallyManagedInitMethods.add(initMethod); } /** * Determine if the given method name indicates an externally managed * initialization method, regardless of method visibility. * <p>In contrast to {@link #isExternallyManagedInitMethod(String)}, this * method also returns {@code true} if there is a {@code private} externally * managed initialization method that has been * {@linkplain #registerExternallyManagedInitMethod(String) registered} * using a qualified method name instead of a simple method name. */ boolean hasAnyExternallyManagedInitMethod(String initMethod) { if (isExternallyManagedInitMethod(initMethod)) { return true; } if (this.externallyManagedInitMethods != null) { for (String candidate : this.externallyManagedInitMethods) { // 对于全限定名称则直接截取最后的方法名进行判断 int indexOfDot = candidate.lastIndexOf('.'); if (indexOfDot >= 0) { String methodName = candidate.substring(indexOfDot + 1); if (methodName.equals(initMethod)) { return true; } } } } return false; } /** * Determine if the given method name indicates an externally managed * initialization method. * <p>See {@link #registerExternallyManagedInitMethod} for details * regarding the format for the supplied {@code initMethod}. */ public boolean isExternallyManagedInitMethod(String initMethod) { return (this.externallyManagedInitMethods != null && this.externallyManagedInitMethods.contains(initMethod)); }在上述方法中主要是对
RootBeanDefinition中的externallyManagedInitMethods属性进行新增和匹配。其中,Spring会使用registerExternallyManagedInitMethod方法对它进行新增,使用hasAnyExternallyManagedInitMethod方法或者isExternallyManagedInitMethod方法将传入的initMethod参数与externallyManagedInitMethods属性进行比较并最终返回判断结果。
2.3. 初始化后置处理
Bean的初始化后置处理主要通过applyBeanPostProcessorsAfterInitialization方法完成。
@Override
public Object applyBeanPostProcessorsAfterInitialization(Object existingBean, String beanName)
        throws BeansException {

    Object result = existingBean;
    for (BeanPostProcessor processor : getBeanPostProcessors()) {
        Object current = processor.postProcessAfterInitialization(result, beanName);
        if (current == null) {
            return result;
        }
        result = current;
    }
    return result;
}
在实现上,applyBeanPostProcessorsAfterInitialization方法中会将bean传入每个BeanPostProcessor中的postProcessAfterInitialization方法进行前置处理,直到遍历所有的BeanPostProcessor或者在遇到第一个返回null时结束并返回结果。
至此,bean的初始化阶段完成。
关于
getObjectForBeanInstance方法的调用在上文
doGetBean方法的执行流程中,不难发现无论是从缓存中获取bean还是主动创建bean,它都会将获取到的bean实例传递到getObjectForBeanInstance方法中进一步处理,这其实是针对FactoryBean所提供的特殊处理。在这里我们借着这个机会对FactoryBean的实现原理一探究竟:在进入源码分析前,首先我们先来回顾一下上文对
FactoryBean的描述:对于使用
FactoryBean所声明的bean,Spring会将FactoryBean及其FactoryBean#getObject方法返回的对象都注册到IoC容器中。其中,对于FactoryBean指定或默认生成的名称是其FactoryBean#getObject所创建的bean实例名称,而FactoryBean实例本身的名称则需在指定或默认生成的名称前加上前缀&,即&beanName。也就是说,对于使用
FactoryBean所声明的bean会产生如下结果:
- 类型为
FactoryBean、名字为&beanName的bean实例。- 类型为
FactoryBean#getObject、名字为beanName的bean实例。下面,我们将带着这两个结果的预期对
getObjectForBeanInstance方法进行阅读与分析:public abstract class AbstractBeanFactory extends FactoryBeanRegistrySupport implements ConfigurableBeanFactory { /** * Get the object for the given bean instance, either the bean * instance itself or its created object in case of a FactoryBean. * @param beanInstance the shared bean instance * @param name the name that may include factory dereference prefix * @param beanName the canonical bean name * @param mbd the merged bean definition * @return the object to expose for the bean */ protected Object getObjectForBeanInstance( Object beanInstance, String name, String beanName, RootBeanDefinition mbd) { // 假设mbd不为空 // 判断name是否带有&前缀 if (BeanFactoryUtils.isFactoryDereference(name)) { // ... return beanInstance; } // Now we have the bean instance, which may be a normal bean or a FactoryBean. // If it's a FactoryBean, we use it to create a bean instance, unless the // caller actually wants a reference to the factory. if (!(beanInstance instanceof FactoryBean<?> factoryBean)) { return beanInstance; } // ... Object object = getObjectFromFactoryBean(factoryBean, beanName, ...); return object; } }根据对代码的理解,对于
getObjectForBeanInstance方法的入参主要有3个需要注意的:
参数 说明 namename参数表示请求时所指定bean的原始名称。其中,对于FactoryBean则格式为&beanName;对于FactoryBean#getObject则格式为beanName。beanNamebeanName参数表示请求时所指定的name参数在经过处理后的名称。其中,对于FactoryBean则格式为beanName;对于FactoryBean#getObject则格式为beanName。beanInstancebeanInstance参数表示通过beanName参数请求获得的bean实例。如果是FactoryBean的定义,则表示FactoryBean实例本身。不难得出,对于
name参数值为&beanName格式的请求,Spring仅仅会将它用作是标识客户端向IoC容器请求FactoryBean实例本身而不是FactoryBean#getObject返回的实例。在简化掉一些赋值语句与非核心判断逻辑后,
getObjectForBeanInstance方法的整体流程就十分清晰了:
- 首先判断
name参数是否带有&前缀,如果是则返回beanInstance实例,否则继续往下执行。在这一步中Spring已经知道客户端是否需要获取FactoryBean实例本身(Spring定义了带有&前缀的beanName为FactoryBean实例)。- 然后判断当前
beanInstance是否属于FactoryBean实例,如果不是则返回beanInstance实例,否则继续往下执行。在这一步中Spring已经完成普通bean实例的处理(非FactoryBean实例)。- 最后将
beanInstance传入getObjectFromFactoryBean方法获取FactoryBean#getObject所返回的对象。在经过第1步和第2步的前置处理后,这一步中所处理的对象目标必然是FactoryBean#getObject所返回的对象。接下来,我们再来看看
getObjectFromFactoryBean方法是如何处理FactoryBean#getObject所返回的对象的。/** * Support base class for singleton registries which need to handle * {@link org.springframework.beans.factory.FactoryBean} instances, * integrated with {@link DefaultSingletonBeanRegistry}'s singleton management. * * <p>Serves as base class for {@link AbstractBeanFactory}. */ public abstract class FactoryBeanRegistrySupport extends DefaultSingletonBeanRegistry { /** * Obtain an object to expose from the given FactoryBean. * @param factory the FactoryBean instance * @param beanName the name of the bean * @param shouldPostProcess whether the bean is subject to post-processing * @return the object obtained from the FactoryBean */ protected Object getObjectFromFactoryBean(FactoryBean<?> factory, String beanName, ...) { if (factory.isSingleton() && containsSingleton(beanName)) { // ...此处加了synchronized锁保证了这段代码的线程安全 Object object = this.factoryBeanObjectCache.get(beanName); if (object == null) { object = doGetObjectFromFactoryBean(factory, beanName); // Only post-process and store if not put there already during getObject() call above // (e.g. because of circular reference processing triggered by custom getBean calls) Object alreadyThere = this.factoryBeanObjectCache.get(beanName); if (alreadyThere != null) { object = alreadyThere; } else { // ... // 假设条件符合,执行初始化后置处理 object = postProcessObjectFromFactoryBean(object, beanName); if (containsSingleton(beanName)) { this.factoryBeanObjectCache.put(beanName, object); } } return object; } } else { Object object = doGetObjectFromFactoryBean(factory, beanName); // 假设条件符合,执行初始化后置处理 object = postProcessObjectFromFactoryBean(object, beanName); } return object; } /** * Obtain an object to expose from the given FactoryBean. * @param factory the FactoryBean instance * @param beanName the name of the bean * @return the object obtained from the FactoryBean */ private Object doGetObjectFromFactoryBean(FactoryBean<?> factory, String beanName) throws BeanCreationException { Object object = factory.getObject(); return object; } } public abstract class AbstractAutowireCapableBeanFactory extends AbstractBeanFactory implements AutowireCapableBeanFactory { /** * Applies the {@code postProcessAfterInitialization} callback of all * registered BeanPostProcessors, giving them a chance to post-process the * object obtained from FactoryBeans (for example, to auto-proxy them). * @see #applyBeanPostProcessorsAfterInitialization */ @Override protected Object postProcessObjectFromFactoryBean(Object object, String beanName) { return applyBeanPostProcessorsAfterInitialization(object, beanName); } @Override public Object applyBeanPostProcessorsAfterInitialization(Object existingBean, String beanName) throws BeansException { Object result = existingBean; for (BeanPostProcessor processor : getBeanPostProcessors()) { Object current = processor.postProcessAfterInitialization(result, beanName); if (current == null) { return result; } result = current; } return result; } }在
getObjectFromFactoryBean方法中就有对FactoryBean#getObject单例作用域与非单例作用域的处理了。具体地,这里分为两种情况:
单例作用域,即
FactoryBean实例属于单例作用域,且FactoryBean#isSingleton为true的情况(与上文FactoryBean单例作用域说明呼应)。
- 首先从
factoryBeanObjectCache缓存中获取beanName对应的实例(factoryBeanObjectCache缓存专门用于存储FactoryBean#getObject创建的对象),如果获取失败则继续往下执行。- 然后执行
doGetObjectFromFactoryBean方法使用FactoryBean#getObject创建bean对象。- 接着再次从
factoryBeanObjectCache缓存中获取beanName对应的实例(用于处理循环依赖问题)。
- 如果能从
factoryBeanObjectCache缓存中获取到,则使用缓存中的对象而不是使用FactoryBean#getObject创建的。- 如果不能从
factoryBeanObjectCache缓存中获取到,则确定使用FactoryBean#getObject创建的对象,并对它执行以下步骤。
- 将实例传入初始化后置处理
BeanPostProcessor#postProcessAfterInitialization方法执行。- 将结果放入到
factoryBeanObjectCache缓存中(保证了FactoryBean#getObject创建对象的单例作用域特性)。- 将获取/创建的
bean对象返回。在上述第
3步中重复再次从factoryBeanObjectCache缓存中获取beanName对应的实例主要是为了处理循环依赖所产生的问题,从而避免在单例作用域下返回各不相同的实例。需要注意,对于第3步中重复地从factoryBeanObjectCache缓存中获取实例会很容易让人误以为是针对多线程并发的处理,实际上因为if代码块开头加入了synchronized的锁机制,所以此处并不会发生并发的场景。下面,我们将结合例子对此作进一步阐述:@Component public class CircularBeanFactoryBean implements FactoryBean { @Autowired private ApplicationContext applicationContext; @Override public boolean isSingleton() { return true } @Override public Class getObjectType() { return CircularBean.class; } @Override public Object getObject() { CircularDependency dependency = applicationContext.getBean(CircularDependency.class); return new CircularBean(dependency); } } public class CircularBean { private CircularDependency circularDependency; public CircularReferenceBean(CircularDependency circularDependency) { this.circularDependency = circularDependency; } } @Component public class CircularDependency { @Autowired private CircularBean circularBean; }在例子中,当
Spring首次创建CircularBeanFactoryBean实例后会通过getObjectFromFactoryBean方法获取其中CircularBean实例。按照下述执行步骤:
- 首先从
factoryBeanObjectCache获取CircularBean实例,显然当前并不存在CircularBean实例。- 然后执行
doGetObjectFromFactoryBean方法时使用FactoryBean#getObject创建CircularBean实例。
- 通过
ApplicationContext#getBean获取CircularDependency实例,而在获取/创建CircularDependency实例的过程中会再次加载它的依赖CircularBean(发生循环依赖),此时会再次触发getObjectFromFactoryBean方法:
- 首先从
factoryBeanObjectCache获取CircularBean实例,因为在外层的尚未创建完CircularBean实例,所以此时还是会获取失败。- 然后执行
doGetObjectFromFactoryBean方法使用FactoryBean#getObject创建CircularBean对象。其中,FactoryBean#getObject再次执行时触发的CircularDependency实例获取(通过ApplicationContext#getBean)由于Spring对bean循环依赖的解决方案使得此次直接可以从缓存中获取(而不是再次触发创建),最终将CircularDependency实例传入CircularBean构造函数完成CircularBean实例的创建(第1个CircularBean实例被创建了)。- 接着将
CircularBean实例放入到factoryBeanObjectCache缓存中。- 最后将
CircularBean实例返回并结束外层CircularDependency依赖的创建。- 将
CircularDependency依赖传入CircularBean构造函数中完成CircularBean实例的创建(第2个CircularBean实例被创建了,即此时存在2个CircularBean实例)。- 最后再次从
factoryBeanObjectCache缓存中获取CircularBean实例,此时由于在第2.1步中已经将创建的CircularBean实例存放到factoryBeanObjectCache缓存中,所以此时能从缓存中获取到CircularBean实例并使用它覆盖第2.2步中创建的CircularBean实例(如果不进行覆盖则会创建出2个CircularBean实例,这并不符合单例作用域的特性)。最终,
Spring通过这种缓存的方式解决了单例作用域下FactoryBean循环依赖所产生的多实例产生问题。非单例作用域(多例作用域)
相比于单例作用域,非单例作用域(多例作用域)的处理逻辑则简单很多,即每次都使用
doGetObjectFromFactoryBean方法创建bean实例,然后将实例传入初始化后置处理BeanPostProcessor#postProcessAfterInitialization方法执行,最后将执行结果返回。总的来说,
FactoryBean实例和FactoryBean#getObject实例实际上所使用的beanName都是相同的,只是它们存储的容器有所不同(特指单例作用域)。而Spring在处理bean请求时会根据命名中是否带有&前缀来区分客户端是想获得/创建FactoryBean实例本身还是FactoryBean#getObject实例。另外需要注意的是,要将FactoryBean#getObject返回的实例指定为单例作用域,不但需要让FactoryBean#isSingleton设置为true,而且还需要将FactoryBean实例本身设置为单例作用域。
Bean的注解解析
在Spring中,对于声明式注解的解析基本上离不开BeanFactoryPostProcessor和BeanPostProcessor两大后置处理器,因此对于bean注解的解析下文将分别通过BeanFactoryPostProcessor和BeanPostProcessor两大后置处理器为切入点详细展开。
CommonAnnotationBeanPostProcessor
对于@Resource注解、@PostConstruct注解和@PreDestroy注解的解析与处理Spring都是通过CommonAnnotationBeanPostProcessor来完成。也就是说,如果我们要让@Resource注解、@PostConstruct注解和@PreDestroy注解生效,就需要将CommonAnnotationBeanPostProcessor注册到Spring容器中。
/**
 * ...
 *
 * <p>This post-processor includes support for the {@link javax.annotation.PostConstruct}
 * and {@link javax.annotation.PreDestroy} annotations - as init annotation
 * and destroy annotation, respectively - through inheriting from
 * {@link InitDestroyAnnotationBeanPostProcessor} with pre-configured annotation types.
 *
 * <p>The central element is the {@link javax.annotation.Resource} annotation
 * for annotation-driven injection of named beans, by default from the containing
 * Spring BeanFactory, with only {@code mappedName} references resolved in JNDI.
 * The {@link #setAlwaysUseJndiLookup "alwaysUseJndiLookup" flag} enforces JNDI lookups
 * equivalent to standard Java EE 5 resource injection for {@code name} references
 * and default names as well. The target beans can be simple POJOs, with no special
 * requirements other than the type having to match.
 *
 * ...
 *
 * <p><b>NOTE:</b> A default CommonAnnotationBeanPostProcessor will be registered
 * by the "context:annotation-config" and "context:component-scan" XML tags.
 * Remove or turn off the default annotation configuration there if you intend
 * to specify a custom CommonAnnotationBeanPostProcessor bean definition!
 * <p><b>NOTE:</b> Annotation injection will be performed <i>before</i> XML injection; thus
 * the latter configuration will override the former for properties wired through
 * both approaches.
 *
 */
public class CommonAnnotationBeanPostProcessor extends InitDestroyAnnotationBeanPostProcessor implements InstantiationAwareBeanPostProcessor, ... {
    ...
}
虽说@Resource注解、@PostConstruct注解和@PreDestroy注解都是通过CommonAnnotationBeanPostProcessor来使其生效,但实际上它们之间的实现原理确是有所不同,因此针对每个注解各自的生效原理下面将分点进行阐述(@PreDestroy注解暂不分析)。
解析@Resource
对于@Resource注解的解析,CommonAnnotationBeanPostProcessor在初始化时首先会将Resource注解类添加到resourceAnnotationTypes属性上。
public class CommonAnnotationBeanPostProcessor extends InitDestroyAnnotationBeanPostProcessor implements InstantiationAwareBeanPostProcessor, ... {

    private static final Set<Class<? extends Annotation>> resourceAnnotationTypes = new LinkedHashSet<>(4);

    static {
        resourceAnnotationTypes.add(Resource.class);

        // ...
    }

}
然后,在bean属性加载的后置处理postProcessProperties方法(具体可阅读上文《源码分析:Bean的创建》章节)中,Spring会完成对被@Resource注解标记字段和方法的依赖加载和依赖注入。
@Override
public PropertyValues postProcessProperties(PropertyValues pvs, Object bean, String beanName) {
    InjectionMetadata metadata = findResourceMetadata(beanName, bean.getClass(), pvs);
    // 忽略异常处理
    metadata.inject(bean, beanName, pvs);
    return pvs;
}
在postProcessProperties方法的实现上,Spring会按照以下2个步骤执行:
- 通过
findResourceMetadata方法查询/构建出标记了注解的字段/方法。 - 通过
InjectedElement#inject方法完成对被标记字段/方法的依赖加载与依赖注入。
-
1、查询/构建出标记了注解的字段/方法。
在
findResourceMetadata方法中,Spring会通过反射机制将bean中被标注了@Resource的字段/方法封装为ResourceElement对象。private InjectionMetadata findResourceMetadata(String beanName, final Class<?> clazz, @Nullable PropertyValues pvs) { // 忽略缓存处理 InjectionMetadata metadata = buildResourceMetadata(clazz); return metadata; } private InjectionMetadata buildResourceMetadata(final Class<?> clazz) { // ... List<InjectionMetadata.InjectedElement> elements = new ArrayList<>(); Class<?> targetClass = clazz; do { final List<InjectionMetadata.InjectedElement> currElements = new ArrayList<>(); // 通过反射机制获取标注了注解的字段,并将他封装为ResourceElement并添加到currElements中 ReflectionUtils.doWithLocalFields(targetClass, field -> { // ... if (field.isAnnotationPresent(Resource.class)) { // 假设field为非静态字段 currElements.add(new ResourceElement(field, field, null)); } }); // 通过反射机制获取标注了注解的方法,并将他封装为ResourceElement添加到currElements中 ReflectionUtils.doWithLocalMethods(targetClass, method -> { // 可简单理解为method Method bridgedMethod = BridgeMethodResolver.findBridgedMethod(method); // ... if (bridgedMethod.isAnnotationPresent(Resource.class)) { // 假设method为非静态方法 PropertyDescriptor pd = BeanUtils.findPropertyForMethod(bridgedMethod, clazz); currElements.add(new ResourceElement(method, bridgedMethod, pd)); } }); elements.addAll(0, currElements); // 由下至上遍历父类 targetClass = targetClass.getSuperclass(); } while (targetClass != null && targetClass != Object.class); return InjectionMetadata.forElements(elements, clazz); }在实现上
findResourceMetadata会将真正构建ResourceElement对象的逻辑委托给buildResourceMetadata来完成。在buildResourceMetadata中会分别通过反射机制获取并封装bean中被@Resource注解标注的字段和方法,并最终返回InjectionMetadata对象(含InjectionMetadata.InjectedElement列表)。关于
Bridge method,源自Java泛型擦除的解决方案。在编译继承了泛型的类或者接口时,由于泛型擦除导致了方法覆盖失效,Java会特地生成的与其泛型擦除后对应的方法,这个方法我们就称之为Bridge method。更多详情我们可以阅读以下链接:
-
2、完成对被标记字段/方法的依赖加载与依赖注入。
在
ResourceElement封装完成后,紧接着就是执行InjectedElement#inject方法完成对bean的加载与注入。而由于ResourceElement并没有对其进行方法覆盖,因此执行的是InjectedElement基类中定义的InjectedElement#inject逻辑,即:/** * A single injected element. */ public abstract static class InjectedElement { protected final Member member; protected final boolean isField; @Nullable protected final PropertyDescriptor pd; protected InjectedElement(Member member, @Nullable PropertyDescriptor pd) { this.member = member; this.isField = (member instanceof Field); this.pd = pd; } /** * Either this or {@link #getResourceToInject} needs to be overridden. */ protected void inject(Object target, @Nullable String requestingBeanName, @Nullable PropertyValues pvs) throws Throwable { if (this.isField) { Field field = (Field) this.member; ReflectionUtils.makeAccessible(field); field.set(target, getResourceToInject(target, requestingBeanName)); } else { Method method = (Method) this.member; ReflectionUtils.makeAccessible(method); method.invoke(target, getResourceToInject(target, requestingBeanName)); } } /** * Either this or {@link #inject} needs to be overridden. */ @Nullable protected Object getResourceToInject(Object target, @Nullable String requestingBeanName) { return null; } }显然,在
InjectedElement#inject中会通过Java反射机制对字段属性进行赋值或者对方法进行调用。其中,对于属性值的获取和解析Spring在这里是通过可继承的getResourceToInject方法来完成,这就需要回到ResourceElement#getResourceToInject的定义上了。public class CommonAnnotationBeanPostProcessor extends ... implements ... { private class ResourceElement extends LookupElement { @Override protected Object getResourceToInject(Object target, @Nullable String requestingBeanName) { // 忽略Lazy的处理 return getResource(this, requestingBeanName); } } /** * Obtain the resource object for the given name and type. */ protected Object getResource(LookupElement element, @Nullable String requestingBeanName) ... { // 忽略JNDI的处理 // 通过BeanFactory获取和解析参数指定的依赖 return autowireResource(this.resourceFactory, element, requestingBeanName); } /** * Obtain a resource object for the given name and type through autowiring * based on the given factory. * @return the resource object (never {@code null}) */ protected Object autowireResource(BeanFactory factory, LookupElement element, @Nullable String requestingBeanName) ... { // ... Object resource = BeanFactory#getBean(...); return resource; } }最终,
Spring经过层层委托执行BeanFactory#getBean获取和解析参数所指定的依赖并返回到InjectedElement#inject进行注入。
至此,在CommonAnnotationBeanPostProcessor中完成了对@Resource注解的解析与处理。
解析@PostConstruct
对于@PostConstruct注解,表面上Spring是通过CommonAnnotationBeanPostProcessor来使其生效,但实际上是CommonAnnotationBeanPostProcessor通过继承的InitDestroyAnnotationBeanPostProcessor来使其最终发挥作用的。
在实现上,InitDestroyAnnotationBeanPostProcessor并没有特殊指定@PostConstruct注解作为标记初始化方法的注解,而是提供了InitDestroyAnnotationBeanPostProcessor#setInitAnnotationType方法让客户端可以进行自定义设置。根据这个设定不难猜出,CommonAnnotationBeanPostProcessor在继承InitDestroyAnnotationBeanPostProcessor类的时候就向InitDestroyAnnotationBeanPostProcessor设置了@PostConstruct注解作为标记初始化方法的注解,具体如下所示:
/**
 * {@link org.springframework.beans.factory.config.BeanPostProcessor} implementation
 * that supports common Java annotations out of the box, in particular the common
 * annotations in the {@code jakarta.annotation} package. These common Java
 * annotations are supported in many Jakarta EE technologies (e.g. JSF and JAX-RS).
 *
 * <p>This post-processor includes support for the {@link jakarta.annotation.PostConstruct}
 * and {@link jakarta.annotation.PreDestroy} annotations - as init annotation
 * and destroy annotation, respectively - through inheriting from
 * {@link InitDestroyAnnotationBeanPostProcessor} with pre-configured annotation types.
 *
 * ...
 */
public class CommonAnnotationBeanPostProcessor extends InitDestroyAnnotationBeanPostProcessor implements InstantiationAwareBeanPostProcessor, ... {
    /**
     * Create a new CommonAnnotationBeanPostProcessor,
     * with the init and destroy annotation types set to
     * {@link jakarta.annotation.PostConstruct} and {@link jakarta.annotation.PreDestroy},
     * respectively.
     */
    public CommonAnnotationBeanPostProcessor() {
        setInitAnnotationType(PostConstruct.class);
        // ...
    }
}

public class InitDestroyAnnotationBeanPostProcessor implements DestructionAwareBeanPostProcessor, MergedBeanDefinitionPostProcessor, ... {

    @Nullable
    private Class<? extends Annotation> initAnnotationType;

    /**
     * Specify the init annotation to check for, indicating initialization
     * methods to call after configuration of a bean.
     * <p>Any custom annotation can be used, since there are no required
     * annotation attributes. There is no default, although a typical choice
     * is the {@link jakarta.annotation.PostConstruct} annotation.
     */
    public void setInitAnnotationType(Class<? extends Annotation> initAnnotationType) {
        this.initAnnotationType = initAnnotationType;
    }
}
在上述代码中我们可以看到,Spring在构造CommonAnnotationBeanPostProcessor时就将@PostConstruct注解类设置到InitDestroyAnnotationBeanPostProcessor的initAnnotationType属性上了。
在完成了initAnnotationType属性的初始化后,顺着bean的创建流程执行到BeanPostProcessor的前置处理方法postProcessBeforeInitialization时,Spring会通过InitDestroyAnnotationBeanPostProcessor#findLifecycleMetadata方法查找出对应的生命周期方法,然后调用LifecycleMetadata#invokeInitMethods进行初始化。
/**
 * {@link org.springframework.beans.factory.config.BeanPostProcessor} implementation
 * that invokes annotated init and destroy methods. Allows for an annotation
 * alternative to Spring's {@link org.springframework.beans.factory.InitializingBean}
 * and {@link org.springframework.beans.factory.DisposableBean} callback interfaces.
 *
 * <p>The actual annotation types that this post-processor checks for can be
 * configured through the {@link #setInitAnnotationType "initAnnotationType"}
 * and {@link #setDestroyAnnotationType "destroyAnnotationType"} properties.
 * Any custom annotation can be used, since there are no required annotation
 * attributes.
 *
 * <p>Init and destroy annotations may be applied to methods of any visibility:
 * public, package-protected, protected, or private. Multiple such methods
 * may be annotated, but it is recommended to only annotate one single
 * init method and destroy method, respectively.
 *
 * <p>Spring's {@link org.springframework.context.annotation.CommonAnnotationBeanPostProcessor}
 * supports the {@link jakarta.annotation.PostConstruct} and {@link jakarta.annotation.PreDestroy}
 * annotations out of the box, as init annotation and destroy annotation, respectively.
 *
 * ...
 */
public class InitDestroyAnnotationBeanPostProcessor implements DestructionAwareBeanPostProcessor, MergedBeanDefinitionPostProcessor, ... {

    @Nullable
    private Class<? extends Annotation> initAnnotationType;

    @Override
    public Object postProcessBeforeInitialization(Object bean, String beanName) throws BeansException {
        LifecycleMetadata metadata = findLifecycleMetadata(bean.getClass());
        metadata.invokeInitMethods(bean, beanName);
        return bean;
    }
}
其中,在findLifecycleMetadata方法会通过反射遍历类及其父类中标记了@PostConstruct注解的方法,并将其封装为LifecycleMetadata对象返回。
public class InitDestroyAnnotationBeanPostProcessor implements DestructionAwareBeanPostProcessor, MergedBeanDefinitionPostProcessor, ... {

    private LifecycleMetadata findLifecycleMetadata(Class<?> clazz) {
        // 忽略缓存的处理
        return buildLifecycleMetadata(clazz);
    }

    private LifecycleMetadata buildLifecycleMetadata(final Class<?> clazz) {
        // ...

        List<LifecycleElement> initMethods = new ArrayList<>();
        Class<?> targetClass = clazz;

        // 通过反射遍历类及其父类中标记了`@PostConstruct`注解的方法
        do {
            final List<LifecycleElement> currInitMethods = new ArrayList<>();

            ReflectionUtils.doWithLocalMethods(targetClass, method -> {
                if (this.initAnnotationType != null && method.isAnnotationPresent(this.initAnnotationType)) {
                    LifecycleElement element = new LifecycleElement(method);
                    currInitMethods.add(element);
                }
            });

            initMethods.addAll(0, currInitMethods);
            targetClass = targetClass.getSuperclass();
        }
        while (targetClass != null && targetClass != Object.class);

        // 假设存在
        return new LifecycleMetadata(clazz, initMethods, destroyMethods));
    }


    /**
     * Class representing information about annotated init and destroy methods.
     */
    private class LifecycleMetadata {

        private final Class<?> targetClass;

        private final Collection<LifecycleElement> initMethods;

        private volatile Set<LifecycleElement> checkedInitMethods;

        public LifecycleMetadata(Class<?> targetClass, Collection<LifecycleElement> initMethods, ...) {
            this.targetClass = targetClass;
            this.initMethods = initMethods;
        }
    }

    /**
     * Class representing injection information about an annotated method.
     */
    private static class LifecycleElement {

        private final Method method;

        public LifecycleElement(Method method) {
            // 假设method符合条件
            this.method = method;
        }

        // ...
    }

}
在完成了LifecycleMetadata对象(含标记有@PostConstruct注解的方法)后,Spring就会通过LifecycleMetadata#invokeInitMethods方法完成对初始化方法的调用了(通过反射的方式完成方法的调用)。
public class InitDestroyAnnotationBeanPostProcessor implements DestructionAwareBeanPostProcessor, MergedBeanDefinitionPostProcessor, ... {
    /**
     * Class representing information about annotated init and destroy methods.
     */
    private class LifecycleMetadata {

        private final Class<?> targetClass;

        private final Collection<LifecycleElement> initMethods;

        private volatile Set<LifecycleElement> checkedInitMethods;

        public void invokeInitMethods(Object target, String beanName) throws Throwable {
            Collection<LifecycleElement> checkedInitMethods = this.checkedInitMethods;
            Collection<LifecycleElement> initMethodsToIterate =
                    (checkedInitMethods != null ? checkedInitMethods : this.initMethods);
            // 假设initMethodsToIterate不为空
            for (LifecycleElement element : initMethodsToIterate) {
                element.invoke(target);
            }
        }
    }

    /**
     * Class representing injection information about an annotated method.
     */
    private static class LifecycleElement {

        private final Method method;

        // ...

        public void invoke(Object target) throws Throwable {
            ReflectionUtils.makeAccessible(this.method);
            this.method.invoke(target, (Object[]) null);
        }
    }

}
至此,Spring在BeanPostProcessor的前置处理方法postProcessBeforeInitialization上完成了对被外部管理的initMethod的调用(使用@PostConstruct注解所标注的initMethod方法)。
那对于
externallyManagedInitMethods属性,Spring是在什么时候对它进行修改来避免在invokeInitMethods方法中被同时调用了呢?对于
externallyManagedInitMethods属性的变更,实际上是InitDestroyAnnotationBeanPostProcessor使用了MergedBeanDefinitionPostProcessor提供的扩展点提前完成的(相对于BeanPostProcessor),下面我们可以看到MergedBeanDefinitionPostProcessor#postProcessMergedBeanDefinition方法:public class InitDestroyAnnotationBeanPostProcessor implements MergedBeanDefinitionPostProcessor, ... { @Override public void postProcessMergedBeanDefinition(RootBeanDefinition beanDefinition, Class<?> beanType, String beanName) { findInjectionMetadata(beanDefinition, beanType); } private LifecycleMetadata findInjectionMetadata(RootBeanDefinition beanDefinition, Class<?> beanType) { LifecycleMetadata metadata = findLifecycleMetadata(beanType); metadata.checkConfigMembers(beanDefinition); return metadata; } /** * Class representing information about annotated init and destroy methods. */ private class LifecycleMetadata { private final Collection<LifecycleElement> initMethods; private volatile Set<LifecycleElement> checkedInitMethods; public void checkConfigMembers(RootBeanDefinition beanDefinition) { Set<LifecycleElement> checkedInitMethods = new LinkedHashSet<>(this.initMethods.size()); for (LifecycleElement element : this.initMethods) { String methodIdentifier = element.getIdentifier(); if (!beanDefinition.isExternallyManagedInitMethod(methodIdentifier)) { // 注册到externallyManagedInitMethods属性 beanDefinition.registerExternallyManagedInitMethod(methodIdentifier); checkedInitMethods.add(element); } } // ...忽略destroyMethod的处理 this.checkedInitMethods = checkedInitMethods; } } }
postProcessMergedBeanDefinition方法首先会将处理委托给了findInjectionMetadata方法,接着findInjectionMetadata方法会提前完成findLifecycleMetadata方法的调用,最后使用LifecycleMetadata对象的checkConfigMembers方法完成了externallyManagedInitMethods属性的变更。需要注意,为了能够更清晰的理解初始化的逻辑,笔者贴出的上述代码是简化后的(例如,对于findLifecycleMetadata方法由于存在多次的调用,实际上Spring是做了缓存处理的),有兴趣的读者可以再去阅读Spring的完整版源码。
最后,结合上文《源码分析:Bean的创建》章节中提到Spring使用激活bean初始化的invokeInitMethods方法中执行的顺序,即:
InitializingBean#afterPropertiesSet()方法init()方法(自定义配置)
在添加@PostConstruct注解标记初始化方法后(Spring将这种类型的init方法称之为被外部管理的initMethod),bean整体的初始化方法执行顺序演变如下:
@PostConstruct注解方法(被外部管理的initMethod)InitializingBean#afterPropertiesSet()方法init()方法(自定义配置)
AutowiredAnnotationBeanPostProcessor
对于@Autowired注解、@Inject注解和@Value注解的解析与处理Spring都是通过AutowiredAnnotationBeanPostProcessor来完成。也就是说,如果我们要让@Autowired注解、@Inject注解和@Value注解生效,就需要将AutowiredAnnotationBeanPostProcessor注册到Spring容器中。
/**
 * {@link org.springframework.beans.factory.config.BeanPostProcessor BeanPostProcessor}
 * implementation that autowires annotated fields, setter methods, and arbitrary
 * config methods. Such members to be injected are detected through annotations:
 * by default, Spring's {@link Autowired @Autowired} and {@link Value @Value}
 * annotations.
 *
 * <p>Also supports JSR-330's {@link javax.inject.Inject @Inject} annotation,
 * if available, as a direct alternative to Spring's own {@code @Autowired}.
 *
 * ...
 *
 * <h3>Annotation Config vs. XML Config</h3>
 * <p>A default {@code AutowiredAnnotationBeanPostProcessor} will be registered
 * by the "context:annotation-config" and "context:component-scan" XML tags.
 * Remove or turn off the default annotation configuration there if you intend
 * to specify a custom {@code AutowiredAnnotationBeanPostProcessor} bean definition.
 *
 * ...
 *
 */
public class AutowiredAnnotationBeanPostProcessor implements SmartInstantiationAwareBeanPostProcessor, MergedBeanDefinitionPostProcessor, ... {

    private final Set<Class<? extends Annotation>> autowiredAnnotationTypes = new LinkedHashSet<>(4);

    public AutowiredAnnotationBeanPostProcessor() {
        this.autowiredAnnotationTypes.add(Autowired.class);
        this.autowiredAnnotationTypes.add(Value.class);
        // 忽略异常处理
        this.autowiredAnnotationTypes.add((Class<? extends Annotation>)
                ClassUtils.forName("javax.inject.Inject", AutowiredAnnotationBeanPostProcessor.class.getClassLoader()));
    }

}
首先,在AutowiredAnnotationBeanPostProcessor构造器中就会将@Autowired注解、@Inject注解和@Value注解的Class类型添加到autowiredAnnotationTypes中,然后在bean属性加载的后置处理postProcessProperties方法(具体可阅读上文《源码分析:Bean的创建》章节)中,Spring会完成对被标记字段和方法的依赖加载和依赖注入。
@Override
public PropertyValues postProcessProperties(PropertyValues pvs, Object bean, String beanName) {
    InjectionMetadata metadata = findAutowiringMetadata(beanName, bean.getClass(), pvs);
    // 假设没有异常
    metadata.inject(bean, beanName, pvs);
    return pvs;
}
在postProcessProperties方法中,Spring会按照以下2个步骤执行:
- 通过
findAutowiringMetadata方法查询/构建出标记了注解的字段/方法。 - 通过
InjectionMetadata.InjectedElement#inject方法完成对被标记字段/方法的依赖加载与依赖注入。
-
1、查询/构建出标记了注解的字段/方法。
在
findAutowiringMetadata方法中,Spring会通过反射机制获取并封装bean中字段/方法为InjectionMetadata.InjectedElement对象。private InjectionMetadata findAutowiringMetadata(String beanName, Class<?> clazz, @Nullable PropertyValues pvs) { // 忽略对缓存的处理 InjectionMetadata metadata = buildAutowiringMetadata(clazz); return metadata; } private InjectionMetadata buildAutowiringMetadata(final Class<?> clazz) { // ... List<InjectionMetadata.InjectedElement> elements = new ArrayList<>(); Class<?> targetClass = clazz; do { final List<InjectionMetadata.InjectedElement> currElements = new ArrayList<>(); // 通过反射机制获取标注了注解的字段,并将他封装为InjectionMetadata.InjectedElement添加到currElements中 ReflectionUtils.doWithLocalFields(targetClass, field -> { // 查找并过滤出标注了注解的字段 MergedAnnotation<?> ann = findAutowiredAnnotation(field); if (ann != null) { // 假设field为非静态字段 boolean required = ...; currElements.add(new AutowiredFieldElement(field, required)); } }); // 通过反射机制获取标注了注解的方法,并将他封装为InjectionMetadata.InjectedElement添加到currElements中 ReflectionUtils.doWithLocalMethods(targetClass, method -> { // 可简单理解为method Method bridgedMethod = BridgeMethodResolver.findBridgedMethod(method); // ... // 查找并过滤出标注了注解的方法 MergedAnnotation<?> ann = findAutowiredAnnotation(bridgedMethod); if (ann != null && ...) { // 假设method为非静态方法 boolean required = ...; PropertyDescriptor pd = BeanUtils.findPropertyForMethod(bridgedMethod, clazz); currElements.add(new AutowiredMethodElement(method, required, pd)); } }); elements.addAll(0, currElements); // 由下至上遍历父类 targetClass = targetClass.getSuperclass(); } while (targetClass != null && targetClass != Object.class); return InjectionMetadata.forElements(elements, clazz); } @Nullable private MergedAnnotation<?> findAutowiredAnnotation(AccessibleObject ao) { MergedAnnotations annotations = MergedAnnotations.from(ao); // 在AutowiredAnnotationBeanPostProcessor的构造器中@Autowired注解类、@Inject注解类和@Value注解类添加到autowiredAnnotationTypes属性中 for (Class<? extends Annotation> type : this.autowiredAnnotationTypes) { MergedAnnotation<?> annotation = annotations.get(type); if (annotation.isPresent()) { return annotation; } } return null; }在实现上
findAutowiringMetadata会将真正构建InjectionMetadata.InjectedElement对象的逻辑委托给buildAutowiringMetadata来完成。在buildAutowiringMetadata中会分别通过反射机制获取并封装bean中被注解标注的字段和方法,并最终返回InjectionMetadata对象(含InjectionMetadata.InjectedElement列表)。关于
Bridge method,源自Java泛型擦除的解决方案。在编译继承了泛型的类或者接口时,由于泛型擦除导致了方法覆盖失效,Java会特地生成的与其泛型擦除后对应的方法,这个方法我们就称之为Bridge method。更多详情我们可以阅读以下链接:
-
2、完成对被标记字段/方法的依赖加载与依赖注入。
在完成对
bean中字段/方法的封装后,Spring接着会执行其中的InjectedElement#inject方法完成对bean的加载与注入。而封装字段的AutowiredFieldElement类和封装方法的AutowiredMethodElement类都对inject方法进行了覆盖,下面我们来看看它是如何实现的:在
AutowiredFieldElement中,Spring首先会使用BeanFactory来获取和解析字段中的依赖属性(如有),然后在使用反射机制完成属性值的注入。/** * Class representing injection information about an annotated field. */ private class AutowiredFieldElement extends InjectionMetadata.InjectedElement { private final boolean required; public AutowiredFieldElement(Field field, boolean required) { super(field, null); this.required = required; } @Override protected void inject(Object bean, @Nullable String beanName, @Nullable PropertyValues pvs) throws Throwable { Field field = (Field) this.member; // 解析属性值 Object value = resolveFieldValue(field, bean, beanName); if (value != null) { // 设置属性值 ReflectionUtils.makeAccessible(field); field.set(bean, value); } } @Nullable private Object resolveFieldValue(Field field, Object bean, @Nullable String beanName) { DependencyDescriptor desc = new DependencyDescriptor(field, this.required); desc.setContainingClass(bean.getClass()); // ... // 通过BeanFactory获取和解析指定的依赖 Object value = beanFactory.resolveDependency(desc, beanName, ...); return value; } }与
AutowiredFieldElement相似的,在AutowiredMethodElement中Spring会使用BeanFactory对方法参数中依赖的属性(如有)逐个进行获取和解析,然后在使用反射机制将属性值传入方法中进行调用。/** * Class representing injection information about an annotated method. */ private class AutowiredMethodElement extends InjectionMetadata.InjectedElement { private final boolean required; public AutowiredMethodElement(Method method, boolean required, @Nullable PropertyDescriptor pd) { super(method, pd); this.required = required; } @Override protected void inject(Object bean, @Nullable String beanName, @Nullable PropertyValues pvs) throws Throwable { // 忽略缓存和异常的处理 Method method = (Method) this.member; // 解析方法参数 Object[] arguments = resolveMethodArguments(method, bean, beanName); if (arguments != null) { // 使用方法参数调用方法 ReflectionUtils.makeAccessible(method); method.invoke(bean, arguments); } } @Nullable private Object[] resolveMethodArguments(Method method, Object bean, @Nullable String beanName) { int argumentCount = method.getParameterCount(); Object[] arguments = new Object[argumentCount]; // ... for (int i = 0; i < arguments.length; i++) { MethodParameter methodParam = new MethodParameter(method, i); DependencyDescriptor currDesc = new DependencyDescriptor(methodParam, this.required); currDesc.setContainingClass(bean.getClass()); // 通过BeanFactory获取和解析指定的依赖 Object arg = beanFactory.resolveDependency(currDesc, beanName, ...); if (arg == null && !this.required) { arguments = null; break; } arguments[i] = arg; } return arguments; } }
除此之外,在
AutowiredAnnotationBeanPostProcessor中还对标注在方法中的@Lookup注解完成了解析。在实现上,Spring会在determineCandidateConstructors方法中通过反射机制获取标注了Lookup注解的方法,然后将它添加到BeanFactory中对应RootBeanDefinition的methodOverrides属性上。/* * <h3>{@literal @}Lookup Methods</h3> * <p>In addition to regular injection points as discussed above, this post-processor * also handles Spring's {@link Lookup @Lookup} annotation which identifies lookup * methods to be replaced by the container at runtime. This is essentially a type-safe * version of {@code getBean(Class, args)} and {@code getBean(String, args)}. * See {@link Lookup @Lookup's javadoc} for details. */ public class AutowiredAnnotationBeanPostProcessor implements SmartInstantiationAwareBeanPostProcessor, MergedBeanDefinitionPostProcessor, ... { @Override @Nullable public Constructor<?>[] determineCandidateConstructors(Class<?> beanClass, final String beanName) throws BeanCreationException { // 忽略重复处理等判断 Class<?> targetClass = beanClass; do { ReflectionUtils.doWithLocalMethods(targetClass, method -> { Lookup lookup = method.getAnnotation(Lookup.class); if (lookup != null) { LookupOverride override = new LookupOverride(method, lookup.value()); RootBeanDefinition mbd = (RootBeanDefinition)this.beanFactory.getMergedBeanDefinition(beanName); mbd.getMethodOverrides().addOverride(override); } }); targetClass = targetClass.getSuperclass(); } while (targetClass != null && targetClass != Object.class); // ...处理构造器解析 } }
至此,在AutowiredAnnotationBeanPostProcessor中完成了对@Inject注解和@Value注解的解析与处理。
Bean的循环依赖
在Spring的使用中常常会有bean循环依赖的发生,貌似给人感觉就是这个概念是Spring特有的,但实际上在软件工程中的反模式(anti-pattern)中早已将臭名昭著的循循环依赖原则(ADP)登记在册了,只不过在Spring依赖注入的特性加持下循环依赖变得显而易见了,这也是大部分IoC框架所能遇见的问题。
循环依赖的发生
简单来说,循环依赖即是指模块间的属性存在相互依赖的关系。典型地,在Spring中我们可以轻松地找到以下触发到循环依赖的场景:
-
构造器自动装配发生循环依赖
@Service public class ServiceOne { private ServiceTwo serviceTwo; @Autowired public ServiceOne(ServiceTwo serviceTwo){ this.serviceTwo = serviceTwo; } } @Service public class ServiceTwo { private ServiceOne serviceOne; @Autowired public ServiceTwo(ServiceOne serviceOne){ this.serviceOne = serviceOne; } } -
工厂方法自动装配发生循环依赖
@Bean public BeanA beanA(BeanB beanB) { return new BeanA(); } @Bean public BeanB BeanB(BeanA beanA) { return new BeanB(); } public class BeanA { } public class BeanB { } -
Setter方法自动装配发生循环依赖@Service public class ServiceOne { private ServiceTwo serviceTwo; @Autowired public void setServiceTwo(ServiceTwo serviceTwo){ this.serviceTwo = serviceTwo; } } @Service public class ServiceTwo { private ServiceOne serviceOne; @Autowired public void setServiceOne(ServiceOne serviceOne){ this.serviceOne = serviceOne; } } -
字段自动装配发生循环依赖
@Service
public class ServiceOne {
    @Autowired
    private ServiceTwo serviceTwo;
}

@Service
public class ServiceTwo {
    @Autowired
    private ServiceOne serviceOne;
}
其中,对于上述某些场景在发生循环依赖时可能会被Spring顺利解决而避免异常的发生;对于另一些场景发生循环依赖时则可能无法被Spring解决而抛出循环依赖异常。为了避免在使用Spring的过程中由于使用不当触发到循环依赖异常,下面我们从Spring对循环依赖的的解决方案入手在原理上认识到如何规避循环依赖异常的发生。
循环依赖的解决
在通过AbstractBeanFactory#doGetBean方法执行bean的实例化的时候,Spring会在其中夹杂着对循环依赖的处理,以此来尽可能地避免在实例化过程中循环依赖异常的发生。那下面我们将从AbstractBeanFactory#doGetBean方法开始对Spring循环依赖的解决思路进行分析。
为了更清晰的阐述,这里将bean的创建分为单例模式和多例模式2种:
- 单例模式(
Singleton)的bean创建。 - 多例模式(
Prototype)的bean创建。
由于单例模式和多例模式下对循环依赖的处理方式基本涵盖了所有场景,我们完全可以结合单例模式和多例模式下对循环依赖的处理方式来完成对其他作用域的处理分析,因此在这里就不对
Spring其他类型的作用域展示分析了。
单例模式的bean创建
在单例模式下,doGetBean方法首先会逐个从不同的缓存级别中获取bean实例,如果其中某个层级不为空则将其取出并进一步处理后返回;而如果各个层级都不存在则表示当前bean尚未被实例化,因此对该bean执行实例化操作。下面,我们看到具体的代码步骤:
注意,在此章节贴出的代码并非完整代码,而是经过笔者简化后仅作用于实例化单例作用域
bean的代码。
protected <T> T doGetBean(String name, @Nullable Class<T> requiredType, @Nullable Object[] args, boolean typeCheckOnly) throws ... {

    String beanName = ...;

    Object beanInstance;

    // Eagerly check singleton cache for manually registered singletons.
    Object sharedInstance = getSingleton(beanName, true);
    if (sharedInstance != null && args == null) {
        // ...
        beanInstance = getObjectForBeanInstance(sharedInstance, ...);
    }

    else {

        // ...

        RootBeanDefinition mbd = ...;

        // ...

        // Create bean instance.
        sharedInstance = getSingleton(beanName, () -> {
            // 假设没有异常
            return createBean(beanName, mbd, args);
        });
        beanInstance = getObjectForBeanInstance(sharedInstance, ...);

    }

    return adaptBeanInstance(name, beanInstance, requiredType);
}
在doGetBean方法中,首先会使用getSingleton(String, boolean)方法在缓存中查找出对应的bean实例,在查找失败的情况下再使用getSingleton(String, ObjectFactory)方法创建对应的bean实例。虽然这么一看其执行流程与常规的缓存策略大致相同,但实际上它会在常规缓存策略的基础上添加了多级缓存策略和构建重复性验证来避免循环依赖的发生。
在进行具体的执行流程之前,我们先来对Spring在单例bean的实例化过程中涉及到的多级缓存策略提前进行梳理。具体地,bean在实例化过程中为保证单例作用域的特性、循环依赖的处理和一些设计理念的考虑一共使用到了3个级别的缓存,即:
| 缓存 | 等级 | 说明 |
|---|---|---|
singletonObjects |
三级缓存 | 缓存已完成的bean实例,已执行完成bean的初始化。 |
earlySingletonObjects |
二级缓存 | 缓存构建初期的bean实例,尚未执行bean实例的初始化。 |
singletonFactories |
一级缓存 | 缓存构建bean的工厂实例,尚未执行bean实例的创建。 |
根据上述对每个级别缓存的阐述,基本可以分析出:
- 在三级缓存
singletonObjects的作用下保证了bean单例作用域的特性; - 在二级缓存
earlySingletonObjects的作用下完成了循环依赖的解决,这其实与常规的循环依赖解决方案大致相同,即通过缓存将尚未执行初始化的对象提前暴露出去; - 在一级缓存
singletonFactories的作用下可以延迟二级缓存中earlySingletonObject对象的生成(只有在循环依赖真正发生时才特意生成出earlySingletonObject对象),毕竟循环依赖在bean的引用关系中并不一定会发生(Spring也不推荐在bean的引用关系中发生循环依赖)。
当然,对各级缓存作用的分析仅是基于它们表面的代码行为,而对其在Spring中真正发挥到的作用还需要进一步阅读doGetBean方法的执行逻辑。那下面我们就开始展开对doGetBean方法的阅读理解与逻辑分析。
在doGetBean方法的执行流程中,Spring首先会通过getSingleton(String, boolean)方法从bean的多级缓存中查询缓存实例:
/**
* Return the (raw) singleton object registered under the given name.
* <p>Checks already instantiated singletons and also allows for an early
* reference to a currently created singleton (resolving a circular reference).
* @param beanName the name of the bean to look for
* @param allowEarlyReference whether early references should be created or not
* @return the registered singleton object, or {@code null} if none found
*/
@Nullable
protected Object getSingleton(String beanName, boolean allowEarlyReference) {
// Quick check for existing instance without full singleton lock
Object singletonObject = this.singletonObjects.get(beanName);
if (singletonObject == null && isSingletonCurrentlyInCreation(beanName)) {
singletonObject = this.earlySingletonObjects.get(beanName);
if (singletonObject == null && allowEarlyReference) {
// 忽略并发情况下的获取: Consistent creation of early reference within full singleton lock
ObjectFactory<?> singletonFactory = this.singletonFactories.get(beanName);
if (singletonFactory != null) {
singletonObject = singletonFactory.getObject();
this.earlySingletonObjects.put(beanName, singletonObject);
this.singletonFactories.remove(beanName);
}
}
}
return singletonObject;
}
其中,getSingleton(String, boolean)方法正如上述所说会逐级查询缓存实例,若查询成功则在经过相应的处理后返回。具体地,getSingleton会通过第2个参数allowEarlyReference来控制是否执行一级缓存singletonFactories的查询与二级缓存earlySingletonObject的创建。下面,我们将根据allowEarlyReference参数不同的值总结出不同的执行流程:
-
当
allowEarlyReference参数为true,允许执行一级缓存singletonFactories的查询与二级缓存earlySingletonObject的创建:- 从三级缓存中查询已执行初始化完成的
bean实例singletonObject,如果查询存在直接返回(保证了bean单例作用域的特性),否则执行第2步。 - 从二级缓存中查询构建初期尚未执行初始化的
bean实例earlySingletonObject,如果查询存在直接返回(证实了bean发生过循环依赖),否则执行第3步。 - 从一级缓存中查询是否存在构建
bean的工厂实例singletonFactory,如果不存在直接返回null(证实了bean尚未被创建),否则:- 通过
singletonFactory实例创建出earlySingletonObject实例。 - 将
earlySingletonObject实例添加到二级缓存中。 - 将
singletonFactory实例从一级缓存中移除。 - 将
earlySingletonObject实例返回。
- 通过
即,
getSingleton(String, true)方法会分别从三级缓存singletonObjects、二级缓存earlySingletonObjects到一级缓存singletonFactorys中查询对应的缓存实例,如果在三级缓存、二级缓存中查询成功则直接返回;如果在一级缓存中查询成功则根据工厂实例创建出earlySingletonObject实例添加到二级缓存并返回该实例;如果都没有查询成功则返回null表示尚未开始bean实例的创建。+ | | v +---------+----------+ | | success | singletonObjects +------------>+ | | | +---------+----------+ | | | | | | failure | | | v | +-----------+------------+ | | | success | +---------->+ earlySingletonObjects +---------->+ | | | | | +-----------+------------+ | | | | | | | success | | failure | | | | | v | | +----------+-----------+ | | | | | +------------+ singletonFactories | | | | | +----------+-----------+ | | | | | | failure | | | v v null singletonObject/earlySingletonObject - 从三级缓存中查询已执行初始化完成的
-
当
allowEarlyReference参数为false,不允许执行一级缓存singletonFactories的查询与二级缓存earlySingletonObject的创建:- 从三级缓存中查询已执行初始化完成的
bean实例singletonObject,如果查询存在直接返回(保证了bean单例作用域的特性),否则执行第2步。 - 从二级缓存中查询构建初期尚未执行初始化的
bean实例earlySingletonObject,如果查询存在直接返回(证实了bean发生循环依赖),否则直接返回null。
即,
getSingleton(String, false)方法会分别从三级缓存singletonObjects和二级缓存earlySingletonObjects中查询对应的缓存实例,如果在三级缓存或者二级缓存中查询成功则直接返回,否则返回null。+ | | v +---------+----------+ | | success | singletonObjects +------------>+ | | | +---------+----------+ | | | | | | failure | | | v | +-----------+------------+ | | | success | | earlySingletonObjects +---------->+ | | | +-----------+------------+ | | | | | | failure | | | v v null singletonObject/earlySingletonObject - 从三级缓存中查询已执行初始化完成的
在代码中我们可以看到doGetBean方法执行的是getSingleton(String, true)方法,即会分别从三级缓存singletonObjects、二级缓存earlySingletonObjects到一级缓存singletonFactorys中查询对应的缓存实例。为了能完整地描述循环依赖的整个流程,这里就暂且假设bean尚未被创建过。因此,Spring在执行getSingleton(String, true)方法时返回null,随即进入到getSingleton(String, ObjectFactory)方法执行bean实例的创建,具体如下所示:
/**
* Return the (raw) singleton object registered under the given name,
* creating and registering a new one if none registered yet.
* @param beanName the name of the bean
* @param singletonFactory the ObjectFactory to lazily create the singleton
* with, if necessary
* @return the registered singleton object
*/
public Object getSingleton(String beanName, ObjectFactory<?> singletonFactory) {
Object singletonObject = this.singletonObjects.get(beanName);
if (singletonObject == null) {
// ...
beforeSingletonCreation(beanName);
boolean newSingleton = false;
try {
// 假设无异常
singletonObject = singletonFactory.getObject();
newSingleton = true;
} finally {
afterSingletonCreation(beanName);
}
if (newSingleton) {
addSingleton(beanName, singletonObject);
}
}
return singletonObject;
}
如同常规单例模式下的实例创建流程,在getSingleton(String, ObjectFactory)方法中也会优先从三级缓存singletonObjects中获取实例,在获取失败后才会执行singletonObject对象的创建。而在singletonObject的创建流程中,除了会完成singletonObject实例的创建,还添加了实例创建的前置处理beforeSingletonCreation与后置处理afterSingletonCreation,具体代码如下所示:
/** Names of beans that are currently in creation. */
private final Set<String> singletonsCurrentlyInCreation =
Collections.newSetFromMap(new ConcurrentHashMap<>(16));
/**
* Callback before singleton creation.
* <p>The default implementation register the singleton as currently in creation.
* @param beanName the name of the singleton about to be created
* @see #isSingletonCurrentlyInCreation
*/
protected void beforeSingletonCreation(String beanName) {
if (... && !this.singletonsCurrentlyInCreation.add(beanName)) {
throw new BeanCurrentlyInCreationException(beanName);
}
}
/**
* Callback after singleton creation.
* <p>The default implementation marks the singleton as not in creation anymore.
* @param beanName the name of the singleton that has been created
* @see #isSingletonCurrentlyInCreation
*/
protected void afterSingletonCreation(String beanName) {
if (... && !this.singletonsCurrentlyInCreation.remove(beanName)) {
throw new IllegalStateException("...");
}
}
在前置处理beforeSingletonCreation(创建bean实例前)中,Spring会尝试将当前beanName加入到singletonsCurrentlyInCreation中,若加入失败则抛出异常BeanCurrentlyInCreationException;而后置处理afterSingletonCreation(创建bean实例后)中,Spring会尝试将当前beanName从singletonsCurrentlyInCreation中移除,若移除失败则抛出异常IllegalStateException。
实际上,
Spring就是通过这种前置处理和后置处理来判断bean在实例化过程中是否发生了无法解决的循环依赖,进而在请求时抛出异常提前阻止程序进入无限循环。
典型地,当Spring在构造器自动装配时发生了循环依赖即会在前置处理中触发BeanCurrentlyInCreationException异常的发生,具体流程如下图所示:
+
|
|
v
+-------------+-------------+
throw ex | | circular references
<------------+ beforeSingletonCreation +<----------------------+
| | |
+-------------+-------------+ |
| |
| |
| |
v |
+--------------+---------------+ +----------+-----------+
| | | |
| singletonFactory#getObject +--------->+ createBeanInstance |
| | | |
+--------------+---------------+ +----------+-----------+
| |
| | To expose earlySingletonObject
| |
v v
+------------+-------------+
| |
| afterSingletonCreation |
| |
+--------------------------+
回归到正常流程上,如果在前置处理beforeSingletonCreation没有发现循环依赖,那么Spring就会进入到createBean方法执行bean实例的创建。
@Override
protected Object createBean(String beanName, RootBeanDefinition mbd, @Nullable Object[] args)
throws BeanCreationException {
RootBeanDefinition mbdToUse = mbd;
//...
Object beanInstance = doCreateBean(beanName, mbdToUse, args);
return beanInstance;
}
protected Object doCreateBean(String beanName, RootBeanDefinition mbd, @Nullable Object[] args) throws BeanCreationException {
// 1. 执行`raw bean`实例的创建
BeanWrapper instanceWrapper = ...createBeanInstance(beanName, mbd, args);
Object bean = instanceWrapper.getWrappedInstance();
// ...
// 2. 通过`raw bean`实例构建工厂实例并将其添加到一级缓存
addSingletonFactory(beanName, () -> getEarlyBeanReference(beanName, mbd, bean));
Object exposedObject = bean;
// 3. 执行`raw bean`实例的属性填充
populateBean(beanName, mbd, instanceWrapper);
// 4. 执行`raw bean`实例的初始化
exposedObject = initializeBean(beanName, exposedObject, mbd);
// 5. 归正最终返回的`bean`实例
Object earlySingletonReference = getSingleton(beanName, false);
if (earlySingletonReference != null) {
if (exposedObject == bean) {
exposedObject = earlySingletonReference;
}
else if (...) {
...
}
}
// ...
return exposedObject;
}
在createBean方法中不但会执行基本的bean实例化流程,而且还会额外添加解决循环依赖的代码块,具体执行流程如下所示:
- 执行
raw bean实例的创建 - 通过
raw bean实例构建工厂实例并将其添加到一级缓存 - 执行
raw bean实例的属性填充 - 执行
raw bean实例的初始化 - 归正最终返回的
bean实例
其中,步骤1、3和4都是bean实例化流程的基本步骤,这在上文《源码分析:Bean的创建》章节中已有所提及,这里就不在赘述了。而步骤2和步骤5则主要用于解决bean的循环依赖,下面我们来详细看看这2个步骤:
根据上述流程,Spring在执行完bean基本对象的创建后就会执行步骤2(在属性填充和实例初始化前),即通过raw bean实例构造出工厂实例并将其添加到一级缓存:
// 视`() -> getEarlyBeanReference(beanName, mbd, bean)`为工厂实例
addSingletonFactory(beanName, () -> getEarlyBeanReference(beanName, mbd, bean));
/**
* Add the given singleton factory for building the specified singleton
* if necessary.
* <p>To be called for eager registration of singletons, e.g. to be able to
* resolve circular references.
* @param beanName the name of the bean
* @param singletonFactory the factory for the singleton object
*/
protected void addSingletonFactory(String beanName, ObjectFactory<?> singletonFactory) {
if (!this.singletonObjects.containsKey(beanName)) {
this.singletonFactories.put(beanName, singletonFactory);
this.earlySingletonObjects.remove(beanName);
}
}
通过这种方式,如果Spring在属性填充阶段发生了循环依赖再次向doGetBean方法请求当前bean时就会触发到getSingleton(String, true)方法的执行(此时在一级缓存中会存在当前bean的工厂实例缓存)。在getSingleton(String, true)方法中会一路探查到一级缓存将当前存储的工厂实例取出执行(即执行getEarlyBeanReference方法),具体执行逻辑如下所示:
/**
* Obtain a reference for early access to the specified bean,
* typically for the purpose of resolving a circular reference.
* @param beanName the name of the bean (for error handling purposes)
* @param mbd the merged bean definition for the bean
* @param bean the raw bean instance
* @return the object to expose as bean reference
*/
protected Object getEarlyBeanReference(String beanName, RootBeanDefinition mbd, Object bean) {
Object exposedObject = bean;
//...假设符合条件
for (BeanPostProcessor bp : getBeanPostProcessors()) {
if (bp instanceof SmartInstantiationAwareBeanPostProcessor) {
SmartInstantiationAwareBeanPostProcessor ibp = (SmartInstantiationAwareBeanPostProcessor) bp;
exposedObject = ibp.getEarlyBeanReference(exposedObject, beanName);
}
}
return exposedObject;
}
public interface SmartInstantiationAwareBeanPostProcessor extends InstantiationAwareBeanPostProcessor {
/**
* Obtain a reference for early access to the specified bean,
* typically for the purpose of resolving a circular reference.
* <p>This callback gives post-processors a chance to expose a wrapper
* early - that is, before the target bean instance is fully initialized.
* The exposed object should be equivalent to the what
* {@link #postProcessBeforeInitialization} / {@link #postProcessAfterInitialization}
* would expose otherwise. Note that the object returned by this method will
* be used as bean reference unless the post-processor returns a different
* wrapper from said post-process callbacks. In other words: Those post-process
* callbacks may either eventually expose the same reference or alternatively
* return the raw bean instance from those subsequent callbacks (if the wrapper
* for the affected bean has been built for a call to this method already,
* it will be exposes as final bean reference by default).
* <p>The default implementation returns the given {@code bean} as-is.
* @param bean the raw bean instance
* @param beanName the name of the bean
* @return the object to expose as bean reference
* (typically with the passed-in bean instance as default)
*/
default Object getEarlyBeanReference(Object bean, String beanName) throws BeansException {
return bean;
}
}
在getEarlyBeanReference方法中会遍历所有的SmartInstantiationAwareBeanPostProcessor对raw bean进行修饰处理,默认情况下SmartInstantiationAwareBeanPostProcessor#getEarlyBeanReference不会做任何处理直接原样返回bean,而如果Spring使用了AOP特性则会通过其实现类中的AbstractAutoProxyCreator#getEarlyBeanReference方法对bean包装一层代理,具体如下所示:
/**
* {@link org.springframework.beans.factory.config.BeanPostProcessor} implementation
* that wraps each eligible bean with an AOP proxy, delegating to specified interceptors
* before invoking the bean itself.
* ...
*/
public abstract class AbstractAutoProxyCreator extends ProxyProcessorSupport implements SmartInstantiationAwareBeanPostProcessor, ... {
@Override
public Object getEarlyBeanReference(Object bean, String beanName) {
Object cacheKey = getCacheKey(bean.getClass(), beanName);
// 特别需要关注这里,在对bean包装前会将bean存入缓存中
this.earlyProxyReferences.put(cacheKey, bean);
return wrapIfNecessary(bean, beanName, cacheKey);
}
/**
* Wrap the given bean if necessary, i.e. if it is eligible for being proxied.
* @param bean the raw bean instance
* @param beanName the name of the bean
* @param cacheKey the cache key for metadata access
* @return a proxy wrapping the bean, or the raw bean instance as-is
*/
protected Object wrapIfNecessary(Object bean, String beanName, Object cacheKey) {
// ...
// Create proxy if we have advice.
Object[] specificInterceptors = getAdvicesAndAdvisorsForBean(bean.getClass(), beanName, null);
if (specificInterceptors != DO_NOT_PROXY) {
Object proxy = createProxy(
bean.getClass(), beanName, specificInterceptors, new SingletonTargetSource(bean));
this.proxyTypes.put(cacheKey, proxy.getClass());
return proxy;
}
// ...
return bean;
}
}
也就是说,在默认情况下如果没有使用Spring AOP,SmartInstantiationAwareBeanPostProcessor#getEarlyBeanReference会原样返回bean实例;而如果使用了Spring AOP,SmartInstantiationAwareBeanPostProcessor#getEarlyBeanReference则会包装一层代理层再返回。而不管在哪种情况下执行,getSingleton(String, true)方法在通过getEarlyBeanReference方法获得earlySingletonObject实例后就将它添加到二级缓存中,并最终将earlySingletonObject实例返回,完成对早期bean的提前暴露,从而终止对bean的再次创建、属性填充和实例初始化,避免程序在循环依赖中不断地对bean进行实例化的困境。Spring就是通过这种方式来解决bean的循环依赖的,具体流程如下图所示:
+
| get A
v
+-------+--------+
+--------+ getSingleton +<-----------------------------------+
| +-------+--------+ |
| | |
| v |
| +----------+-----------+ +--------------+ +-------+ |
| | createBeanInstance +-->+ populateBean +-->+ |-| +--->
| +----------------------+ +------+-------+ +-------+ |
| | get B | get A
v v |
+-----------+-----------+ +-------+--------+ |
| getSingletonFactory | | getSingleton | |
+-----------+-----------+ +-------+--------+ |
| | |
v v |
+------------+------------+ +----------+-----------+ +------+-------+ +-------+
| getEarlyBeanReference | | createBeanInstance +-->+ populateBean +-->+ |-| +--->
+------------+------------+ +----------------------+ +------+-------+ +-------+
| ^
| |
+--------------------------------------------------------------+
一般来说,
getEarlyBeanReference方法返回的对象与postProcessBeforeInitialization/postProcessAfterInitialization所返回的对象是相等的。不过,Spring并没有特意对此作强制要求,如果我们在postProcessBeforeInitialization/postProcessAfterInitialization中返回与之前不一样的引用就会造成它们之间的等式不成立。
再结合上文bean创建流程中前置处理beforeSingletonCreation方法与后置处理afterSingletonCreation方法的判断,不难得出Spring就是通过这种将早期bean提前暴露到缓存的方式来避免bean依赖的创建再次进入到前置处理beforeSingletonCreation方法中造成异常的抛出,具体可参考以下流程图:
|
|
v
+--------+-------+
| | circular references
+--------------+ getSingleton +<--------------------------------------------------+
| | | |
| +--------+-------+ |
| | |
| create if not exists |
| | |
| +------------------------------------+ |
| | | | |
| | v | |
| | +-------------+-------------+ | |
| | | | | |
| | | beforeSingletonCreation | | |
| | | | | |
| | +-------------+-------------+ | |
| | | | |
| | | | |
| | | | |
| | v | |
| | +--------------+---------------+ | +----------------------+ |
| | | | | | | |
| | | singletonFactory#getObject +--------->+ createBeanInstance | |
| | | | | | | |
| | +--------------+---------------+ | +----------+-----------+ |
| | | | | |
| | | | To expose earlySingletonObject |
| | | | | |
| | v | v |
| | +------------+-------------+ | +----------+------------+ |
| | | | | | | |
| | | afterSingletonCreation | | | addSingletonFactory | |
| | | | | | | |
| | +--------------------------+ | +----------+------------+ |
| | | | |
| | | | |
| +------------------------------------+ | |
| v |
| +-------+---------+ |
| | | |
+---------------------------------------------------->+ populateBean +-----------+
get from cache if exists | |
+-------+---------+
|
|continue
|
v
简单来说,Spring就是通过将早期bean实例earlySingletonObject提前暴露出去的方式来解决bean的循环依赖。这样一看感觉Spring已经完成bean的循环依赖的处理了,但实际上这里仅仅考虑了没有代理层(特指AbstractAutoProxyCreator,包含Spring AOP的处理)情况下的循环依赖,而对于循环依赖发生在需经过代理层处理(特指AbstractAutoProxyCreator,包含Spring AOP的处理)的bean实例时则要加上步骤5的配合了。
其中,createBean方法步骤5的执行流程如下所示:
- 通过
getSingleton(String, false)方法获取缓存earlySingletonReference,如果存在则继续执行第2步,否则结束执行。 - 通过
exposedObject属性判断bean实例初始化前后引用是否发生过变化,如果没发生过变化则继续执行第3步,否则结束执行。 - 将
earlySingletonReference赋值给exposedObject属性替换最终暴露的bean实例。
需要注意,
getSingleton(String, false)方法是不允许执行一级缓存singletonFactories的查询与二级缓存earlySingletonObject的创建。
可能对于上述步骤5的执行流程看上去会有点迷惑,下面将结合上下文对它进一步解读:
- 对于
getSingleton(String, false)方法,如果earlySingletonReference为非空则表示发生过循环依赖,否则未发生过。 - 对于
initializeBean实例初始化,如果其中初始化前置处理或者后置处理发生了类似于添加代理层的操作就会导致引用发生变化,否则不发生。
对于第
2点中提及到在实例初始化的前置处理或者后置处理中如果将传入的实例对象变更为另一种对象也会导致引用发生变化,不过由于这种操作并非常规操作(Spring也不推荐),在这里就不往这个方向分析了。
根据对Spring AOP的了解,在使用Spring AOP时会使用动态代理为bean添加一层代理层。按照这种前提显然使用了Spring AOP的情况是不会触发到步骤5的,但对于没有使用Spring AOP的场景就更让人觉得匪夷所思了,因为在这种情况下无论是通过getEarlyBeanReference方法提前暴露的对象还是在经过实例初始化后的对象都是不变的(它们都是原始的bean引用),这样就更没有替换的必要了。在笔者一筹莫展之际,重新阅读了一遍用于实现Spring AOP的AbstractAutoProxyCreator类,并且在结合用于提前暴露早期bean的getEarlyBeanReference方法和用于实例初始化的postProcessAfterInitialization方法后找到了答案,下面我们先来看看这2个方法:
public abstract class AbstractAutoProxyCreator extends ProxyProcessorSupport implements SmartInstantiationAwareBeanPostProcessor, ... {
private final Map<Object, Object> earlyProxyReferences = new ConcurrentHashMap<>(16);
@Override
public Object getEarlyBeanReference(Object bean, String beanName) {
Object cacheKey = getCacheKey(bean.getClass(), beanName);
// 在raw bean进行Spring AOP前将它存入earlyProxyReferences缓存中
this.earlyProxyReferences.put(cacheKey, bean);
return wrapIfNecessary(bean, beanName, cacheKey);
}
/**
* Create a proxy with the configured interceptors if the bean is
* identified as one to proxy by the subclass.
* @see #getAdvicesAndAdvisorsForBean
*/
@Override
public Object postProcessAfterInitialization(@Nullable Object bean, String beanName) {
if (bean != null) {
Object cacheKey = getCacheKey(bean.getClass(), beanName);
// 从earlyProxyReferences缓存中取出raw bean进行判断
if (this.earlyProxyReferences.remove(cacheKey) != bean) {
return wrapIfNecessary(bean, beanName, cacheKey);
}
}
return bean;
}
}
看到这里答案应该呼之欲出了,我们拿到这两个方法代入到doCreateBean方法中就清晰明了了,即:
- 执行
createBeanInstance方法创建raw bean实例。 - 将第
1步中的raw bean实例传入addSingletonFactory方法创建出其bean的工厂实例并将其添加到一级缓存中。 - 执行
populateBean方法给第1步中的raw bean实例填充属性。- 在执行期间发生了循环依赖再次执行
getSingleton(String, true)方法查询出在第2步中缓存的工厂实例,拿出该工厂实例触发getEarlyBeanReference方法的执行。- 将第
2步中传入的raw bean实例添加到earlyProxyReferences缓存。 - 将第
2步中传入的raw bean实例包装代理层(方法返回,结束getSingleton(String, true)方法的执行(查询成功,结束循环依赖))。
- 将第
- 在执行期间发生了循环依赖再次执行
- 执行
initializeBean方法给第1步中的raw bean实例初始化。- 在
AbstractAutoProxyCreator后置处理器(包含Spring AOP的处理)的postProcessAfterInitialization方法中判断传入的bean实例与第3步循环依赖中触发earlyProxyReferences缓存的bean实例相等(都为raw bean实例),跳过执行对传入bean实例(raw bean实例)的代理封装(方法返回)。
- 在
- 归正最终返回的
bean实例- 通过
getSingleton(beanName, false)方法获取到earlySingletonReference实例不为空(发生过循环依赖),继续往下执行。 - 通过比较
exposedObject实例发现没有发生过变化(因为在4步中跳过了bean实例的代理封装),继续往下执行。 - 将
exposedObject属性设置为earlySingletonReference,完成将提前暴露的代理对象归正给当前返回的exposedObject属性,保证了循环依赖提前暴露出去的对象与初始化后返回的对象一致。
- 通过
简单来说,Spring在循环依赖发生时将封装了代理的raw bean提前暴露出去,然后在属性填充和初始化(不包含类似Spring AOP等一系列会让bean引用发生变化的处理)阶段对raw bean内的属性等进行的赋值/修改操作会同时作用于传入bean引用与提前暴露出去包含在代理中的bean引用(两者为同一bean引用),而在初始化阶段中对后置处理器AbstractAutoProxyCreator(包含Spring AOP的处理)的执行会对发生过bean提前暴露的实例不做代理封装并在初始化结束后将提前暴露的代理实例赋值给最终返回的bean实例(替换)。通过这种方式,Spring在最大程度上保证循环依赖提前暴露的出去的对象与在初始化后返回的对象一致,这也呼应了上文提到的:“一般来说,getEarlyBeanReference方法返回的对象与postProcessBeforeInitialization/postProcessAfterInitialization所返回的对象是相等的“。
不难得出,如果bean仅通过AbstractAutoProxyCreator(包含Spring AOP的处理)后置处理器来生成代理层(没有覆盖非protected的方法),无论在初始化阶段中后置处理器按照哪个顺序执行,最终都能保证提前暴露的bean引用与初始化执行后的bean引用一致(通过AbstractAutoProxyCreator来添加代理层可以确保getEarlyBeanReference方法和postProcessAfterInitialization方法都有添加代理层的逻辑,使得最终循环依赖提前暴露的bean引用与初始化执行后的bean引用一致)。
没进行过
Spring AOP的bean实例也是会执行步骤5(归正最终返回的bean实例)的,但是由于提前暴露的bean引用与初始化后的bean引用并没有发生过变化,因此在这种情况下步骤5是冗余处理。
但如果我们在bean实例化的过程中添加自定义的SmartInstantiationAwareBeanPostProcessor来生成代理层,那最终生成的bean实例很有可能会存在一定的问题。而这其中的问题会根据自定义的SmartInstantiationAwareBeanPostProcessor的执行顺序(在AbstractAutoProxyCreator前后)有所不同,下面我们将根据自定义的SmartInstantiationAwareBeanPostProcessor的执行顺序分点阐述。
首先,假设下面SmartInstantiationAwareBeanPostProcessor类中getEarlyBeanReference方法和postProcessAfterInitialization方法生成代理层的逻辑是相同的,因为在不相同的情况下提前暴露的对象与初始化后所生成的对象必然不一致(无任何探讨的意义)。同时这里也得出一个结论:在实现SmartInstantiationAwareBeanPostProcessor类时必须保证getEarlyBeanReference方法和postProcessAfterInitialization方法中的逻辑是相同的,以此来达到提前暴露的对象与初始化后所生成的对象是一致的。
另外,如果我们使用更顶级的
BeanPostProcessor类来生成代理层,那么最终生成的bean实例也极有可能是有问题的。根据上文分析,在发生循环依赖时使用getEarlyBeanReference方法提前暴露bean实例(含代理层)是通过SmartInstantiationAwareBeanPostProcessor类来实现的,如果我们使用BeanPostProcessor类来实现的话就会导致在getEarlyBeanReference方法中暴露的对象没有经过BeanPostProcessor来生成代理层,而在初始化后生成的对象则是经过BeanPostProcessor来生成代理层,这显然会发生bean实例不一致的问题。
-
当生成代理层的自定义
SmartInstantiationAwareBeanPostProcessor在AbstractAutoProxyCreator之前:+ | v +--------------------+-----------------------+ | | | SmartInstantiationAwareBeanPostProcessor | | | +--------------------+-----------------------+ | v +-------------+--------------+ | | | AbstractAutoProxyCreator | | | +-------------+--------------+ | v在这种情况下,
doCreateBean方法的执行流程就演变为下面这样了:- 执行
createBeanInstance方法创建raw bean实例。 - 将第
1步中的raw bean实例传入addSingletonFactory方法创建出其bean的工厂实例并将其添加到一级缓存中。 - 执行
populateBean方法给第1步中的raw bean实例填充属性(发生了循环依赖)。- 在执行期间发生了循环依赖再次执行
getSingleton(String, true)方法查询出在第2步中缓存的工厂实例,拿出该工厂实例触发getEarlyBeanReference方法的执行。- 在自定义
SmartInstantiationAwareBeanPostProcessor中为传入bean实例封装一层代理层(方法返回,进入AbstractAutoProxyCreator继续执行)。 - 在
AbstractAutoProxyCreator中将传入bean实例添加到earlyProxyReferences缓存中。 - 在
AbstractAutoProxyCreator中将传入bean实例封装一层代理层(方法返回,结束getSingleton(String, true)方法的执行(查询成功,结束循环依赖))。
- 在自定义
- 在执行期间发生了循环依赖再次执行
- 执行
initializeBean方法给第1步中的raw bean实例初始化。- 在
SmartInstantiationAwareBeanPostProcessor的postProcessAfterInitialization方法中为传入bean实例封装一层代理层(方法返回)。 - 在
AbstractAutoProxyCreator的postProcessAfterInitialization方法中判断传入的bean实例与从第2步AbstractAutoProxyCreator#earlyProxyReferences缓存中的bean实例并不想等(传入的是在SmartInstantiationAwareBeanPostProcessor#postProcessAfterInitialization中添加了代理层的bean实例,而AbstractAutoProxyCreator#earlyProxyReferences缓存的是第3步中SmartInstantiationAwareBeanPostProcessor#getEarlyBeanReference添加了代理层的bean实例,在没有重写等式判断方法和添加缓存的前提下是不相等的),所以接着为传入bean实例的代理封装(方法返回)。
- 在
- 归正最终返回的
bean实例- 通过
getSingleton(beanName, false)方法获取到earlySingletonReference实例不为空(发生过循环依赖),继续往下执行。 - 通过比较
exposedObject实例发现发生过变化,结束执行(不替换)。
- 通过
在上述流程中我们可以看到虽然循环依赖提前暴露的对象引用与初始化后获得的对象引用是不相等的,但是它们所实现的代理层和功能点都是相同的。这在常规的场景下一般是不会产生什么大的问题的,因为在外层代理层功能相同的情况下表明了最终所经过的额外逻辑是相同的,而最终委托给被代理对象时所执行的对象也是同一单例作用域下的实例。
- 执行
-
当生成代理层的自定义
SmartInstantiationAwareBeanPostProcessor在AbstractAutoProxyCreator之后:+ | v +-------------+--------------+ | | | AbstractAutoProxyCreator | | | +-------------+--------------+ | v +--------------------+-----------------------+ | | | SmartInstantiationAwareBeanPostProcessor | | | +--------------------+-----------------------+ | v在这种情况下,
doCreateBean方法的执行流程就演变为下面这样了:- 执行
createBeanInstance方法创建raw bean实例。 - 将第
1步中的raw bean实例传入addSingletonFactory方法创建出其bean的工厂实例并将其添加到一级缓存中。 - 执行
populateBean方法给第1步中的raw bean实例填充属性(发生了循环依赖)。- 在执行期间发生了循环依赖再次执行
getSingleton(String, true)方法查询出在第2步中缓存的工厂实例,拿出该工厂实例触发getEarlyBeanReference方法的执行。- 在
AbstractAutoProxyCreator中将传入bean实例添加到earlyProxyReferences缓存中。 - 在
AbstractAutoProxyCreator中将传入bean实例封装一层代理层(方法返回,进入SmartInstantiationAwareBeanPostProcessor继续执行)。 - 在自定义
SmartInstantiationAwareBeanPostProcessor中为传入bean实例封装一层代理层(方法返回,结束getSingleton(String, true)方法的执行(查询成功,结束循环依赖))。
- 在
- 在执行期间发生了循环依赖再次执行
- 执行
initializeBean方法给第1步中的raw bean实例初始化。- 在
AbstractAutoProxyCreator的postProcessAfterInitialization方法中判断传入的bean实例与从第2步中AbstractAutoProxyCreator#earlyProxyReferences缓存中的bean实例相等,跳过执行对传入bean实例的代理封装(方法返回)。 - 在
SmartInstantiationAwareBeanPostProcessor的postProcessAfterInitialization方法中为传入bean实例封装一层代理层(方法返回)。
- 在
- 归正最终返回的
bean实例- 通过
getSingleton(beanName, false)方法获取到earlySingletonReference实例不为空(发生过循环依赖),继续往下执行。 - 通过比较
exposedObject实例发现发生过变化,结束执行(不替换)。
- 通过
在上述流程中我们可以看到循环依赖提前暴露的对象引用与初始化后获得的对象不但引用是不相等的,而且在功能上也是有所差异,即对循环依赖提前暴露的对象是添加了
AbstractAutoProxyCreator和SmartInstantiationAwareBeanPostProcessor两个代理层的,而在初始化后所得到的对象只添加了SmartInstantiationAwareBeanPostProcessor的代理层,这种导致功能缺失的差异显然是致命的。因此,我们在开发过程中应该尽可能的保证这种执行顺序的发生。与此同时,为了避免这种情况的发生
Spring也通过ProxyProcessorSupport将AbstractAutoProxyCreator的执行顺序设置到了最后。public class ProxyProcessorSupport extends ... implements Ordered, ... { /** * This should run after all other processors, so that it can just add * an advisor to existing proxies rather than double-proxy. */ private int order = Ordered.LOWEST_PRECEDENCE; @Override public int getOrder() { return this.order; } }在开发过程中,我们应该尽量避免将自定义的
SmartInstantiationAwareBeanPostProcessor优先级设置为最低LOWEST_PRECEDENCE,因为两个优先级相同的类会继续根据第二维度的顺序执行。 - 执行
关于
Spring在执行bean实例化时为什么是将工厂实例提前暴露出去,而不是直接提前构造完earlySingletonObject实例暴露出去呢?在笔者看来这个问题有
2个方面的考虑:
- 从功能上讲,通过
getEarlyBeanReference提前暴露bean实例后可能会由于开发规范性的问题导致最终它与初始化后获得的对象不一致(具体可阅读上文)。因此Spring只有在真正发生了循环依赖时才通过getEarlyBeanReference提前暴露bean实例,其他情况下则尽量避免。- 从设计上讲,通过
getEarlyBeanReference提前暴露bean实例会破坏了bean实例化原有的执行流程:实例化->属性填充->实例初始化(添加AOP代理),使得它变为:添加AOP代理->实例化->属性填充->实例初始化,这可能会产生除了上述第1种所产生的问题,还可能会导致其他异常的发生。因此Spring只有在真正发生了循环依赖时才通过getEarlyBeanReference提前暴露bean实例,其他情况下则尽量避免(常常在迭代中会用这种手法去兼容代码,而不是直接作暴力修改处理)。这也解释了为什么
Spring使用了三级缓存来解决循环依赖,而不是二级缓存。
最后,回到getSingleton(String, ObjectFactory)方法在执行完createBean方法生成bean实例后接着执行后置处理afterSingletonCreation将当前beanName从singletonsCurrentlyInCreation中移除(避免再次创建导致异常的发生),然后执行addSingleton方法将最终完整版的bean添加到三级缓存singletonObjects中,同时在二级缓存earlySingletonObjects和一级缓存singletonFactories中将beanName对应的缓存实例移除。
/**
* Add the given singleton object to the singleton cache of this factory.
* <p>To be called for eager registration of singletons.
* @param beanName the name of the bean
* @param singletonObject the singleton object
*/
protected void addSingleton(String beanName, Object singletonObject) {
this.singletonObjects.put(beanName, singletonObject);
this.singletonFactories.remove(beanName);
this.earlySingletonObjects.remove(beanName);
}
至此,结束单例模式(Singleton)下bean的创建(含循环依赖)。
多例模式的bean创建
相比于单例模式,多例模式的bean创建就相对来说简单得多。首先,在多例模式下没有三级缓存的查询,而是直接通过isPrototypeCurrentlyInCreation方法判断prototypesCurrentlyInCreation属性是否包含当前beanName,若包含则表示循环依赖的发生,抛出BeanCurrentlyInCreationException异常;否则表示prototypesCurrentlyInCreation属性不包含当前beanName,开始执行多例模式的bean创建。下面,我们看到具体的代码步骤:
protected <T> T doGetBean(String name, @Nullable Class<T> requiredType, @Nullable Object[] args, boolean typeCheckOnly) throws ... {
String beanName = ...;
Object beanInstance;
// Fail if we're already creating this bean instance:
// We're assumably within a circular reference.
if (isPrototypeCurrentlyInCreation(beanName)) {
throw new BeanCurrentlyInCreationException(beanName);
}
// ...
RootBeanDefinition mbd = ...;
// ...
// Create bean instance.
// It's a prototype -> create a new instance.
Object prototypeInstance = null;
try {
beforePrototypeCreation(beanName);
prototypeInstance = createBean(beanName, mbd, args);
}
finally {
afterPrototypeCreation(beanName);
}
beanInstance = getObjectForBeanInstance(prototypeInstance, name, beanName, mbd);
return adaptBeanInstance(name, beanInstance, requiredType);
}
/**
* Return whether the specified prototype bean is currently in creation
* (within the current thread).
* @param beanName the name of the bean
*/
protected boolean isPrototypeCurrentlyInCreation(String beanName) {
Object curVal = this.prototypesCurrentlyInCreation.get();
return (curVal != null &&
(curVal.equals(beanName) || (curVal instanceof Set && ((Set<?>) curVal).contains(beanName))));
}
与单例模式类似,在多例模式下会在bean的创建前后加上前置处理beforePrototypeCreation方法和后置处理afterPrototypeCreation方法,具体代码如下所示:
/** Names of beans that are currently in creation. */
private final ThreadLocal<Object> prototypesCurrentlyInCreation =
new NamedThreadLocal<>("Prototype beans currently in creation");
/**
* Callback before prototype creation.
* <p>The default implementation register the prototype as currently in creation.
* @param beanName the name of the prototype about to be created
* @see #isPrototypeCurrentlyInCreation
*/
protected void beforePrototypeCreation(String beanName) {
Object curVal = this.prototypesCurrentlyInCreation.get();
if (curVal == null) {
this.prototypesCurrentlyInCreation.set(beanName);
}
else if (curVal instanceof String) {
Set<String> beanNameSet = new HashSet<>(2);
beanNameSet.add((String) curVal);
beanNameSet.add(beanName);
this.prototypesCurrentlyInCreation.set(beanNameSet);
}
else {
Set<String> beanNameSet = (Set<String>) curVal;
beanNameSet.add(beanName);
}
}
/**
* Callback after prototype creation.
* <p>The default implementation marks the prototype as not in creation anymore.
* @param beanName the name of the prototype that has been created
* @see #isPrototypeCurrentlyInCreation
*/
protected void afterPrototypeCreation(String beanName) {
Object curVal = this.prototypesCurrentlyInCreation.get();
if (curVal instanceof String) {
this.prototypesCurrentlyInCreation.remove();
}
else if (curVal instanceof Set) {
Set<String> beanNameSet = (Set<String>) curVal;
beanNameSet.remove(beanName);
if (beanNameSet.isEmpty()) {
this.prototypesCurrentlyInCreation.remove();
}
}
}
在前置处理beforePrototypeCreation会将当前请求的beanName加入到prototypesCurrentlyInCreation中;而在后置处理afterPrototypeCreation中则将当前请求的beanName从prototypesCurrentlyInCreation中移除。结合isPrototypeCurrentlyInCreation方法的判断,如果在请求多例bean(假设依赖也是多例bean)的过程中发生了循环依赖(在多例模式下特指具有相同beanName的bean)则必然会发生异常(由于没有提前暴露与缓存机制,不区分是构造器自动装配还是Setter方法自动装配)。
根据多例模式的特性,如果在遇到对同一
beanName的循环依赖时如果不通过异常提前终止创建流程,则会造成bean在创建过程中不断地循环创建对象。
+
|
|
v
+----------------+-----------------+
throw ex | |
<----------+ isPrototypeCurrentlyInCreation +<----------+
| | |
+----------------+-----------------+ |
| |
| |
v |
+-------------+--------------+ |
| | |
| beforePrototypeCreation | |
| | |
+-------------+--------------+ |
| |
| |
v |
+------+-------+ |
| | |
| createBean +---------------------+
| | circular references
+------+-------+
|
|
v
+------------+-------------+
| |
| afterPrototypeCreation |
| |
+------------+-------------+
|
|
v
回归到正常流程上,如果在前置处理beforePrototypeCreation没有发现循环依赖,那么Spring就会进入到createBean方法执行bean实例的创建。
protected Object createBean(String beanName, RootBeanDefinition mbd, @Nullable Object[] args)
throws BeanCreationException {
RootBeanDefinition mbdToUse = mbd;
//...
Object beanInstance = doCreateBean(beanName, mbdToUse, args);
return beanInstance;
}
protected Object doCreateBean(String beanName, RootBeanDefinition mbd, @Nullable Object[] args) throws BeanCreationException {
// 1. 执行`raw bean`实例的创建
BeanWrapper instanceWrapper = ...createBeanInstance(beanName, mbd, args);
Object bean = instanceWrapper.getWrappedInstance();
// ...
Object exposedObject = bean;
// 2. 执行`raw bean`实例的属性填充
populateBean(beanName, mbd, instanceWrapper);
// 3. 执行`raw bean`实例的初始化
exposedObject = initializeBean(beanName, exposedObject, mbd);
// ...
return exposedObject;
}
相比于单例模式,多例模式由于没有提前暴露和缓存的机制,createBean方法的执行就简单得多,具体执行流程如下所示:
- 执行
raw bean实例的创建 - 执行
raw bean实例的属性填充 - 执行
raw bean实例的初始化
在执行流程上看仅是保留了基本的raw bean创建流程,那再结合上文前置方法beforePrototypeCreation和后置方法afterPrototypeCreation的处理,若在populateBean属性填充时发生了循环依赖就会触发isPrototypeCurrentlyInCreation的判断抛出BeanCurrentlyInCreationException异常,具体可参考以下流程图:
+
|
|
+----------------------------------------+
| | |
| v |
| +----------------+-----------------+ |
throw ex | | | | circular references
<-----------------+ isPrototypeCurrentlyInCreation +-----------------------------------+
| | | | |
| +----------------+-----------------+ | |
| | | |
| | | |
| v | |
| +-------------+--------------+ | |
| | | | |
| | beforePrototypeCreation | | |
| | | | |
| +-------------+--------------+ | |
| | | |
| | | |
| v | |
| +------+-------+ | +----------------------+ |
| | | | | | |
| | createBean +----------------->+ createBeanInstance | |
| | | | | | |
| +------+-------+ | +----------+-----------+ |
| | | | |
| | | | |
| v | v |
| +------------+-------------+ | +-------+--------+ |
| | | | | | |
| | afterPrototypeCreation | | | populateBean +------+
| | | | | |
| +------------+-------------+ | +-------+--------+
| | | |
+----------------------------------------+ | continue
| |
v v
需要注意,上述讨论的是请求
bean与依赖bean都为多例模式的情况,而如果请求bean或者依赖bean任意一个不是多例模式(例如,单例模式)则需要结合对应作用域的bean创建流程进行分析,由于篇幅有限就不过多展开了。
至此,结束多例模式(Prototype)下bean的创建(含循环依赖)。
循环依赖的结论
总的来说,如果在Spring创建raw bean的阶段中发生了循环依赖是无法被解决而抛出异常的,因为在这个阶段中Spring还尚未将bean提前暴露出去,典型的有通过构造器完成自动装配发生了循环依赖。而如果Spring在raw bean的属性填充阶段发生了循环依赖,则会被Spring通过将bean提前暴露出去的方式顺利化解掉,典型的有使用字段的自动装配和Setter方法的自动装配来完成依赖注入。
需要注意的是,
Spring在处理工厂方法参数的自动装配时会将它们当作是构造参数的自动装配来处理,也就是说通过工厂方法完成自动装配时发生了循环依赖也会抛出异常。
除此之外,Spring在进行bean的实例化过程中还是会存在一些比较隐匿比较特殊的情况会导致bean在发生循环依赖时抛出异常。例如,在@Configuration的配置类中存在自动装配的属性与通过实例工厂方法创建的bean有相互依赖的关系时可能会因循环依赖抛出异常,具体如下所示:
@Configuration
public class Config {
@Autowired
private List<BaseService> serviceList;
@Bean
public CircularReferenceService circularReferenceService(){
return new CircularReferenceService(serviceList);
}
}
@Service
public class ServiceFirst implements BaseService {
@Autowired
private CircularReferenceService circularReferenceService;
}
@Service
public class ServiceSecond extends BaseService {
@Autowired
private CircularReferenceService circularReferenceService;
}
在上述场景中,如果ServiceFirst或者ServiceSecond先于Config被加载就会发生循环依赖异常。要清晰解释其中发生异常的原理需要我们再次回顾上文《源码分析:Bean的创建》章节中提到“关于通过实例工厂方法声明bean”的实例化流程,即在通过实例工厂方法创建bean实例前会提前获取当前实例工厂方法所在的工厂实例,具体代码如下所示:
// factoryBeanName属性指的是工厂实例bean的名称,而不是FactoryBean实例的名称
String factoryBeanName = mbd.getFactoryBeanName();
if (factoryBeanName != null) {
//...
factoryBean = this.beanFactory.getBean(factoryBeanName);
}
// ...
在这里Spring就会使用BeanFactory#getBean来获取工厂实例。
在有了这一层认知之后,我们结合上文关于“Bean的创建”章节和“Bean的循环依赖“章节的分析推演出以下执行流程:
- 执行
ServiceFirst的bean实例创建。 - 将早期
ServiceFirst的bean实例提前暴露。 - 执行
ServiceFirst#CircularReferenceService的属性填充,触发CircularReferenceService的创建。 - 执行
CircularReferenceService的创建(将其加入到了singletonsCurrentlyInCreation属性中),由于是通过实例工厂方法声明的,所以在CircularReferenceService创建前触发了Config的创建(尚未将早期CircularReferenceService的bean实例提前暴露)。 - 执行
Config的bean实例创建。 - 执行
Config#serviceList的属性填充,触发BaseService类(含ServiceFirst和ServiceSecond)的创建。 - 执行
ServiceFirst的bean实例创建,由于在缓存中查询到被早期暴露ServiceFirst实例(在第2步中被暴露),所以结束ServiceFirst的再次创建。 - 执行
ServiceSecond的bean实例创建。 - 执行
ServiceSecond#CircularReferenceService的属性填充,触发CircularReferenceService的创建(在缓存中尚未添加CircularReferenceService实例)。 - 执行
CircularReferenceService的创建,由于在第4步首次触发创建时已经将CircularReferenceService加入到了singletonsCurrentlyInCreation属性中,在此再次创建CircularReferenceService时判断singletonsCurrentlyInCreation属性中存在CircularReferenceService,因此抛出循环依赖异常。
在上述流程中,我们可以看到由于Spring先触发了ServiceFirst而导致了循环依赖异常的发生;类似地,如果我们先触发了ServiceSecond也同样会触发循环依赖异常的发生。那如果我们先触发了Config配置类的加载是不是就不会产生问题了呢?下面我们可以来模拟一下整个流程:
- 执行
Config的bean实例创建。 - 将早期
Config的bean实例提前暴露。 - 执行
Config#serviceList的属性填充(属性加载阶段),触发BaseService类(含ServiceFirst和ServiceSecond)的创建。 - 执行
ServiceFirst的bean实例创建。 - 执行
ServiceFirst#CircularReferenceService的属性填充,触发CircularReferenceService的创建。 - 由于
CircularReferenceService是通过实例工厂方法声明的,所以在CircularReferenceService创建前触发了Config的创建。 - 执行
Config的bean实例创建,由于在缓存中查询到被早期暴露Config实例(在第2步中被暴露),所以结束Config的再次创建。 - 执行
CircularReferenceService的创建,将Config#serviceList的属性传入CircularReferenceService构造器中进行创建,但由于Config#serviceList属性尚处于加载阶段而没有将值真正设置到属性中,所以此时传入null到CircularReferenceService构造器中进行构建(意味着CircularReferenceService中的serviceList属性为null)。 - 完成
CircularReferenceService的创建(含属性填充完成和实例初始化完成),并将CircularReferenceService实例加入到缓存中。 - 完成
ServiceFirst的bean实例创建(含属性填充完成和实例初始化完成),并将ServiceFirst实例加入到缓存中。 - 执行
ServiceSecond的bean实例创建。 - 执行
ServiceSecond#CircularReferenceService的属性填充,触发CircularReferenceService的创建。 - 执行
CircularReferenceService的bean实例创建,由于在缓存中查询到已被实例化完成的CircularReferenceService实例(在第9步中将构建完成的CircularReferenceService实例加入到缓存),所以结束CircularReferenceService的再次创建。需要注意,在缓存中CircularReferenceService的serviceList属性为null。 - 完成
ServiceSecond的bean实例创建(含属性填充完成和实例初始化完成),并将ServiceSecond实例加入到缓存中。 - 执行
Config#serviceList的属性填充(属性赋值阶段),在赋值完成后Config#serviceList的属性值为包含ServiceFirst实例和ServiceSecond实例的列表。 - 完成
Config的bean实例创建(含属性填充完成和实例初始化完成),并将Config实例加入到缓存中。
在上述模拟流程中,我们可以看到先触发了Config配置类的加载同样会产生其他问题,即在属性填充前期Spring尚未将值设置到Config#serviceList中时触发了CircularReferenceService的加载导致传入其构造器的Config#serviceList属性为null,进而使得构建完成的CircularReferenceService实例中serviceList属性为null(赋值失败)。显然地,这是比循环依赖更为致命的异常,因为它会在运行时让程序发生异常而不是在启动加载时。
综上所述,一般情况下如果在Spring创建raw bean的阶段中发生了循环依赖是无法被解决而抛出异常的,而如果Spring在raw bean的属性填充阶段发生了循环依赖则会被Spring通过将bean提前暴露出去的方式顺利化解掉。但这并不是绝对的法则,在特殊情况下属性填充阶段发生的循环依赖也是有可能会抛出异常的(甚至会产生更为致命的异常),这取决于我们在开发中是如何使用Spring IoC的。
至此,我们完成了整个Bean循环依赖的分析章节。
总结
本文用了6万多字的篇幅分别从Spring Ioc的概念、用法和原理三个方面展开进行了相对较为全面的分析,相信读者在阅读完本文后会对Spring IoC有一个更为全面的认识,同时也希望能帮助到读者在开发中可以规避掉一些不必要的风险。
更多详情可阅读
Spring官方文档:
评论区